
Consortium Network Topology
The APTC network spans three organizations: Bank of Singapore, HSBC Hong Kong, and DBS Bank Jakarta. Each organization operates two peer nodes (one anchor, one backup), a dedicated Fabric CA, and a CouchDB state database per peer. Five Raft orderer nodes are distributed across all three data centers to ensure consensus survives any single site failure. The anchor peers handle cross-organization gossip dissemination while the second peer in each org serves as a read-heavy query endpoint.
Free to use, share it in your presentations, blogs, or learning materials.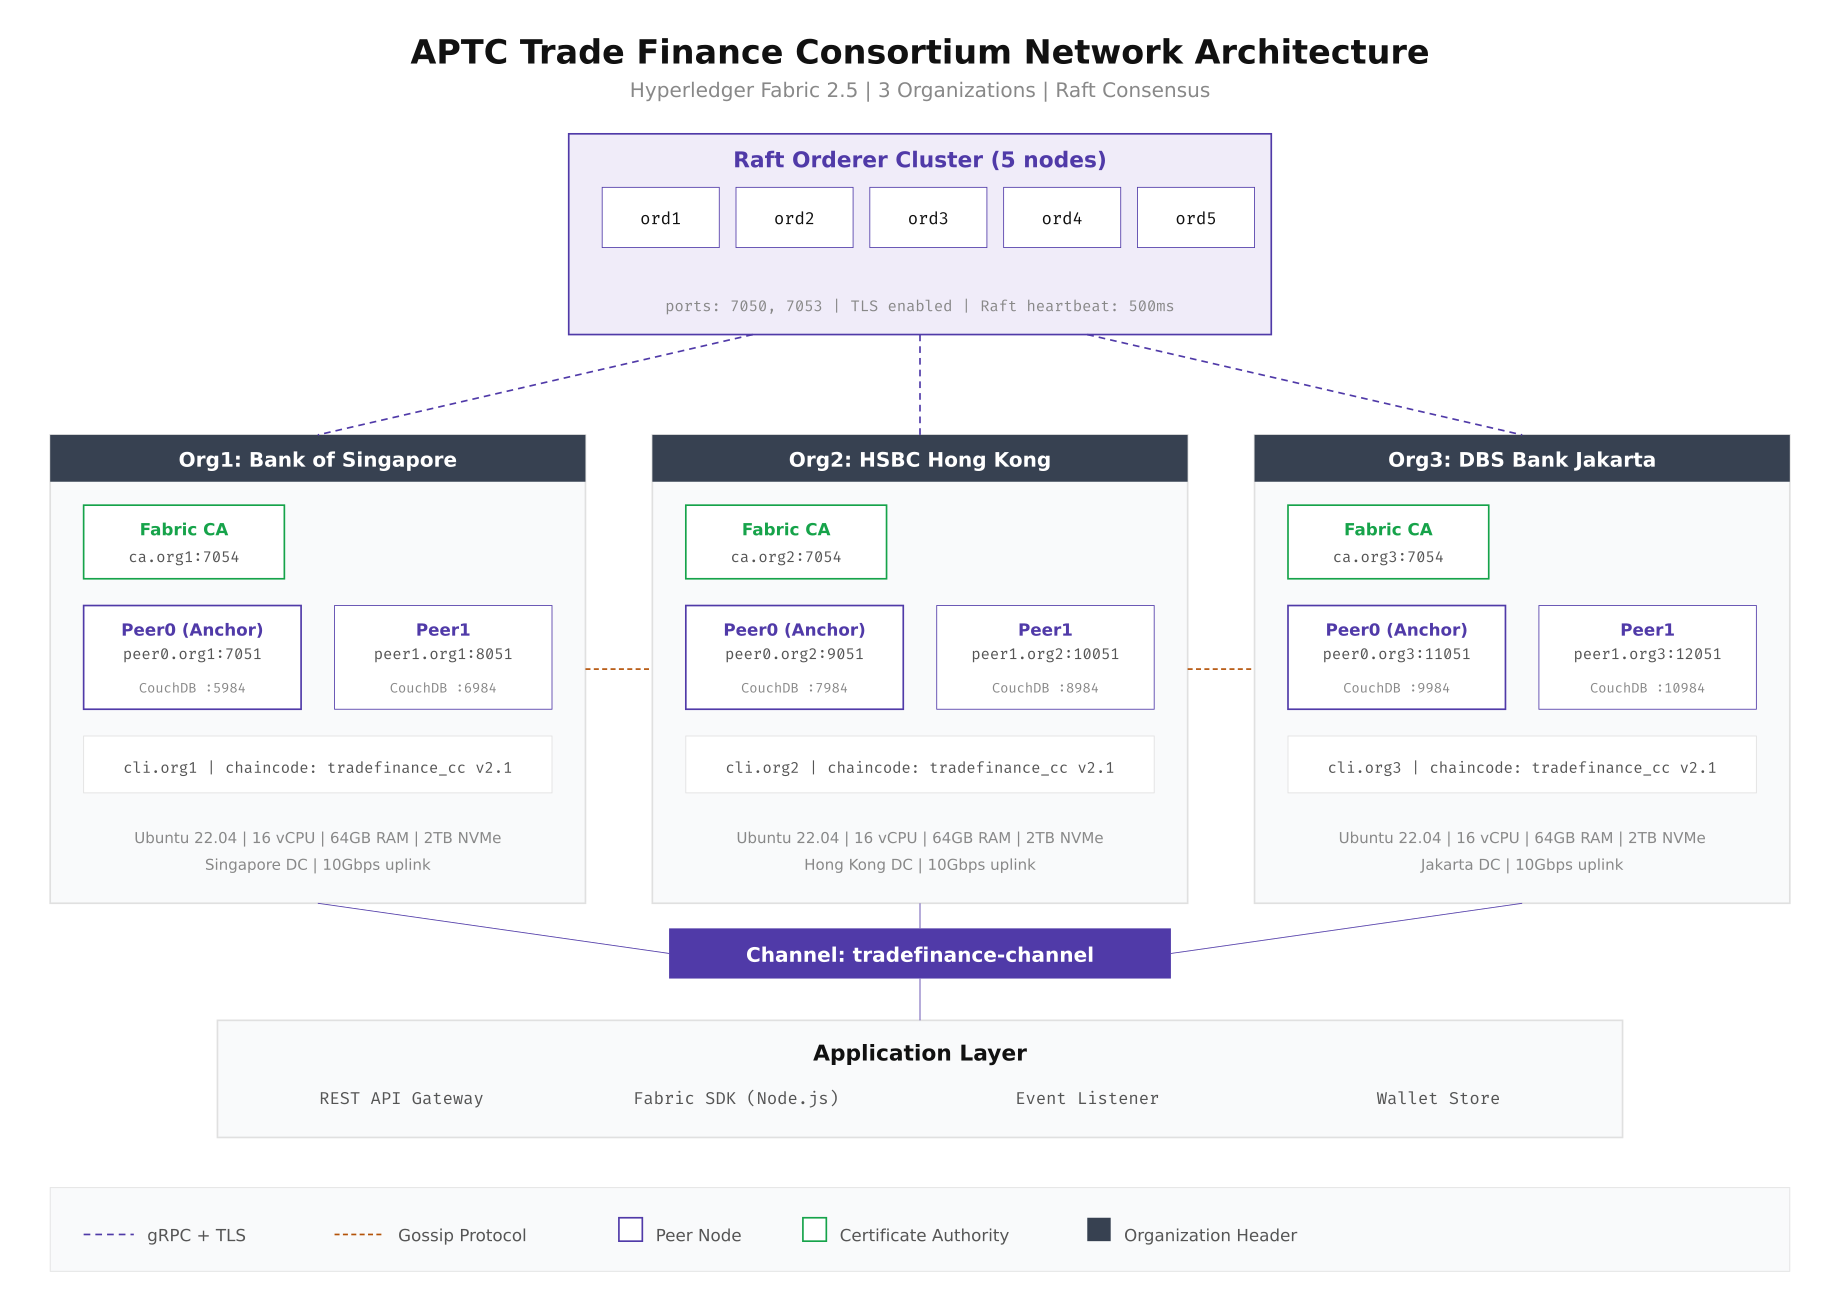
The diagram above shows how the five Raft orderers form a shared consensus cluster while each organization maintains its own peer infrastructure. Gossip protocol handles block distribution between peers within the same organization, and anchor peers bridge the gap between organizations. Every communication channel runs over gRPC with TLS 1.3 enabled.
Setting Up the Project Directory
Before generating any cryptographic material or configuration, you need a well-structured project directory. The layout below separates concerns cleanly: configuration templates, generated crypto material, channel artifacts, chaincode source, Docker compose files, and operational scripts each get their own directory. Run these commands on the first node of each organization to establish the base structure.
# Create the production network directory structure
sudo mkdir -p /opt/aptc-network/{configtx,crypto-config,channel-artifacts,chaincode/tradefinance,docker,scripts,backup,logs}

# Set ownership to the blockchain operator user
sudo chown -R bcoperator:bcoperator /opt/aptc-network
chmod 750 /opt/aptc-network

# Verify the structure
tree -L 2 /opt/aptc-network/
# /opt/aptc-network/
# ├── backup/
# ├── chaincode/
# │   └── tradefinance/
# ├── channel-artifacts/
# ├── configtx/
# ├── crypto-config/
# ├── docker/
# ├── logs/
# └── scripts/
The bootstrap sequence follows a strict order: generate cryptographic identities first, then create the genesis block and channel transaction, then bring up Docker containers, and finally create and join the channel. Each step feeds its output into the next, and skipping or reordering any step results in a broken network.
Free to use, share it in your presentations, blogs, or learning materials.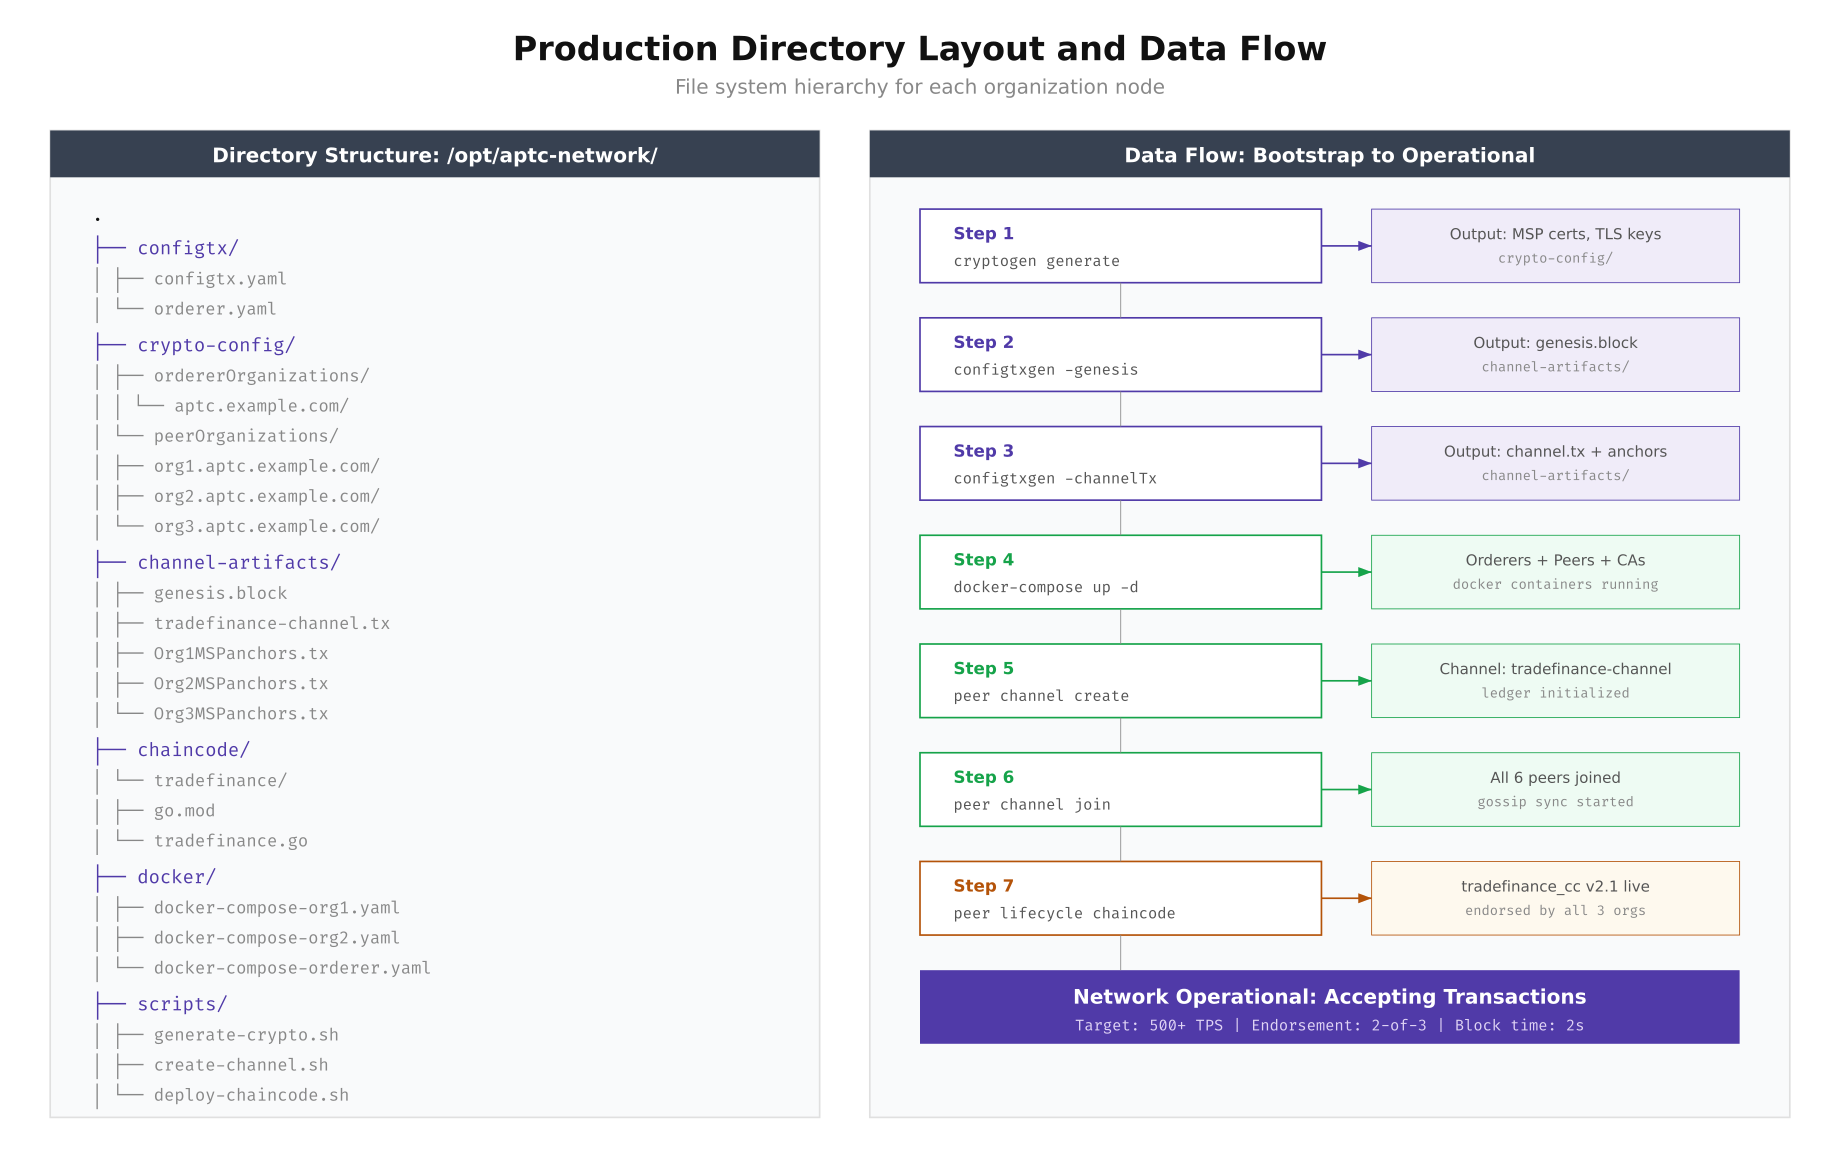
As shown above, each step produces artifacts consumed by the next. The cryptogen tool generates MSP directories and TLS certificates that Docker containers mount at startup. The configtxgen tool reads from configtx.yaml and produces the genesis block that orderers load on first boot.
Generating Cryptographic Material
The crypto-config.yaml file defines every identity in the network. For production, each organization gets an enrollment CA, a TLS CA, admin identities, and peer identities. The orderer organization gets its own separate crypto tree. Run cryptogen on a secure bastion host that never connects directly to the network.
# crypto-config.yaml (abbreviated for Org1)
OrdererOrgs:
  - Name: OrdererOrg
    Domain: aptc.example.com
    EnableNodeOUs: true
    Specs:
      - Hostname: orderer1
      - Hostname: orderer2
      - Hostname: orderer3
      - Hostname: orderer4
      - Hostname: orderer5

PeerOrgs:
  - Name: Org1
    Domain: org1.aptc.example.com
    EnableNodeOUs: true
    Template:
      Count: 2
      SANS:
        - "peer0.org1.aptc.example.com"
        - "peer1.org1.aptc.example.com"
    Users:
      Count: 3
# Generate all crypto material
cd /opt/aptc-network
cryptogen generate --config=configtx/crypto-config.yaml --output=crypto-config/
# Verify the output structure
ls crypto-config/peerOrganizations/org1.aptc.example.com/
# ca/ msp/ peers/ tlsca/ users/
# Check that TLS certificates were generated
openssl x509 -in crypto-config/peerOrganizations/org1.aptc.example.com/peers/peer0.org1.aptc.example.com/tls/server.crt -noout -subject -dates
# subject=CN = peer0.org1.aptc.example.com
# notBefore=Mar 2 00:00:00 2026 GMT
# notAfter=Mar 2 00:00:00 2027 GMTHardware Resource Planning
Resource allocation for blockchain nodes is not guesswork. Orderer nodes need fast disk I/O but moderate CPU because their primary job is sequencing transactions into blocks. Peer nodes demand significantly more CPU and RAM because they execute chaincode (smart contracts), maintain the world state in CouchDB, and validate every block received from the orderer. The table below reflects the APTC consortium’s actual provisioning based on load testing at 500 TPS sustained throughput.
Free to use, share it in your presentations, blogs, or learning materials.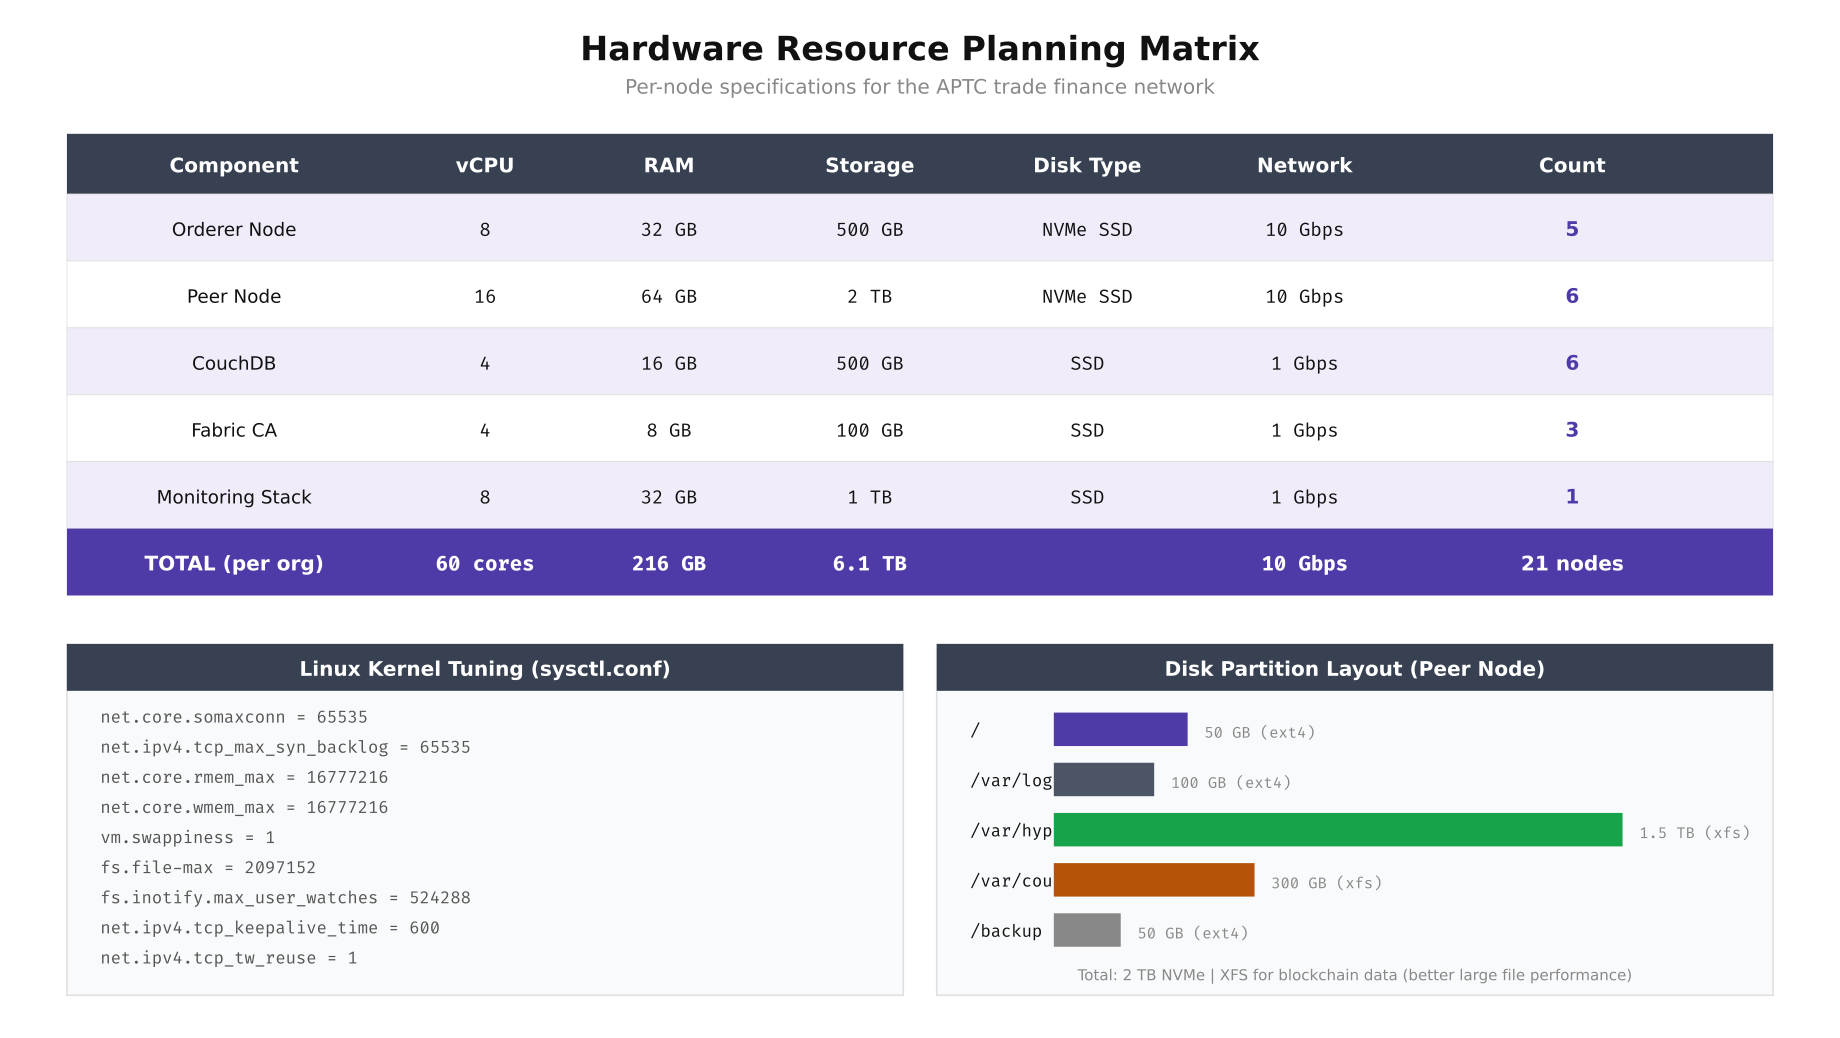
The resource matrix above includes the kernel tuning parameters that made the biggest difference in APTC’s load testing. Setting vm.swappiness to 1 prevents the kernel from swapping blockchain data to disk under memory pressure, which would cause catastrophic latency spikes during block validation. The XFS filesystem is chosen for blockchain data partitions because it handles large sequential writes significantly better than ext4.
# Apply kernel tuning on every blockchain node
cat <<'EOF' | sudo tee /etc/sysctl.d/99-blockchain.conf
net.core.somaxconn = 65535
net.ipv4.tcp_max_syn_backlog = 65535
net.core.rmem_max = 16777216
net.core.wmem_max = 16777216
vm.swappiness = 1
fs.file-max = 2097152
fs.inotify.max_user_watches = 524288
net.ipv4.tcp_keepalive_time = 600
net.ipv4.tcp_tw_reuse = 1
EOF

sudo sysctl --system

# Set ulimits for the blockchain operator
cat <<'EOF' | sudo tee /etc/security/limits.d/99-blockchain.conf
bcoperator soft nofile 1048576
bcoperator hard nofile 1048576
bcoperator soft nproc 65535
bcoperator hard nproc 65535
EOF

# Format and mount the blockchain data partition with XFS
sudo mkfs.xfs -f /dev/nvme1n1p1
sudo mkdir -p /var/hyperledger
sudo mount -o noatime,nodiratime /dev/nvme1n1p1 /var/hyperledger
echo '/dev/nvme1n1p1 /var/hyperledger xfs noatime,nodiratime 0 0' | sudo tee -a /etc/fstab
Security Architecture
Production blockchain networks operate on a defense-in-depth model with five distinct security layers. The outermost layer handles network perimeter controls: nftables firewall rules, DDoS protection via rate limiting, WireGuard VPN tunnels between consortium sites, and strict IP allowlisting. The second layer enforces transport security with TLS 1.3 on all peer gRPC channels and mutual TLS on orderer cluster communication. Below that, the MSP (Membership Service Provider) layer manages X.509 identity enrollment, access control lists, and certificate revocation. The application layer adds endorsement policies and private data collections. Finally, the OS itself is hardened with SELinux, automatic security updates, and audit logging.
Free to use, share it in your presentations, blogs, or learning materials.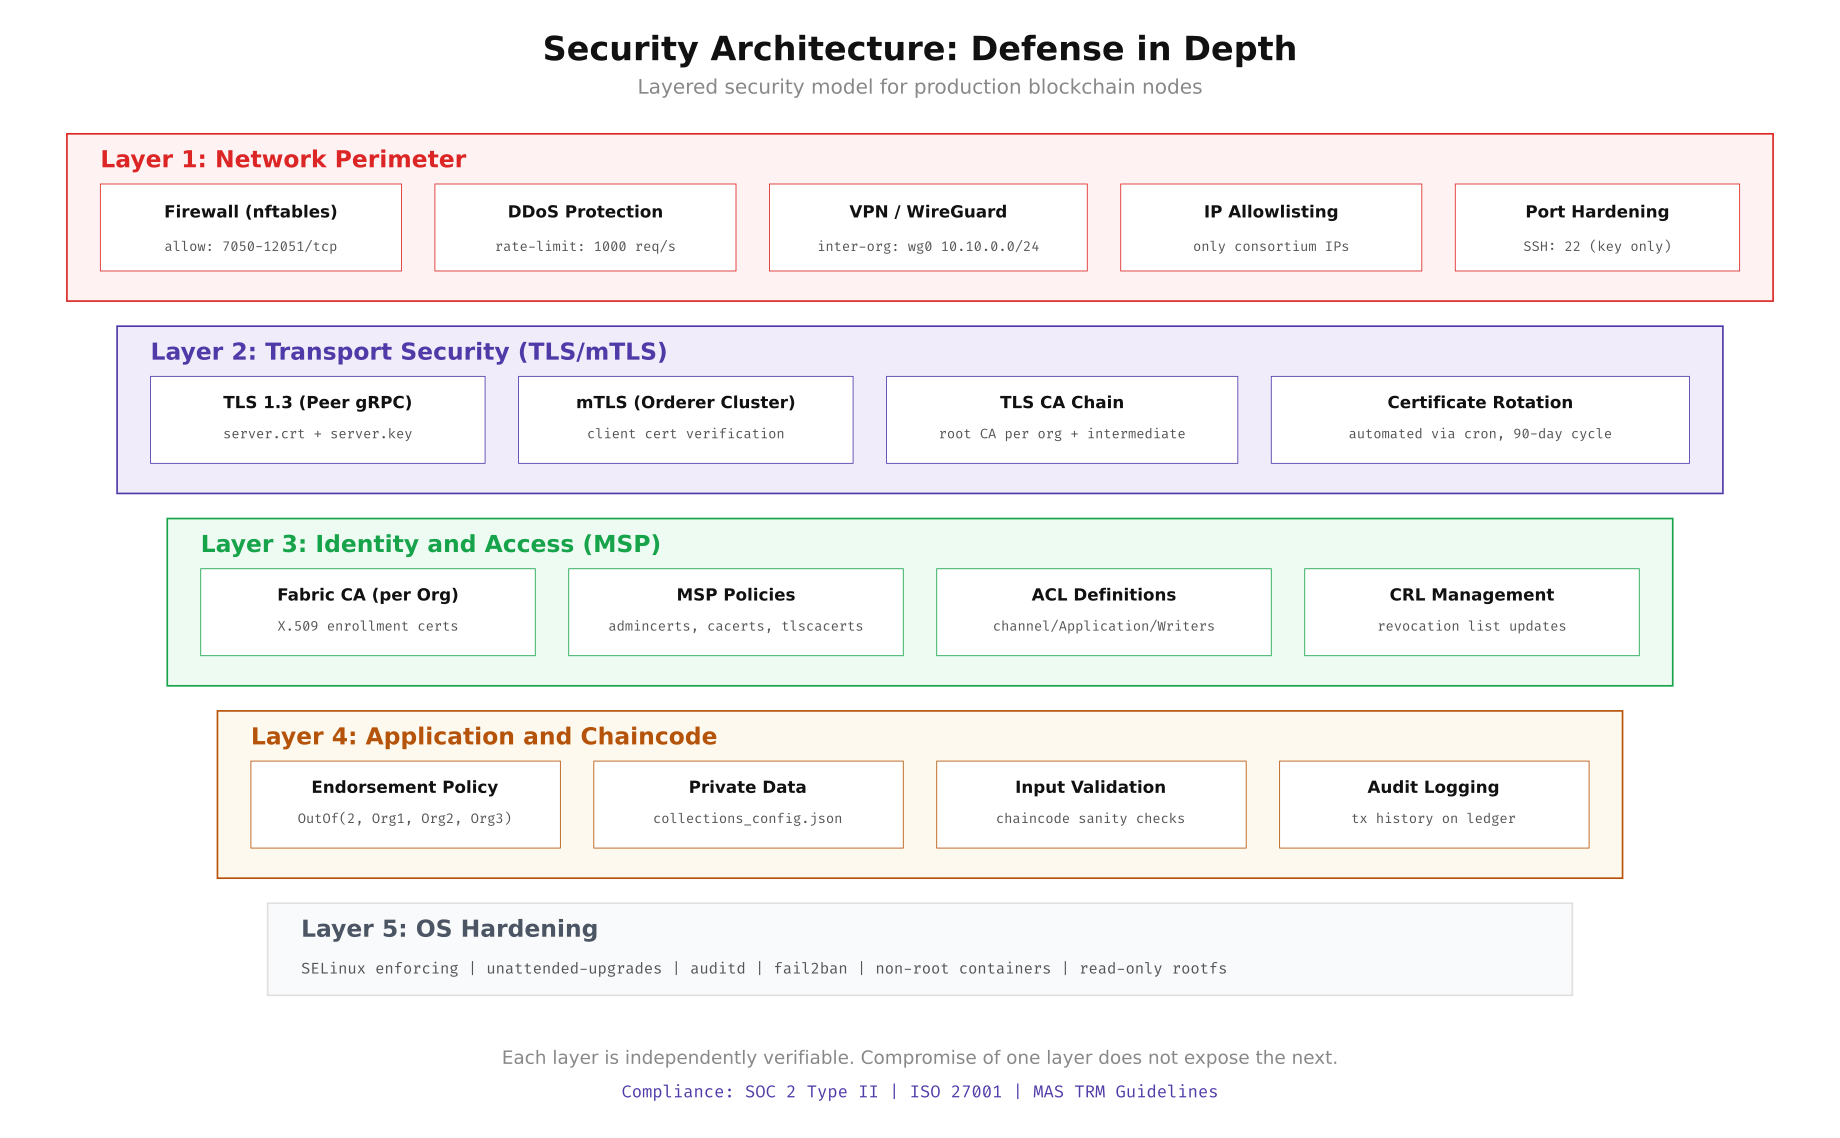
This layered approach means that even if an attacker breaches the network perimeter, they still face TLS encryption, certificate-based identity verification, chaincode-level access controls, and OS-level restrictions before they can tamper with the ledger. Each layer is independently auditable and testable.
# Configure nftables firewall on each node
cat <<'EOF' | sudo tee /etc/nftables.conf
#!/usr/sbin/nft -f
flush ruleset

table inet filter {
    chain input {
        type filter hook input priority 0; policy drop;

        # Allow loopback
        iif "lo" accept

        # Allow established connections
        ct state established,related accept

        # SSH from bastion only
        ip saddr 10.10.0.100 tcp dport 22 accept

        # Fabric peer ports (consortium IPs only)
        ip saddr { 10.10.1.0/24, 10.10.2.0/24, 10.10.3.0/24 } tcp dport 7051-12051 accept

        # Orderer ports (consortium IPs only)
        ip saddr { 10.10.1.0/24, 10.10.2.0/24, 10.10.3.0/24 } tcp dport 7050 accept

        # Prometheus metrics (monitoring subnet)
        ip saddr 10.10.100.0/24 tcp dport 9443 accept

        # Rate limit new connections
        tcp flags syn limit rate 1000/second burst 500 packets accept

        # Log and drop everything else
        log prefix "[nft-drop] " drop
    }

    chain forward {
        type filter hook forward priority 0; policy drop;
    }

    chain output {
        type filter hook output priority 0; policy accept;
    }
}
EOF

sudo systemctl enable nftables
sudo systemctl restart nftables
sudo nft list ruleset
WireGuard VPN Between Consortium Sites
Inter-organization traffic traverses the public internet between Singapore, Hong Kong, and Jakarta. WireGuard provides a lightweight encrypted tunnel that adds minimal latency overhead (typically under 2ms per hop). Each organization runs a WireGuard interface with pre-shared keys for forward secrecy.
# Install WireGuard on Ubuntu 22.04
sudo apt update && sudo apt install -y wireguard

# Generate keys on each node
wg genkey | sudo tee /etc/wireguard/private.key
sudo chmod 600 /etc/wireguard/private.key
sudo cat /etc/wireguard/private.key | wg pubkey | sudo tee /etc/wireguard/public.key

# Generate preshared key (run once, share securely)
wg genpsk | sudo tee /etc/wireguard/psk.key

# Configure Org1 Singapore gateway (10.10.1.1)
cat <<'EOF' | sudo tee /etc/wireguard/wg0.conf
[Interface]
Address = 10.10.1.1/24
ListenPort = 51820
PrivateKey = <org1-private-key>
PostUp = iptables -A FORWARD -i wg0 -j ACCEPT
PostDown = iptables -D FORWARD -i wg0 -j ACCEPT

[Peer]
# Org2 Hong Kong
PublicKey = <org2-public-key>
PresharedKey = <psk-key>
Endpoint = hk-gateway.aptc.example.com:51820
AllowedIPs = 10.10.2.0/24
PersistentKeepalive = 25

[Peer]
# Org3 Jakarta
PublicKey = <org3-public-key>
PresharedKey = <psk-key>
Endpoint = jkt-gateway.aptc.example.com:51820
AllowedIPs = 10.10.3.0/24
PersistentKeepalive = 25
EOF

sudo systemctl enable wg-quick@wg0
sudo systemctl start wg-quick@wg0

# Verify tunnel connectivity
sudo wg show wg0
ping -c 3 10.10.2.1   # Hong Kong gateway
ping -c 3 10.10.3.1   # Jakarta gateway
Pre-Production Validation Checklist
Before any transaction hits the ledger, run this validation script on every node. It checks kernel parameters, disk performance, network connectivity to all peers, TLS certificate validity, and Docker resource availability. Any failure should block the go-live decision.
#!/bin/bash
# scripts/validate-node.sh - Pre-production readiness check

PASS=0
FAIL=0

check() {
    if eval "$2" >/dev/null 2>&1; then
        echo "[PASS] $1"
        ((PASS++))
    else
        echo "[FAIL] $1"
        ((FAIL++))
    fi
}

echo "=== APTC Node Validation ==="
echo "Host: $(hostname) | Date: $(date -u)"
echo ""

# Kernel checks
check "vm.swappiness = 1" "[ $(sysctl -n vm.swappiness) -le 1 ]"
check "file-max >= 2097152" "[ $(sysctl -n fs.file-max) -ge 2097152 ]"
check "somaxconn >= 65535" "[ $(sysctl -n net.core.somaxconn) -ge 65535 ]"

# Disk checks
check "XFS on /var/hyperledger" "mount | grep '/var/hyperledger.*xfs'"
check "Disk IOPS > 10000" "[ $(sudo fio --name=test --rw=randread --bs=4k --runtime=5 --numjobs=1 --output-format=json /var/hyperledger/fio-test 2>/dev/null | jq '.jobs[0].read.iops' | cut -d. -f1) -gt 10000 ]"

# Network checks
check "WireGuard wg0 up" "ip link show wg0 | grep -q UP"
check "Ping Org2 gateway" "ping -c 1 -W 2 10.10.2.1"
check "Ping Org3 gateway" "ping -c 1 -W 2 10.10.3.1"

# Docker checks
check "Docker running" "systemctl is-active docker"
check "Docker memory > 48GB" "[ $(docker info --format '{{.MemTotal}}' | awk '{print int($1/1073741824)}') -ge 48 ]"

# TLS certificate checks
check "Peer TLS cert valid" "openssl x509 -checkend 86400 -noout -in /opt/aptc-network/crypto-config/peerOrganizations/org1.aptc.example.com/peers/peer0.org1.aptc.example.com/tls/server.crt"

echo ""
echo "Results: $PASS passed, $FAIL failed"
[ $FAIL -eq 0 ] && echo "STATUS: READY FOR PRODUCTION" || echo "STATUS: NOT READY - Fix failures before proceeding"
Running this script across all 21 nodes before the initial go-live saved APTC from two critical issues: one node had vm.swappiness at the default value of 60 (which would have caused swap thrashing under load), and another node’s NVMe drive was delivering only 3,000 IOPS due to a missing driver update. Both were caught and fixed before the network processed its first real transaction.