LumaNova Technologies is the scenario company used throughout this series. LumaNova is a Copenhagen-based AI consultancy that deploys OpenClaw as their internal assistant across teams. Their engineering team uses Discord, the sales team uses WhatsApp, and management uses Telegram. All three teams share a single OpenClaw agent with unified memory and skills. This series builds that deployment from scratch on a dedicated Ubuntu server.
By the end of this part, the LumaNova server will have a fully updated Ubuntu 24.04 LTS installation with Docker CE, Docker Compose, and Node.js 22 LTS installed and verified. The introduction article covers OpenClaw’s architecture, features, and supported platforms if you need background context before starting the installation.
Free to use, share it in your presentations, blogs, or learning materials.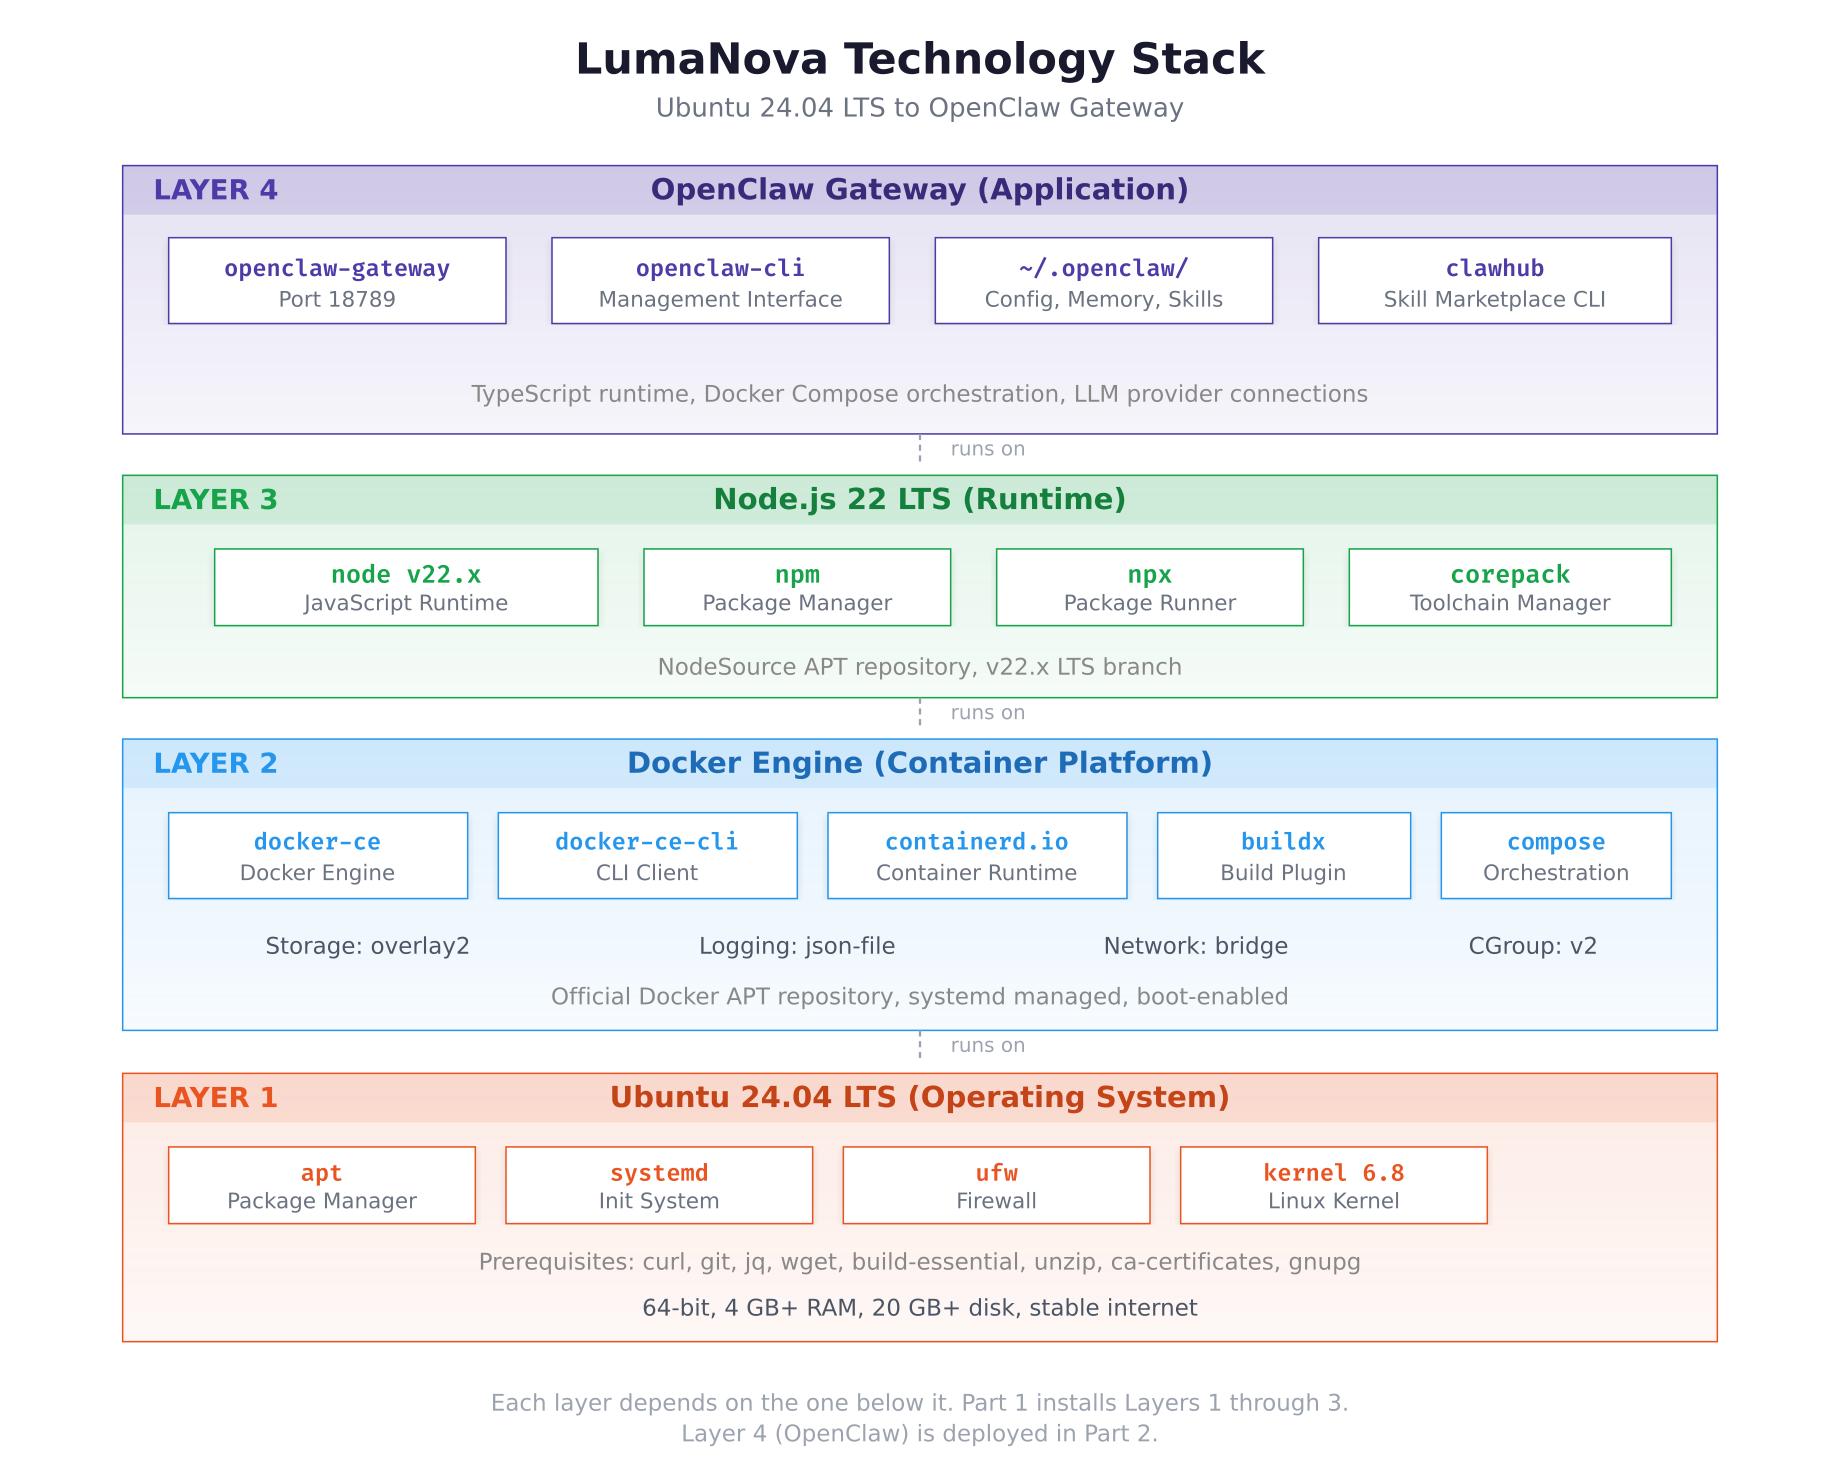
The stack diagram above shows the four layers that make up the complete deployment. Ubuntu 24.04 LTS provides the base operating system with systemd, apt, and kernel 6.8. Docker Engine sits on top, providing container isolation through containerd and runc. Node.js 22 LTS provides the JavaScript runtime that OpenClaw requires. The Gateway application layer at the top is deployed as a Docker container in Part 2.
Prerequisites
This guide assumes you have the following ready before starting.
A fresh Ubuntu 24.04 LTS server with at least 4 GB RAM, 20 GB disk space, and a stable internet connection. A virtual machine, cloud instance, or dedicated server all work. Root or sudo access is required for package installation.
SSH access to the server from your local machine. All commands in this guide are executed over SSH on the Ubuntu server.
System Update and Upgrade
Start by updating the package index and upgrading all installed packages to their latest versions. This ensures the server has the most recent security patches and library versions before adding new software.
$ sudo apt update && sudo apt upgrade -yReading package lists… Done
Building dependency tree… Done
Reading state information… Done
Calculating upgrade… Done
The following packages will be upgraded:
base-files libsystemd-shared libsystemd0 libudev1
4 upgraded, 0 newly installed, 0 to remove and 0 not upgraded.
Need to get 1,847 kB of archives.
After this operation, 0 B of additional disk space will be used.
Fetched 1,847 kB in 2s (924 kB/s)
Setting up base-files (13ubuntu10.2) …
Processing triggers for libc-bin (2.39-0ubuntu8.4) …
Processing triggers for man-db (2.12.0-4build2) …If the kernel was upgraded, reboot the server before continuing to ensure the new kernel is loaded.
$ sudo rebootWait 30 seconds, then reconnect via SSH.
$ uname -r6.8.0-51-genericInstalling Prerequisite Packages
Several utilities are needed by Docker’s setup process and by OpenClaw’s build steps. Install them all in a single command so nothing is missing later.
$ sudo apt install -y curl git jq wget build-essential unzip ca-certificates gnupg lsb-release software-properties-commonReading package lists… Done
Building dependency tree… Done
Reading state information… Done
The following NEW packages will be installed:
git git-man jq libjq1 libonig5 lsb-release software-properties-common
The following packages are already installed:
build-essential ca-certificates curl gnupg unzip wget
0 upgraded, 7 newly installed, 0 to remove and 0 not upgraded.
Need to get 8,412 kB of archives.
Setting up git (1:2.43.0-1ubuntu7.2) …
Setting up jq (1.7.1-3build1) …Verify the key utilities are accessible from the command line.
$ curl –version | head -1
$ git –version
$ jq –versioncurl 8.5.0 (x86_64-pc-linux-gnu) libcurl/8.5.0 OpenSSL/3.0.13
git version 2.43.0
jq-1.7.1Adding the Docker Official Repository
Ubuntu’s default repositories include an older Docker package. The official Docker repository provides the latest stable releases of Docker CE, the CLI tools, containerd, and the Compose plugin. Setting this up involves adding Docker’s GPG signing key and configuring the APT source.
$ sudo install -m 0755 -d /etc/apt/keyrings$ sudo curl -fsSL https://download.docker.com/linux/ubuntu/gpg -o /etc/apt/keyrings/docker.asc
$ sudo chmod a+r /etc/apt/keyrings/docker.asc$ echo \
$ “deb [arch=$(dpkg –print-architecture) signed-by=/etc/apt/keyrings/docker.asc] https://download.docker.com/linux/ubuntu \
$ $(. /etc/os-release && echo “${UBUNTU_CODENAME:-$VERSION_CODENAME}”) stable” | \
$ sudo tee /etc/apt/sources.list.d/docker.list > /dev/null$ sudo apt updateHit:1 http://archive.ubuntu.com/ubuntu noble InRelease
Hit:2 http://archive.ubuntu.com/ubuntu noble-updates InRelease
Hit:3 http://security.ubuntu.com/ubuntu noble-security InRelease
Get:4 https://download.docker.com/linux/ubuntu noble InRelease [48.8 kB]
Get:5 https://download.docker.com/linux/ubuntu noble/stable amd64 Packages [18.6 kB]
Fetched 67.4 kB in 1s (67.4 kB/s)
Reading package lists… DoneThe Docker repository is now active. The noble codename corresponds to Ubuntu 24.04 LTS.
Installing Docker CE and Components
Install the complete Docker stack: the engine, the CLI client, containerd, the Buildx plugin for multi-platform builds, and the Compose plugin for multi-container orchestration. OpenClaw uses Docker Compose to manage its gateway container and configuration volumes.
$ sudo apt install -y docker-ce docker-ce-cli containerd.io docker-buildx-plugin docker-compose-pluginThe following NEW packages will be installed:
containerd.io docker-buildx-plugin docker-ce docker-ce-cli
docker-compose-plugin
0 upgraded, 5 newly installed, 0 to remove and 0 not upgraded.
Need to get 121 MB of archives.
After this operation, 441 MB of additional disk space will be used.
Setting up containerd.io (1.7.25-1) …
Setting up docker-ce-cli (5:27.5.1-1~ubuntu.24.04~noble) …
Setting up docker-buildx-plugin (0.21.2-1~ubuntu.24.04~noble) …
Setting up docker-compose-plugin (2.32.4-1~ubuntu.24.04~noble) …
Setting up docker-ce (5:27.5.1-1~ubuntu.24.04~noble) …
Created symlink /etc/systemd/system/multi-user.target.wants/docker.service
Created symlink /etc/systemd/system/sockets.target.wants/docker.socketPost-Installation Configuration
By default, Docker commands require root privileges. Add your user to the docker group so you can run Docker commands without sudo. This is required for OpenClaw’s setup script, which expects Docker to be accessible without elevation.
$ sudo usermod -aG docker $USER$ newgrp dockerNext, configure the Docker daemon with production-appropriate defaults. The configuration file controls the storage driver, log rotation, default network settings, and cgroup driver. Without log rotation, container logs grow without limit and eventually consume all disk space.
$ sudo vim /etc/docker/daemon.json{
“storage-driver”: “overlay2”,
“log-driver”: “json-file”,
“log-opts”: {
“max-size”: “10m”,
“max-file”: “3”
},
“default-address-pools”: [
{
“base”: “172.20.0.0/16”,
“size”: 24
}
],
“exec-opts”: [“native.cgroupdriver=systemd”],
“live-restore”: true
}Press Esc, type :wq, press Enter to save and exit.
The storage-driver sets overlay2 as the filesystem layering backend, which is the recommended driver for Ubuntu. The log-opts cap each container’s log at 10 MB with 3 rotated files, preventing runaway disk usage. The live-restore option keeps containers running during daemon restarts, which is useful during Docker upgrades. The native.cgroupdriver=systemd ensures Docker uses the same cgroup manager as the host system.
$ sudo systemctl restart docker$ sudo systemctl status docker –no-pager● docker.service – Docker Application Container Engine
Loaded: loaded (/usr/lib/systemd/system/docker.service; enabled; preset: enabled)
Active: active (running) since Sun 2026-03-02 10:15:32 UTC; 5s ago
TriggeredBy: ● docker.socket
Docs: https://docs.docker.com
Main PID: 2847 (dockerd)
Tasks: 12
Memory: 42.3M
CPU: 312ms
CGroup: /system.slice/docker.service
└─2847 /usr/bin/dockerd -H fd:// –containerd=/run/containerd/containerd.sockVerifying Docker Installation
Run a series of verification commands to confirm that every Docker component is installed correctly and operational.
$ docker run hello-worldUnable to find image ‘hello-world:latest’ locally
latest: Pulling from library/hello-world
e6590344b1a5: Pull complete
Digest: sha256:d715f14f9eca81473d9112df50457893aa7e1ba8…
Status: Downloaded newer image for hello-world:latest
Hello from Docker!
This message shows that your installation appears to be working correctly.
To generate this message, Docker took the following steps:
1. The Docker client contacted the Docker daemon.
2. The Docker daemon pulled the “hello-world” image from the Docker Hub.
3. The Docker daemon created a new container from that image which runs the
executable that produces the output you are currently reading.
4. The Docker daemon streamed that output to the Docker client, which sent it
to your terminal.$ docker –version
$ docker compose versionDocker version 27.5.1, build 9f9e405
Docker Compose version v2.32.4$ docker info | head -25Client: Docker Engine – Community
Version: 27.5.1
Context: default
Server: Docker Engine – Community
Containers: 1
Running: 0
Paused: 0
Stopped: 1
Images: 1
Server Version: 27.5.1
Storage Driver: overlay2
Backing Filesystem: extfs
Supports d_type: true
Using metacopy: false
Native Overlay Diff: true
userxattr: false
Logging Driver: json-file
Cgroup Driver: systemd
Cgroup Version: 2
Plugins:
Volume: local
Network: bridge host ipvlan macvlan null overlay
Log: awslogs fluentd gcplogs gelf journald json-file local splunk syslog
Swarm: inactive
Default Runtime: runcConfirm that the storage driver shows overlay2, the logging driver shows json-file, and the cgroup driver shows systemd. These values match the daemon.json configuration applied earlier.
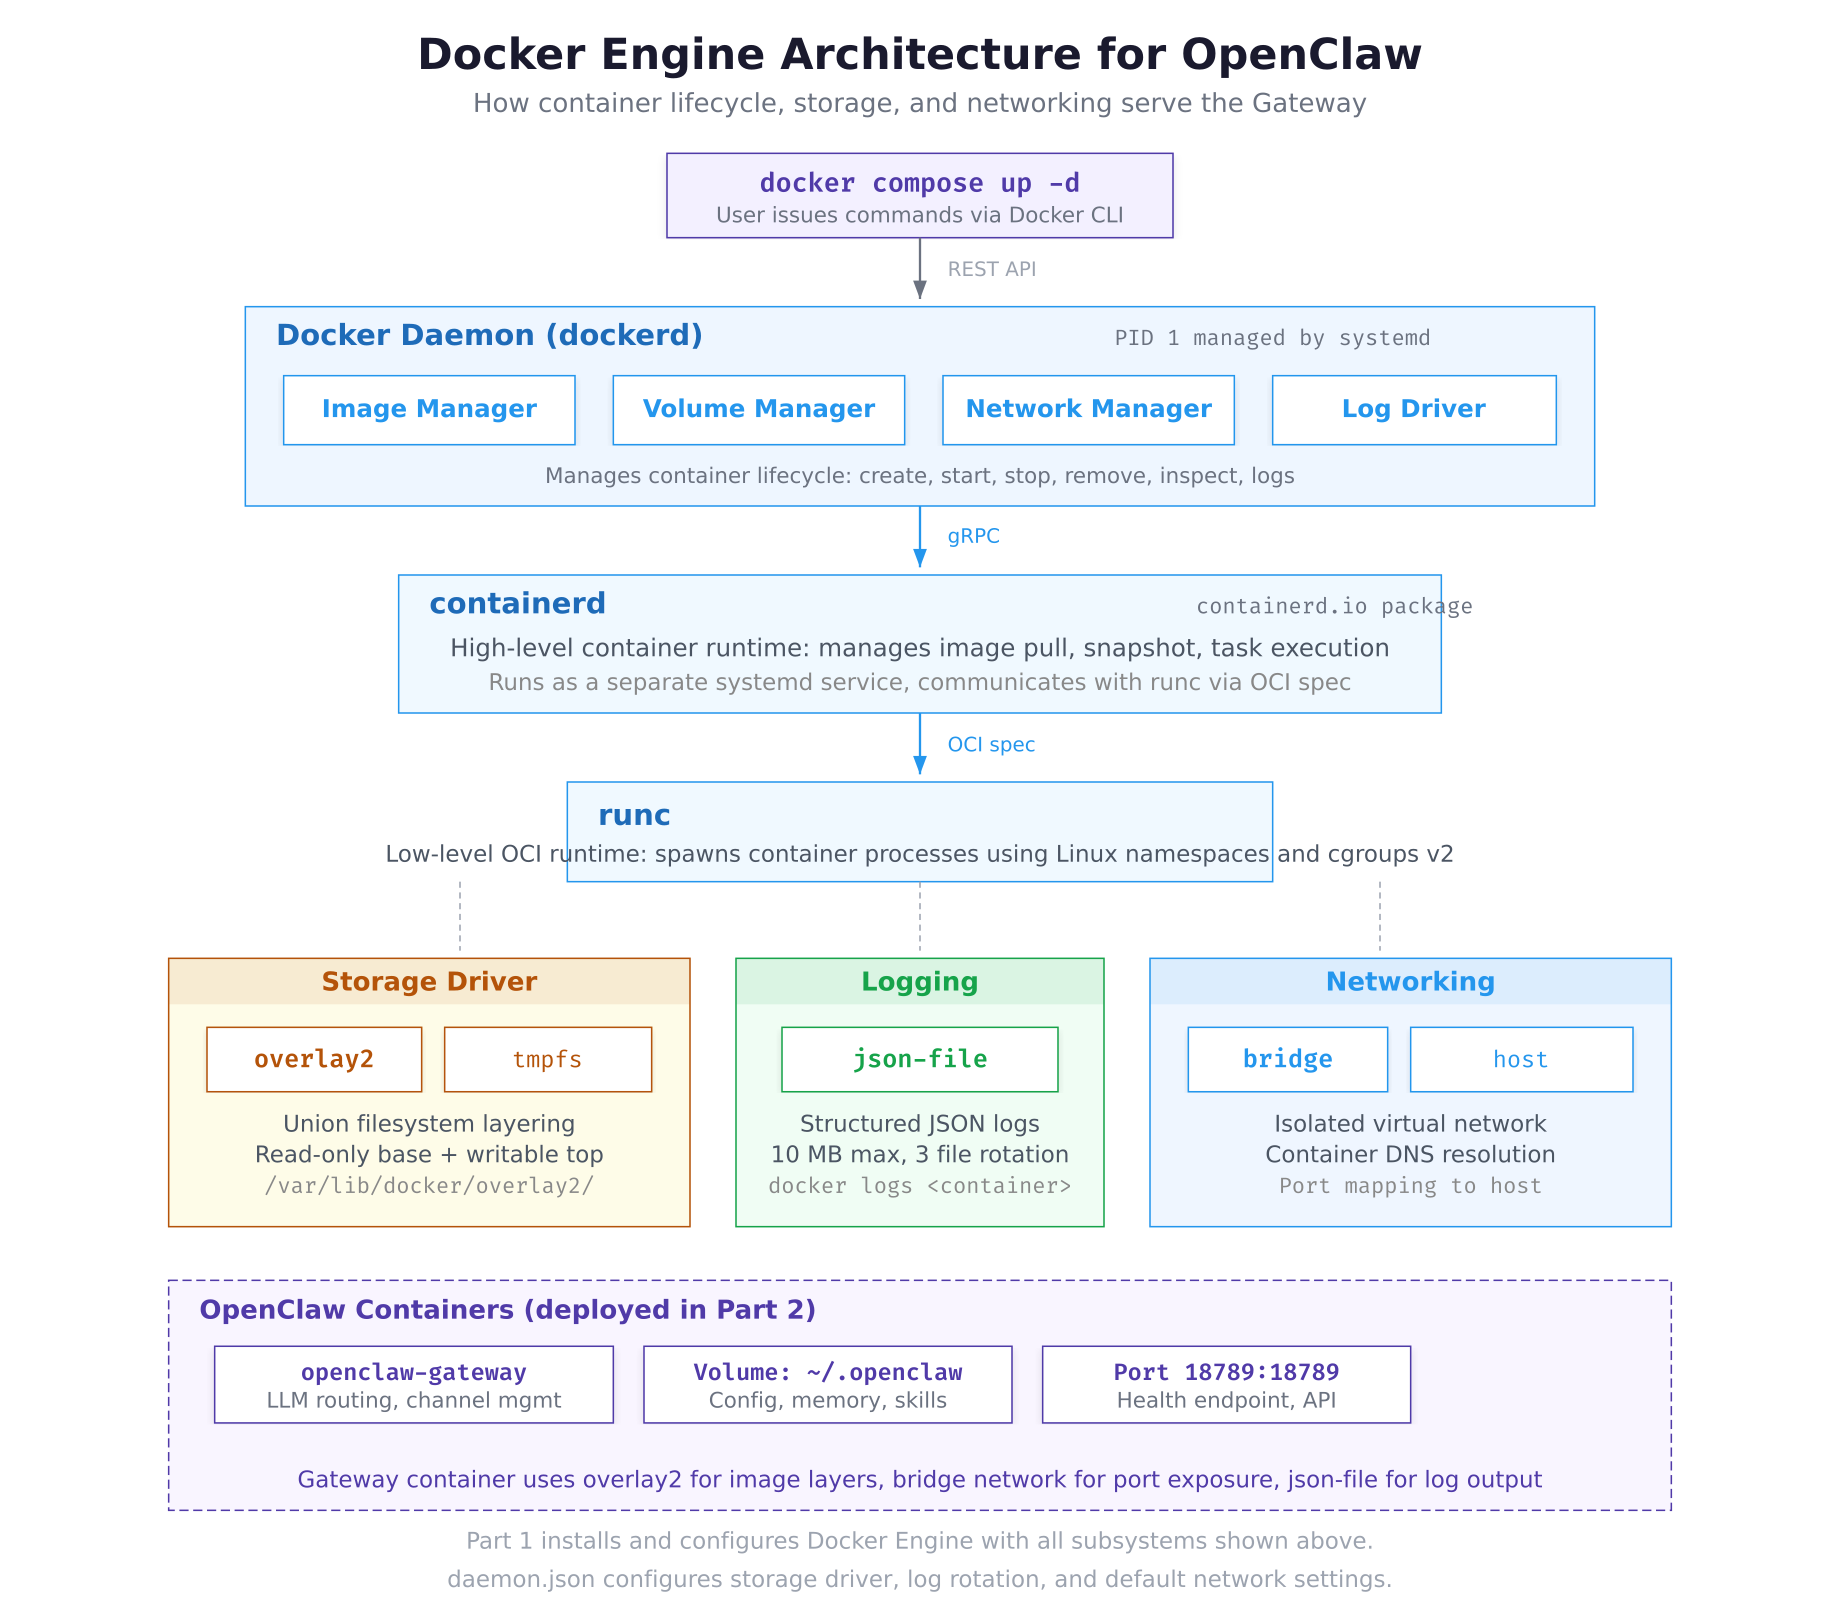
The architecture above traces the path from a user command to a running container. When you execute docker compose up, the Docker CLI sends the request to the daemon over a REST API. The daemon delegates container creation to containerd via gRPC, which uses runc to spawn the actual process inside isolated Linux namespaces and cgroups. Below these runtime components, the overlay2 storage driver manages image layers, the json-file driver captures log output, and the bridge network provides container-to-container DNS and port mapping to the host.
Installing Node.js 22 LTS
OpenClaw is written in TypeScript and requires Node.js 22 or newer. The NodeSource APT repository provides the official Node.js packages for Ubuntu, ensuring you get the exact LTS version with proper security updates.
$ curl -fsSL https://deb.nodesource.com/setup_22.x | sudo -E bash –## Installing the NodeSource Node.js 22.x repo…
## Populating apt-get cache…
## Confirming “noble” is supported…
## Adding the NodeSource signing key to your keyring…
## Creating apt sources list file for the NodeSource Node.js 22.x repo…
## Running `apt-get update` for you…
## Run `sudo apt-get install -y nodejs` to install Node.js 22.x and npm$ sudo apt install -y nodejsThe following NEW packages will be installed:
nodejs
0 upgraded, 1 newly installed, 0 to remove and 0 not upgraded.
Need to get 31.4 MB of archives.
After this operation, 198 MB of additional disk space will be used.
Setting up nodejs (22.14.0-1nodesource1) …$ node -v
$ npm -vv22.14.0
10.9.2Node.js 22.14.0 includes npm 10.9.2 and npx by default. This is the LTS branch that receives security updates through April 2027, making it suitable for production server deployments.
Enabling Docker on Boot
Docker should start automatically when the server boots. This ensures that OpenClaw containers come back online after a server restart without manual intervention.
$ sudo systemctl enable docker
$ sudo systemctl enable containerdSynchronizing state of docker.service with SysV service script with /usr/lib/systemd/systemd-sysv-install.
Executing: /usr/lib/systemd/systemd-sysv-install enable docker$ sudo systemctl is-enabled docker
$ sudo systemctl is-enabled containerdenabled
enabledPrerequisite Verification Checklist
Run every verification command in sequence to confirm the server is fully prepared for the OpenClaw deployment in Part 2.
$ echo “=== Operating System ===”
$ lsb_release -d
$ uname -r
$ echo “”
$ echo “=== Docker ===”
$ docker –version
$ docker compose version
$ docker info –format ‘{{.Driver}}’
$ docker info –format ‘{{.LoggingDriver}}’
$ docker info –format ‘{{.CgroupDriver}}’
$ echo “”
$ echo “=== Node.js ===”
$ node -v
$ npm -v
$ echo “”
$ echo “=== Essential Tools ===”
$ curl –version | head -1
$ git –version
$ jq –version
$ echo “”
$ echo “=== Services ===”
$ systemctl is-active docker
$ systemctl is-enabled docker
$ systemctl is-active containerd
$ systemctl is-enabled containerd=== Operating System ===
Description: Ubuntu 24.04.2 LTS
6.8.0-51-generic
=== Docker ===
Docker version 27.5.1, build 9f9e405
Docker Compose version v2.32.4
overlay2
json-file
systemd
=== Node.js ===
v22.14.0
10.9.2
=== Essential Tools ===
curl 8.5.0 (x86_64-pc-linux-gnu) libcurl/8.5.0 OpenSSL/3.0.13
git version 2.43.0
jq-1.7.1
=== Services ===
active
enabled
active
enabledEvery line in the checklist should show a version number, active, or enabled. If any component shows an error or missing output, revisit the corresponding section above to resolve it before continuing to Part 2.
Troubleshooting
Docker Permission Denied
If you see permission denied while trying to connect to the Docker daemon socket, the current user is not in the docker group. Run the group add command and apply it.
$ sudo usermod -aG docker $USER
$ newgrp docker
$ docker ps
Docker Daemon Fails to Start
If Docker fails to start after editing daemon.json, the JSON syntax is likely invalid. Validate the file before restarting.
$ sudo python3 -c “import json; json.load(open(‘/etc/docker/daemon.json’))”If this command produces no output, the JSON is valid. If it prints a parsing error, edit the file and fix the syntax (missing comma, unmatched brace, trailing comma before a closing brace).
NodeSource Script Fails
If the NodeSource setup script fails with a GPG or repository error, ensure the prerequisites are installed and try again.
$ sudo apt install -y ca-certificates curl gnupg
$ curl -fsSL https://deb.nodesource.com/setup_22.x | sudo -E bash –
$ sudo apt install -y nodejs
Summary
The LumaNova server is now fully prepared for OpenClaw deployment. This part accomplished the following:
- Updated Ubuntu 24.04 LTS to the latest package versions and kernel
- Installed essential prerequisite packages: curl, git, jq, wget, build-essential, unzip, ca-certificates, gnupg
- Added the official Docker APT repository with GPG key verification
- Installed Docker CE 27.5.1 with the CLI, containerd, Buildx, and Compose v2.32.4 plugins
- Configured the Docker daemon with overlay2 storage, json-file log rotation (10 MB, 3 files), systemd cgroup driver, and live-restore
- Added the current user to the docker group for rootless Docker access
- Installed Node.js 22.14.0 LTS with npm 10.9.2 via the NodeSource repository
- Enabled Docker and containerd services to start automatically on boot
- Verified every component with a comprehensive checklist
What Comes Next
In Part 2: Cloning OpenClaw and Running the Docker Setup, you will clone the OpenClaw repository, run the Docker setup script, complete the interactive onboarding wizard to connect your first LLM provider, and verify the gateway is running and healthy. The server prepared in this part provides every dependency that the setup script expects to find.