This article details the complete disk layout strategy for NordicBridge, a trade finance consortium operating Hyperledger Fabric 2.5 with Besu settlement nodes across data centers in Oslo, Copenhagen, and Stockholm. NordicBridge processes letter-of-credit transactions for 22 Nordic and Baltic banks, generating approximately 12 GB of new ledger data per month across production channels. The storage architecture must support five years of growth without requiring OS reinstallation or data migration.
Free to use, share it in your presentations, blogs, or learning materials.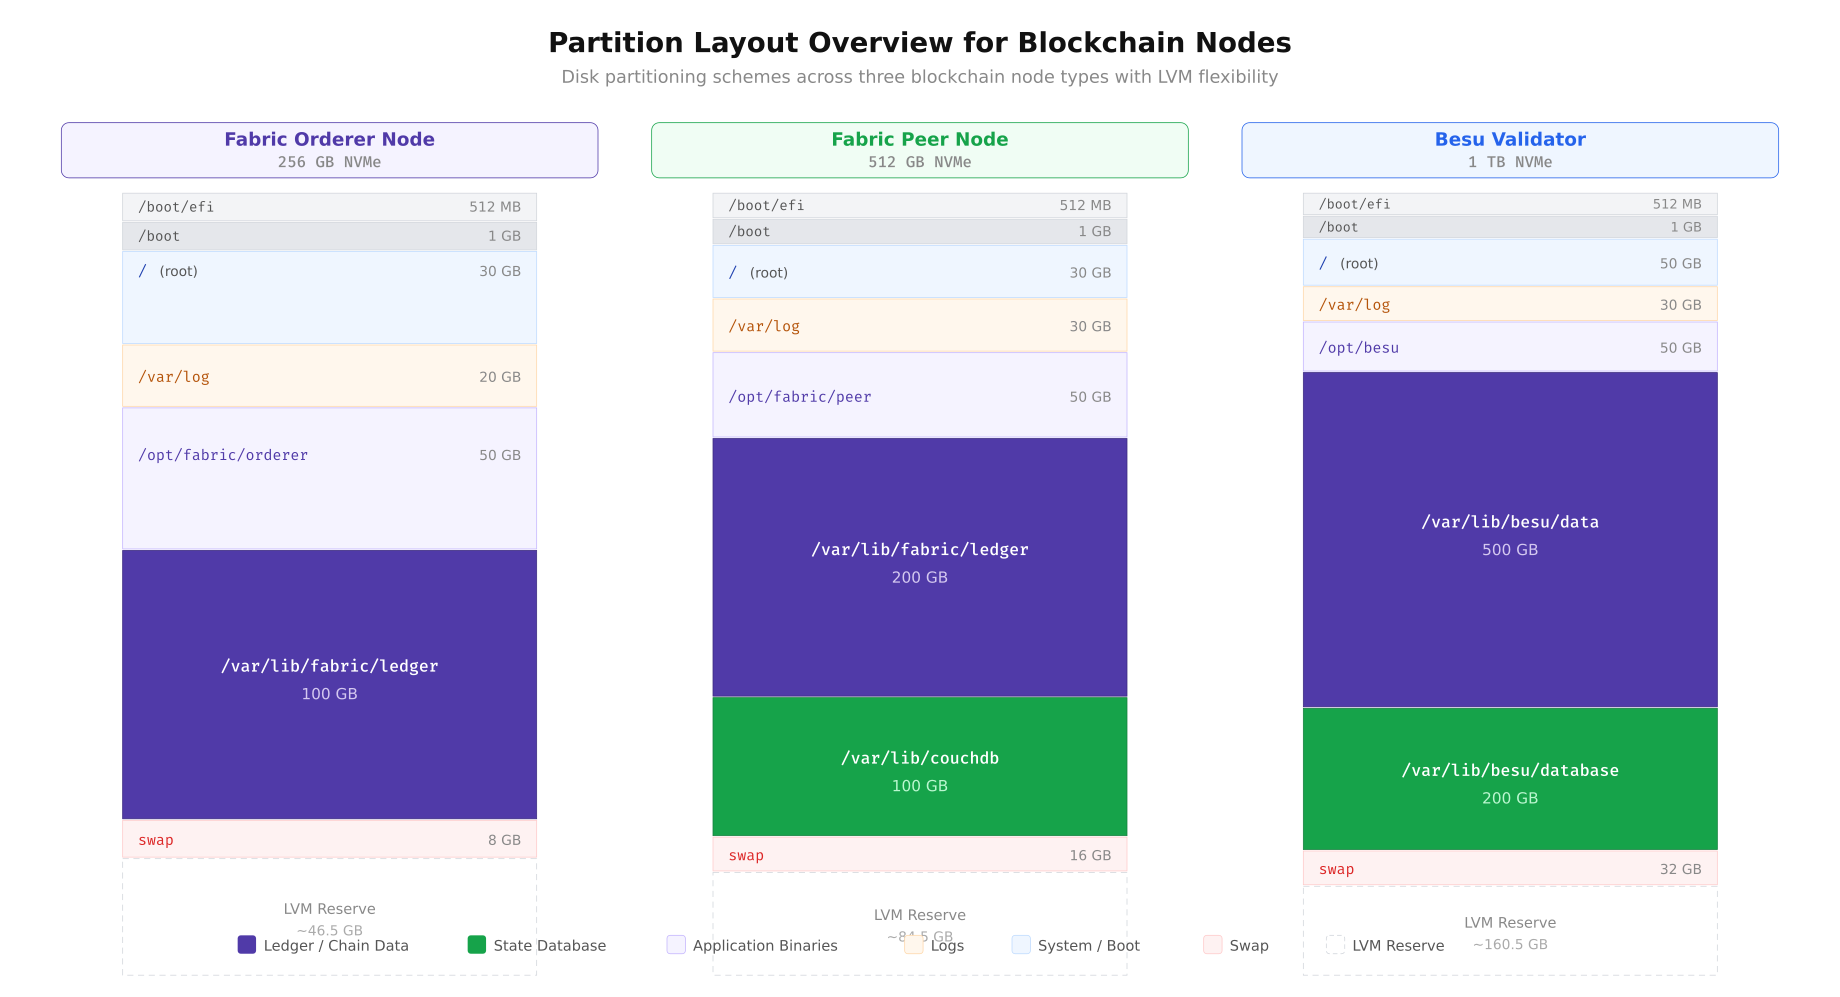
The partition overview above illustrates how NordicBridge allocates disk space differently for each node role. The Fabric Orderer prioritizes Raft log storage with a moderately sized ledger partition because orderers only store block metadata, not full transaction payloads. The Fabric Peer allocates the largest portions to ledger storage and CouchDB state indexes because peers maintain the complete transaction history and serve chaincode queries. The Besu Validator dedicates the majority of its 1 TB NVMe to world state trie data and the chain database. Every configuration reserves unallocated LVM space for online expansion.
LVM Architecture for Online Expansion
NordicBridge standardizes on LVM2 (Logical Volume Manager) for all blockchain storage. LVM provides the critical capability that fixed partitions lack: online volume expansion without unmounting filesystems or stopping blockchain services. When a logical volume reaches its capacity threshold, the operations team extends it from the reserved pool in seconds, and the XFS filesystem grows to fill the new space without any downtime.
Free to use, share it in your presentations, blogs, or learning materials.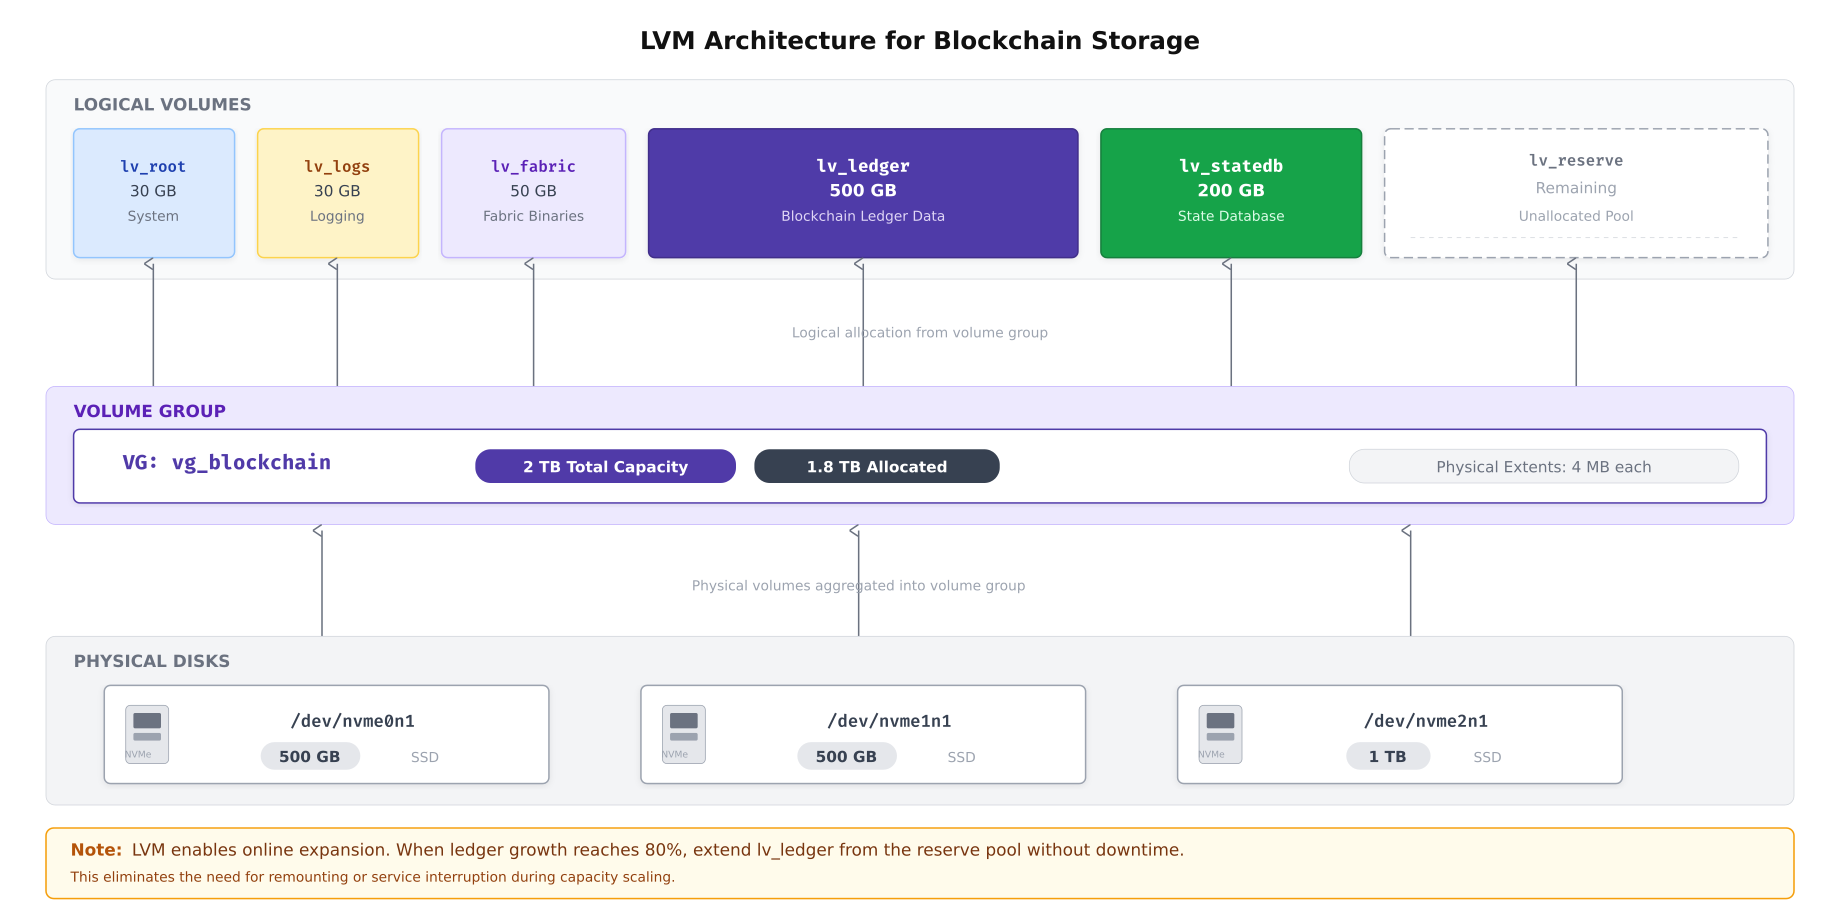
As shown above, NordicBridge aggregates multiple physical NVMe drives into a single volume group. This abstraction layer means that adding a new physical drive to the server instantly expands the available pool without restructuring existing logical volumes. The 4 MB physical extent size balances allocation granularity with metadata overhead. The reserved logical volume acts as an expansion buffer, ensuring that capacity alerts never result in emergency procurement of new drives.
Creating the LVM Layout
The following sequence creates NordicBridge’s LVM architecture from bare NVMe drives. This procedure is executed once during initial server provisioning.
# Step 1: Create physical volumes on NVMe drives
# Each drive is initialized for LVM use
sudo pvcreate /dev/nvme0n1
sudo pvcreate /dev/nvme1n1
sudo pvcreate /dev/nvme2n1

# Verify physical volumes
sudo pvs

# Step 2: Create the volume group spanning all three drives
sudo vgcreate vg_blockchain /dev/nvme0n1 /dev/nvme1n1 /dev/nvme2n1

# Verify volume group (should show combined capacity)
sudo vgs

# Step 3: Create logical volumes with specific sizes
# Root filesystem
sudo lvcreate -L 30G -n lv_root vg_blockchain

# Log partition (separate to prevent log flooding from filling root)
sudo lvcreate -L 30G -n lv_logs vg_blockchain

# Fabric application binaries and configuration
sudo lvcreate -L 50G -n lv_fabric vg_blockchain

# Ledger storage (primary blockchain data)
sudo lvcreate -L 500G -n lv_ledger vg_blockchain

# State database (CouchDB or RocksDB)
sudo lvcreate -L 200G -n lv_statedb vg_blockchain

# Leave remaining space as unallocated reserve
# Verify: sudo vgs should show free PE (physical extents)

# Step 4: Verify logical volume layout
sudo lvs vg_blockchain
Filesystem Creation and Mount Options
NordicBridge uses XFS for all blockchain data partitions. XFS provides superior sequential write performance, supports online defragmentation, and grows seamlessly with LVM expansion. The mount options are tailored for blockchain workloads.
# Create XFS filesystems on each logical volume
sudo mkfs.xfs -L root /dev/vg_blockchain/lv_root
sudo mkfs.xfs -L logs /dev/vg_blockchain/lv_logs
sudo mkfs.xfs -L fabric /dev/vg_blockchain/lv_fabric
sudo mkfs.xfs -L ledger /dev/vg_blockchain/lv_ledger
sudo mkfs.xfs -L statedb /dev/vg_blockchain/lv_statedb

# Create mount points
sudo mkdir -p /var/log
sudo mkdir -p /opt/fabric
sudo mkdir -p /var/lib/fabric/ledger
sudo mkdir -p /var/lib/couchdb

# Add entries to /etc/fstab with hardened mount options
cat <<'EOF' | sudo tee -a /etc/fstab
# Blockchain storage layout - NordicBridge
/dev/vg_blockchain/lv_root    /                      xfs  defaults,noatime                           0 1
/dev/vg_blockchain/lv_logs    /var/log               xfs  defaults,noatime,nosuid,nodev,noexec       0 2
/dev/vg_blockchain/lv_fabric  /opt/fabric            xfs  defaults,noatime,nosuid                    0 2
/dev/vg_blockchain/lv_ledger  /var/lib/fabric/ledger xfs  defaults,noatime,nosuid,nodev              0 2
/dev/vg_blockchain/lv_statedb /var/lib/couchdb       xfs  defaults,noatime,nosuid,nodev              0 2
EOF

# Mount all filesystems
sudo mount -a

# Verify all mounts
df -hT | grep vg_blockchain
The mount options deserve explanation. The noatime flag disables access time updates on every file read, which eliminates unnecessary write I/O on read-heavy ledger queries. The nosuid flag prevents setuid binaries from executing on data partitions, which is a security hardening measure. The nodev flag blocks device file creation on storage partitions. The noexec flag on the log partition prevents execution of any files written to logs, which mitigates log injection attacks.
I/O Access Pattern Analysis
Different blockchain components interact with storage in fundamentally different ways. The orderer writes sequentially as it appends blocks to the Raft log. The peer performs a mix of sequential block writes and random state database reads. CouchDB uses B-tree indexes that generate small random I/O operations. Understanding these patterns determines which I/O scheduler, filesystem options, and hardware configurations optimize each workload.
Free to use, share it in your presentations, blogs, or learning materials.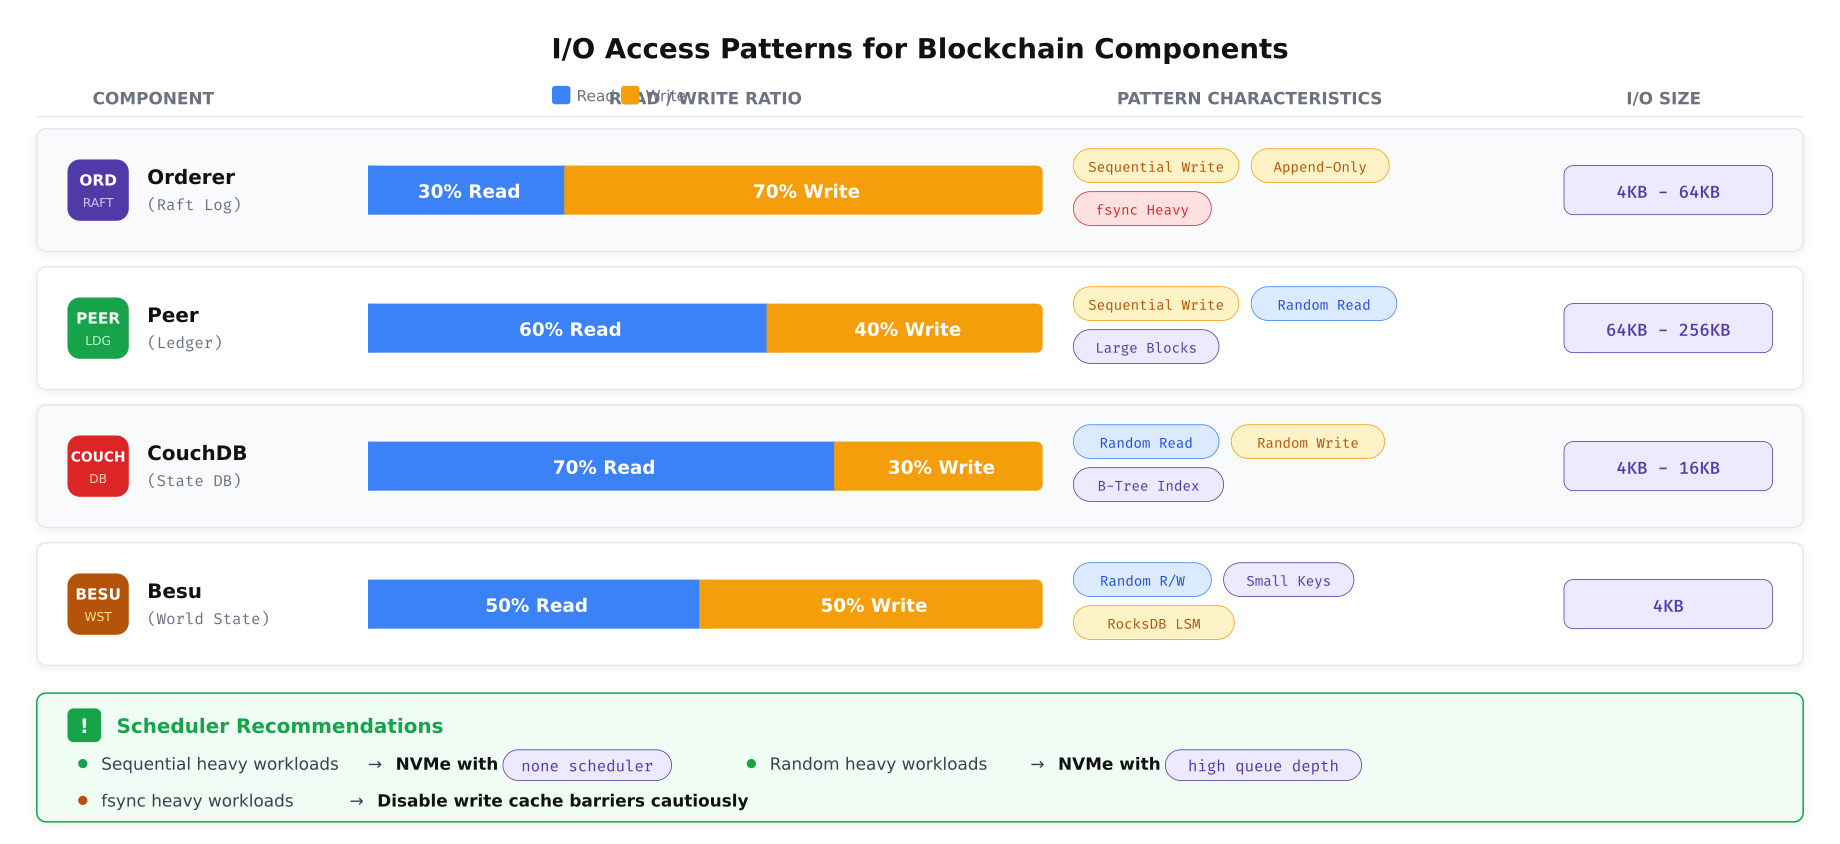
The pattern analysis above reveals distinct storage profiles for each component. The orderer’s append-only, fsync-heavy workload benefits from NVMe drives with high sustained sequential write throughput and fast fsync completion. The peer’s mixed workload requires balanced read/write performance. CouchDB’s random I/O pattern with small block sizes demands high IOPS and low latency, making NVMe drives with deep queue support essential. Besu’s RocksDB engine generates compaction I/O bursts that temporarily spike write amplification, requiring drives that can sustain mixed random workloads without throttling.
I/O Scheduler Configuration
# Check current I/O scheduler for NVMe drives
cat /sys/block/nvme0n1/queue/scheduler

# For NVMe drives: use 'none' (bypass scheduler, direct submission)
# NVMe drives have internal parallelism that makes OS-level scheduling unnecessary
echo none | sudo tee /sys/block/nvme0n1/queue/scheduler
echo none | sudo tee /sys/block/nvme1n1/queue/scheduler
echo none | sudo tee /sys/block/nvme2n1/queue/scheduler

# For SATA SSDs (boot mirror): use 'mq-deadline' for predictable latency
echo mq-deadline | sudo tee /sys/block/sda/queue/scheduler

# Make persistent via udev rules
cat <<'EOF' | sudo tee /etc/udev/rules.d/60-blockchain-ioscheduler.rules
# NVMe drives: no scheduler (direct submission to hardware)
ACTION=="add|change", KERNEL=="nvme[0-9]*", ATTR{queue/scheduler}="none"

# SATA SSDs: mq-deadline for predictable latency
ACTION=="add|change", KERNEL=="sd[a-z]", ATTR{queue/rotational}=="0", ATTR{queue/scheduler}="mq-deadline"

# HDDs (if used for backup): bfq for fair queuing
ACTION=="add|change", KERNEL=="sd[a-z]", ATTR{queue/rotational}=="1", ATTR{queue/scheduler}="bfq"
EOF

# Reload udev rules
sudo udevadm control --reload-rules
sudo udevadm trigger
NVMe Queue Depth and Read-Ahead Tuning
# Increase NVMe queue depth for concurrent I/O operations
# Default nr_requests: 32. Increase for high-concurrency blockchain workloads
echo 256 | sudo tee /sys/block/nvme0n1/queue/nr_requests
echo 256 | sudo tee /sys/block/nvme1n1/queue/nr_requests
echo 256 | sudo tee /sys/block/nvme2n1/queue/nr_requests

# Set read-ahead based on workload type
# Ledger partition: high read-ahead for sequential block reads (2048 sectors = 1 MB)
sudo blockdev --setra 2048 /dev/vg_blockchain/lv_ledger

# State DB partition: low read-ahead for random I/O (256 sectors = 128 KB)
sudo blockdev --setra 256 /dev/vg_blockchain/lv_statedb

# Log partition: moderate read-ahead (512 sectors = 256 KB)
sudo blockdev --setra 512 /dev/vg_blockchain/lv_logs

# Verify read-ahead settings
sudo blockdev --getra /dev/vg_blockchain/lv_ledger
sudo blockdev --getra /dev/vg_blockchain/lv_statedb

# Make persistent via rc.local or systemd unit
cat <<'EOF' | sudo tee /etc/systemd/system/blockchain-disk-tuning.service
[Unit]
Description=Blockchain Disk Tuning
After=local-fs.target

[Service]
Type=oneshot
RemainAfterExit=yes
ExecStart=/bin/bash -c '\
  for dev in nvme0n1 nvme1n1 nvme2n1; do \
    echo 256 > /sys/block/$dev/queue/nr_requests; \
    echo none > /sys/block/$dev/queue/scheduler; \
  done; \
  blockdev --setra 2048 /dev/vg_blockchain/lv_ledger; \
  blockdev --setra 256 /dev/vg_blockchain/lv_statedb; \
  blockdev --setra 512 /dev/vg_blockchain/lv_logs'

[Install]
WantedBy=multi-user.target
EOF

sudo systemctl daemon-reload
sudo systemctl enable blockchain-disk-tuning.service
Filesystem Selection
The choice of filesystem impacts performance, data integrity, and operational flexibility. NordicBridge evaluated three filesystems against blockchain-specific requirements: sequential write throughput for block appending, random read latency for state queries, snapshot capability for backups, and operational complexity for day-to-day management.
Free to use, share it in your presentations, blogs, or learning materials.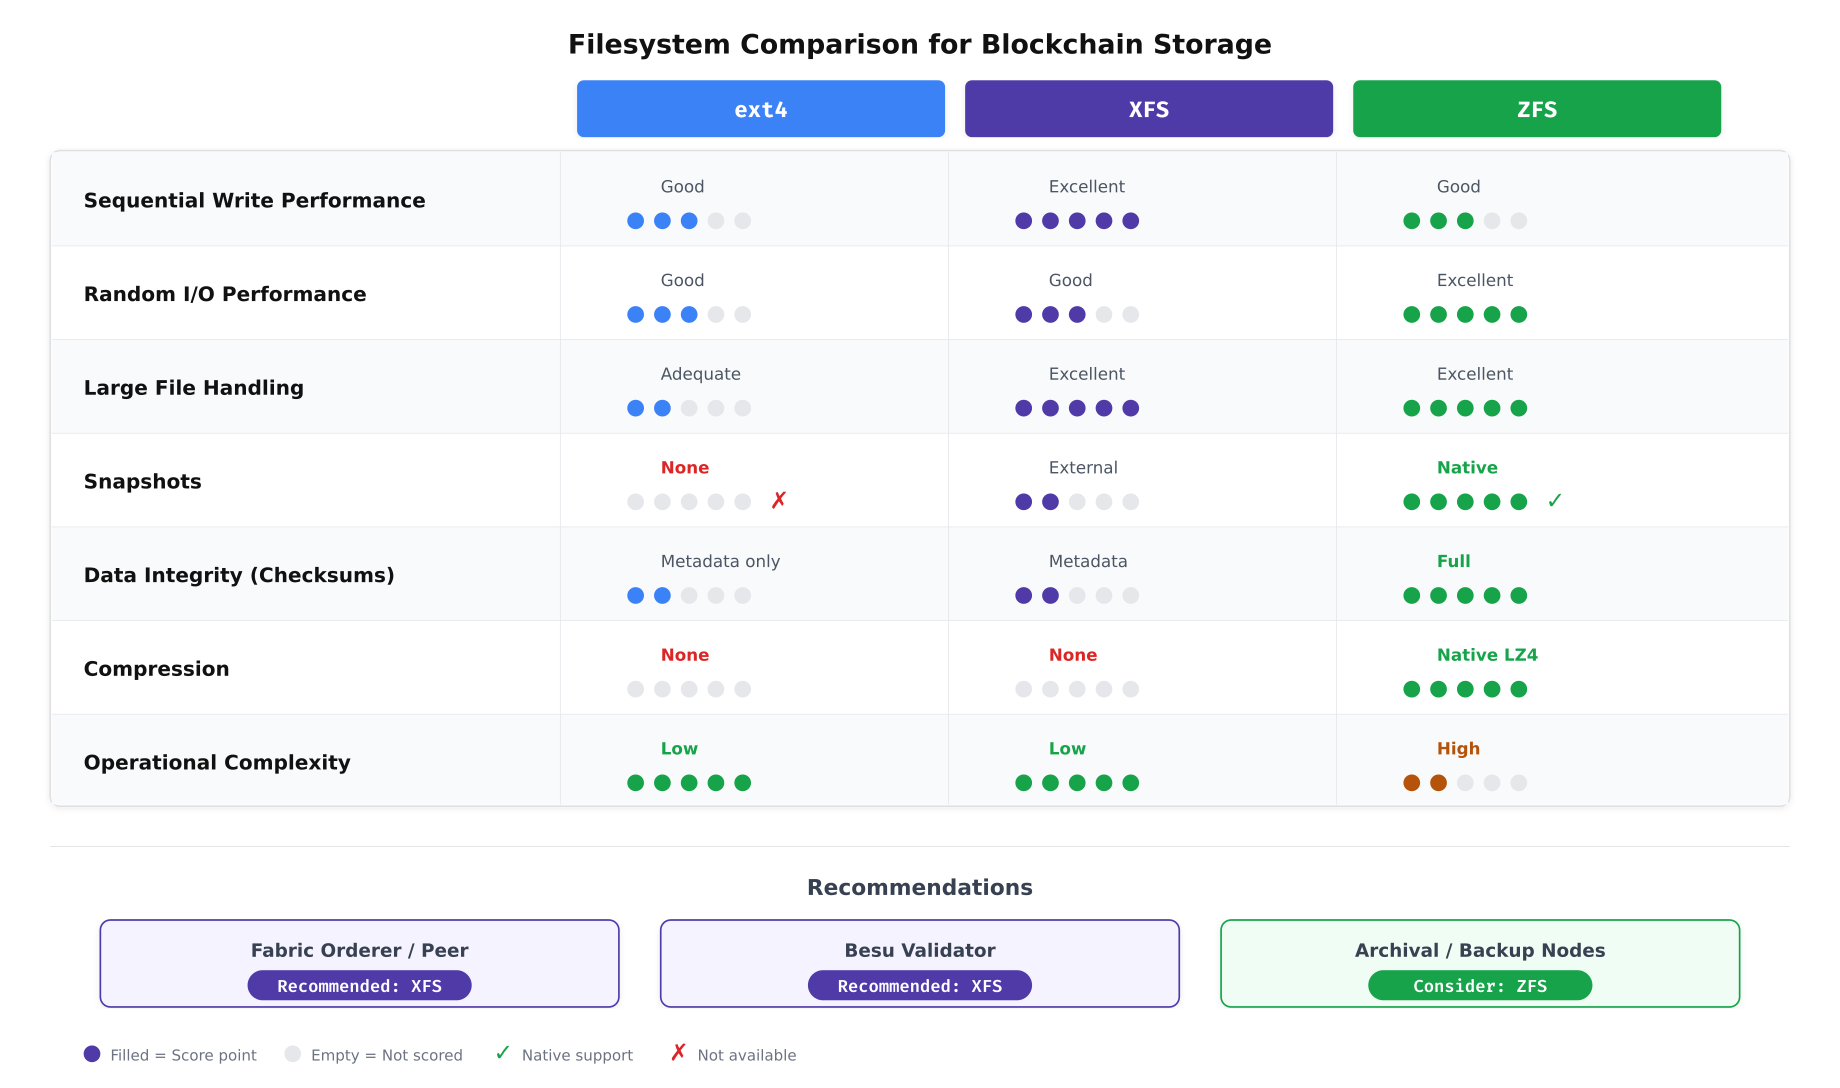
The comparison above guided NordicBridge’s decision. XFS emerged as the production filesystem for both Fabric and Besu nodes because of its excellent sequential write performance, strong large-file handling (ledger blocks), and low operational complexity. ZFS offers compelling features like native snapshots and full data checksumming, but its higher memory overhead and operational complexity make it better suited for archival and backup nodes where data integrity verification is the primary concern rather than transaction throughput.
XFS Optimization for Blockchain Workloads
# XFS-specific optimizations for blockchain ledger partition

# Check current XFS allocation group count and size
sudo xfs_info /var/lib/fabric/ledger

# Online defragmentation (run weekly via cron)
# Reorganizes file extents to reduce fragmentation from append-heavy writes
sudo xfs_fsr /var/lib/fabric/ledger

# Check fragmentation level
sudo xfs_db -r -c frag /dev/vg_blockchain/lv_ledger

# XFS preallocation: reduce metadata updates during sequential writes
# Set extent size hint for ledger directory (64 MB extents)
sudo xfs_io -c "extsize 67108864" /var/lib/fabric/ledger/

# Configure weekly defragmentation via systemd timer
cat <<'EOF' | sudo tee /etc/systemd/system/xfs-defrag.service
[Unit]
Description=XFS Online Defragmentation for Blockchain Storage

[Service]
Type=oneshot
ExecStart=/usr/sbin/xfs_fsr /var/lib/fabric/ledger
ExecStart=/usr/sbin/xfs_fsr /var/lib/couchdb
Nice=19
IOSchedulingClass=idle
EOF

cat <<'EOF' | sudo tee /etc/systemd/system/xfs-defrag.timer
[Unit]
Description=Weekly XFS Defragmentation

[Timer]
OnCalendar=Sun 03:00
Persistent=true

[Install]
WantedBy=timers.target
EOF

sudo systemctl daemon-reload
sudo systemctl enable xfs-defrag.timer
RAID Configuration
NordicBridge separates storage into two RAID tiers: high-performance RAID 10 for active blockchain data and high-capacity RAID 6 for backup and archival storage. This separation ensures that the performance characteristics of each tier match their workload requirements.
Free to use, share it in your presentations, blogs, or learning materials.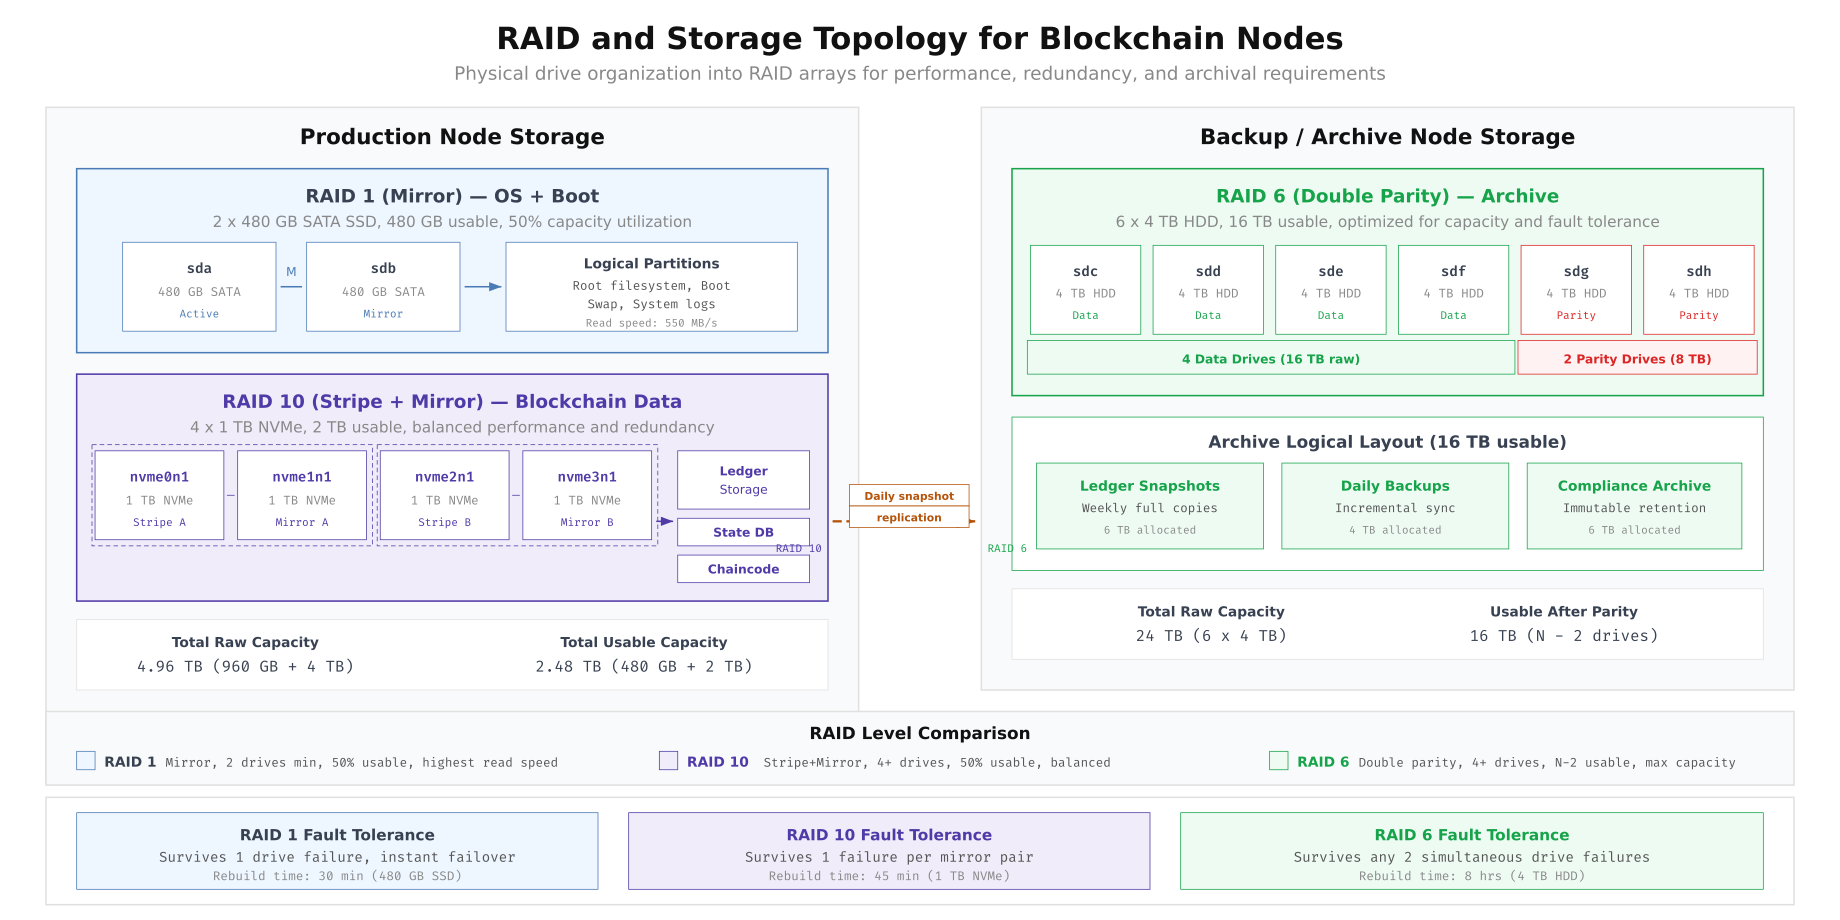
The topology above shows NordicBridge’s two-tier approach. The RAID 1 mirror for the OS boot partition provides redundancy for the operating system without consuming NVMe resources. The RAID 10 array stripes blockchain data across four NVMe drives for maximum throughput while maintaining mirror redundancy. The RAID 6 archive array on the backup node uses double parity to survive two simultaneous drive failures, which is essential for compliance archives that must be retained for seven years under Nordic financial regulations.
Creating the mdadm RAID Arrays
# Create RAID 1 mirror for OS boot (2 x SATA SSD)
sudo mdadm --create /dev/md0 --level=1 --raid-devices=2 /dev/sda /dev/sdb

# Create RAID 10 for blockchain data (4 x NVMe)
sudo mdadm --create /dev/md1 --level=10 --raid-devices=4 \
  /dev/nvme0n1 /dev/nvme1n1 /dev/nvme2n1 /dev/nvme3n1

# Verify RAID status
cat /proc/mdstat

# Save RAID configuration for persistence across reboots
sudo mdadm --detail --scan | sudo tee -a /etc/mdadm/mdadm.conf
sudo update-initramfs -u

# Monitor RAID health: configure email alerts
sudo mdadm --monitor --daemonize --mail=ops@nordicbridge.net --delay=300 /dev/md0 /dev/md1

# Verify RAID 10 stripe performance
sudo hdparm -tT /dev/md1
Data Growth Projection and Capacity Planning
Capacity planning for blockchain storage requires modeling the growth rate of each data type over the projected operational lifetime. NordicBridge tracks three categories of storage consumption: ledger data (blocks and transactions), state database indexes (CouchDB views and query indexes), and operational data (logs, metrics, and temporary files). The growth rates are derived from six months of production telemetry.
Free to use, share it in your presentations, blogs, or learning materials.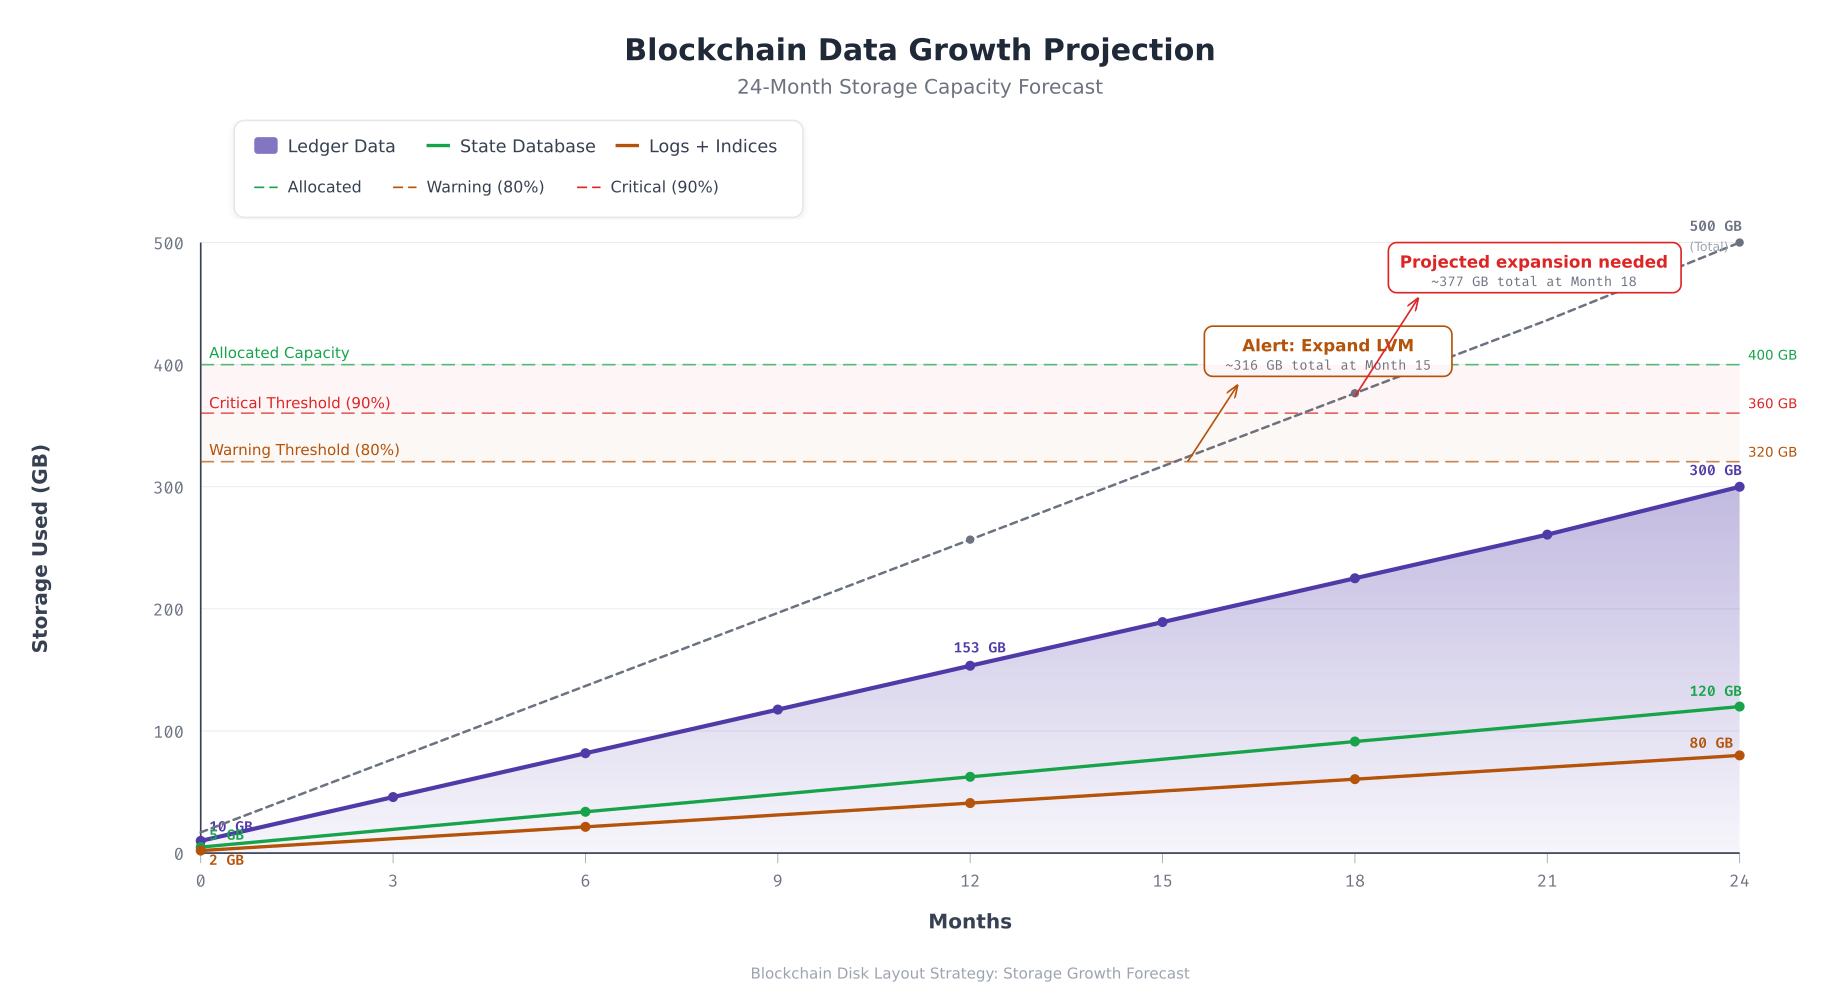
The projection above forecasts NordicBridge’s storage consumption over two years. Ledger data grows linearly at approximately 12.5 GB per month, reaching 300 GB by month 24. The state database grows at roughly 5 GB per month as new CouchDB indexes accumulate. Logs and indices grow at 3.3 GB per month. The combined total crosses the 80% warning threshold around month 15, triggering an automated LVM expansion alert. The 90% critical threshold is reached near month 18 if no action is taken. The LVM reserve pool provides sufficient capacity to extend volumes without procuring additional hardware for the first two years.
Online LVM Expansion Procedure
When the monitoring system triggers a capacity warning, NordicBridge’s operations team expands the affected logical volume from the reserve pool. This procedure runs without downtime and without stopping blockchain services.
# Check current volume sizes and free space in the volume group
sudo vgs
sudo lvs vg_blockchain

# Extend the ledger logical volume by 100 GB from reserve pool
sudo lvextend -L +100G /dev/vg_blockchain/lv_ledger

# Grow the XFS filesystem to fill the new volume size (online, no unmount needed)
sudo xfs_growfs /var/lib/fabric/ledger

# Verify the expansion
df -h /var/lib/fabric/ledger
sudo lvs vg_blockchain

# If the reserve pool is exhausted and a new drive is added:
# Step 1: Initialize the new drive as a physical volume
sudo pvcreate /dev/nvme3n1

# Step 2: Add it to the existing volume group
sudo vgextend vg_blockchain /dev/nvme3n1

# Step 3: Verify expanded capacity
sudo vgs

# Step 4: Now extend logical volumes as needed
sudo lvextend -L +200G /dev/vg_blockchain/lv_ledger
sudo xfs_growfs /var/lib/fabric/ledger
Disk Health Monitoring
Proactive disk monitoring prevents data loss. NordicBridge deploys a monitoring pipeline that collects disk metrics, evaluates them against defined thresholds, routes alerts to the appropriate response channel, and triggers automated remediation where safe to do so.
Free to use, share it in your presentations, blogs, or learning materials.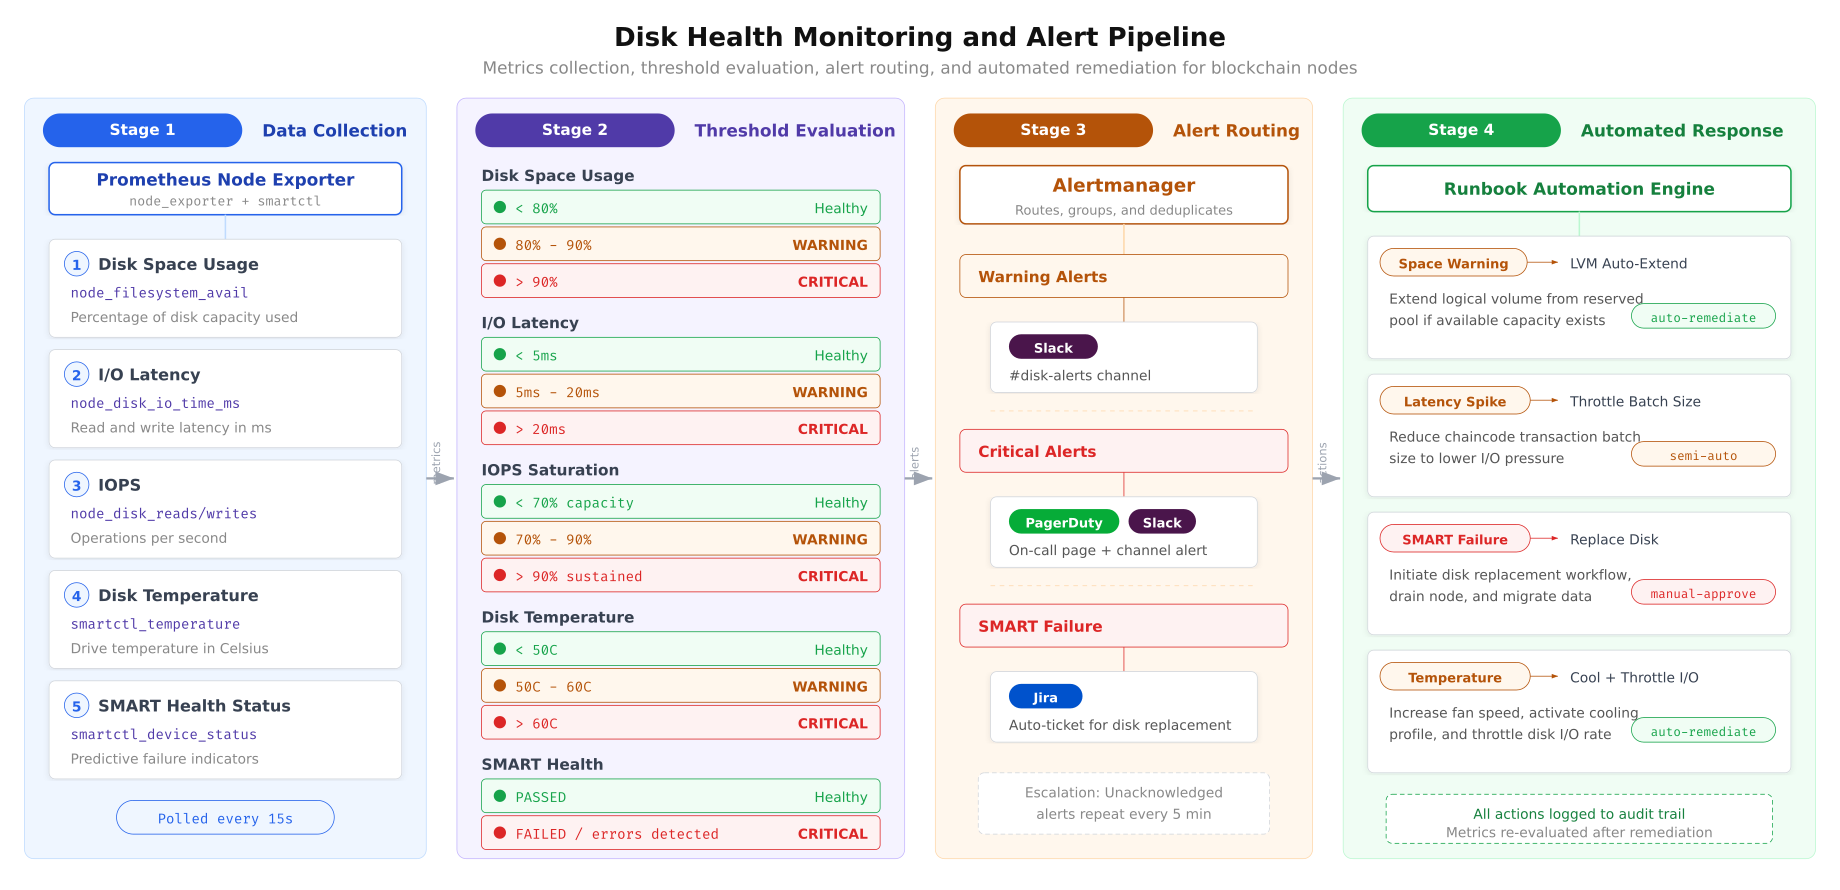
The monitoring pipeline above operates continuously across all NordicBridge nodes. Prometheus Node Exporter polls disk metrics every 15 seconds, including space usage, I/O latency, IOPS, temperature, and SMART health status. Each metric is evaluated against graduated thresholds: healthy (green), warning (triggers Slack notification), and critical (triggers PagerDuty escalation). SMART failures generate automatic Jira tickets for the hardware team. Automated responses handle predictable scenarios like space warnings (LVM auto-extend) and latency spikes (batch size throttling), while irreversible actions like disk replacement require manual approval.
Prometheus Alerting Rules for Disk Health
# /etc/prometheus/rules/disk-alerts.yml
# Prometheus alerting rules for blockchain disk monitoring

groups:
  - name: blockchain-disk-alerts
    rules:
      # Disk space warning at 80%
      - alert: DiskSpaceWarning
        expr: |
          (1 - node_filesystem_avail_bytes{mountpoint=~"/var/lib/.*"}
          / node_filesystem_size_bytes{mountpoint=~"/var/lib/.*"}) * 100 > 80
        for: 5m
        labels:
          severity: warning
          team: blockchain-ops
        annotations:
          summary: "Disk space above 80% on {{ $labels.instance }}"
          description: "{{ $labels.mountpoint }} is {{ $value | humanize }}% full"
          runbook: "Extend LVM from reserve pool"

      # Disk space critical at 90%
      - alert: DiskSpaceCritical
        expr: |
          (1 - node_filesystem_avail_bytes{mountpoint=~"/var/lib/.*"}
          / node_filesystem_size_bytes{mountpoint=~"/var/lib/.*"}) * 100 > 90
        for: 2m
        labels:
          severity: critical
          team: blockchain-ops
        annotations:
          summary: "CRITICAL: Disk space above 90% on {{ $labels.instance }}"
          description: "{{ $labels.mountpoint }} is {{ $value | humanize }}% full"
          runbook: "Immediate LVM expansion required"

      # I/O latency warning
      - alert: DiskLatencyHigh
        expr: |
          rate(node_disk_io_time_seconds_total[5m])
          / rate(node_disk_io_now[5m]) > 0.005
        for: 10m
        labels:
          severity: warning
        annotations:
          summary: "High disk I/O latency on {{ $labels.instance }}"
          description: "Average I/O latency exceeds 5ms on {{ $labels.device }}"

      # SMART health failure
      - alert: SmartHealthFailure
        expr: smartctl_device_smart_healthy != 1
        for: 1m
        labels:
          severity: critical
          team: hardware
        annotations:
          summary: "SMART health failure on {{ $labels.instance }}"
          description: "Drive {{ $labels.device }} reports SMART failure"
          runbook: "Initiate disk replacement procedure"

      # Disk temperature warning
      - alert: DiskTemperatureHigh
        expr: smartctl_device_temperature > 60
        for: 5m
        labels:
          severity: warning
        annotations:
          summary: "High disk temperature on {{ $labels.instance }}"
          description: "Drive {{ $labels.device }} temperature: {{ $value }}C"
SMART Health Monitoring Setup
# Install smartmontools for SMART monitoring
sudo apt install -y smartmontools

# Enable SMART on all NVMe drives
sudo smartctl -s on /dev/nvme0n1
sudo smartctl -s on /dev/nvme1n1
sudo smartctl -s on /dev/nvme2n1

# Run initial SMART health check
sudo smartctl -H /dev/nvme0n1
sudo smartctl -H /dev/nvme1n1
sudo smartctl -H /dev/nvme2n1

# Check NVMe-specific wear indicators
# Percentage Used: how much of the drive's rated write endurance has been consumed
sudo smartctl -A /dev/nvme0n1 | grep -E "Percentage Used|Data Units Written|Power On Hours"

# Configure smartd for continuous monitoring
# /etc/smartd.conf
cat <<'EOF' | sudo tee /etc/smartd.conf
# Monitor all NVMe drives
# -a: all SMART attributes
# -o on: enable automatic offline testing
# -S on: enable automatic attribute saving
# -n standby: skip check if drive is in standby
# -W 5,50,60: track temperature, warn at 50C, fail at 60C
# -m ops@nordicbridge.net: email on alerts
/dev/nvme0n1 -a -o on -S on -W 5,50,60 -m ops@nordicbridge.net
/dev/nvme1n1 -a -o on -S on -W 5,50,60 -m ops@nordicbridge.net
/dev/nvme2n1 -a -o on -S on -W 5,50,60 -m ops@nordicbridge.net
EOF

# Restart smartd to apply configuration
sudo systemctl restart smartd
sudo systemctl enable smartd
Encryption at Rest
NordicBridge encrypts all blockchain data partitions using LUKS2 (Linux Unified Key Setup). Encryption at rest is mandatory under Nordic financial data protection regulations and provides protection against physical drive theft from data center environments.
# Encrypt the ledger logical volume with LUKS2
# Note: this must be done BEFORE creating the filesystem
# For existing deployments, data must be migrated to a new encrypted volume

# Create LUKS2 encrypted volume
sudo cryptsetup luksFormat --type luks2 --cipher aes-xts-plain64 \
  --key-size 512 --hash sha512 --iter-time 5000 /dev/vg_blockchain/lv_ledger

# Open the encrypted volume (creates /dev/mapper/ledger-crypt)
sudo cryptsetup luksOpen /dev/vg_blockchain/lv_ledger ledger-crypt

# Create XFS filesystem on the encrypted volume
sudo mkfs.xfs -L ledger /dev/mapper/ledger-crypt

# Mount the encrypted volume
sudo mount /dev/mapper/ledger-crypt /var/lib/fabric/ledger

# For automated unlock at boot, use a keyfile stored on a separate encrypted USB
# or integrate with a key management system (HashiCorp Vault, AWS KMS)
sudo dd if=/dev/urandom of=/root/.luks-keyfile bs=4096 count=1
sudo chmod 400 /root/.luks-keyfile
sudo cryptsetup luksAddKey /dev/vg_blockchain/lv_ledger /root/.luks-keyfile

# Add to /etc/crypttab for automatic unlock at boot
echo "ledger-crypt /dev/vg_blockchain/lv_ledger /root/.luks-keyfile luks" \
  | sudo tee -a /etc/crypttab

# Update /etc/fstab to mount the encrypted device
# Replace the previous lv_ledger entry with:
# /dev/mapper/ledger-crypt /var/lib/fabric/ledger xfs defaults,noatime,nosuid,nodev 0 2
Production Deployment Checklist
Before NordicBridge promotes any node to production, the disk layout must pass the following verification checks.
- LVM configured: all blockchain storage uses logical volumes with at least 15% unallocated reserve in the volume group for online expansion
- XFS filesystems created: all data partitions formatted as XFS with noatime mount option and appropriate nosuid/nodev/noexec flags
- I/O scheduler set: NVMe drives using ‘none’ scheduler, SATA SSDs using ‘mq-deadline’, persistent via udev rules
- Read-ahead tuned: ledger partitions at 2048 sectors, state DB at 256 sectors, persistent via systemd service
- RAID arrays healthy: md0 (RAID 1) and md1 (RAID 10) reporting clean state with no degraded members
- LUKS encryption active: all blockchain data partitions encrypted at rest with LUKS2, AES-XTS-256
- SMART monitoring enabled: smartd configured for all drives with temperature thresholds and email alerts
- Prometheus alerts configured: disk space (80%/90%), I/O latency (5ms/20ms), temperature, and SMART health rules loaded
- Growth projection documented: 24-month capacity forecast reviewed with expansion timeline identified
- Defragmentation scheduled: weekly XFS defragmentation timer enabled for ledger and state DB partitions
- Backup replication verified: daily snapshot replication from RAID 10 production to RAID 6 archive confirmed operational
- Expansion procedure tested: LVM extend and XFS growfs validated on staging environment with zero-downtime confirmation
NordicBridge’s disk layout strategy reflects a fundamental principle of blockchain infrastructure: storage decisions made at deployment time persist for the lifetime of the network. Unlike application servers that can be redeployed from scratch, blockchain nodes carry irreplaceable ledger history. The LVM abstraction layer provides the flexibility to grow without rebuilding. XFS delivers the write performance that block appending demands. RAID 10 protects against drive failures without sacrificing throughput. The monitoring pipeline catches capacity and health issues before they impact consensus. Together, these components create a storage foundation that supports years of continuous blockchain operation without emergency intervention.