
This guide walks you through deploying a complete Hyperledger Fabric blockchain network on Ubuntu 24.04 LTS, starting from a bare operating system. By the end of this series, you will have a multi-organization permissioned blockchain running across multiple nodes with proper TLS, channel configuration, and deployed chaincode. This first part focuses exclusively on preparing the operating system and installing Docker CE, the container runtime that Hyperledger Fabric depends on for every one of its components.
FjordTrade is the scenario company used throughout this series. FjordTrade is a Nordic commodity trading platform that facilitates cross-border trade settlement across three offices: Oslo (Org1), Helsinki (Org2), and Tallinn (Org3, added in Part 7). Each office operates its own organization node within a permissioned Hyperledger Fabric network. The Oslo office serves as the initial orderer host, Helsinki runs the primary peer for its organization, and Tallinn joins the consortium later to demonstrate dynamic organization onboarding. FjordTrade processes grain, timber, and mineral futures contracts that require tamper-proof settlement records shared among all three offices in near real-time.
Free to use, share it in your presentations, blogs, or learning materials.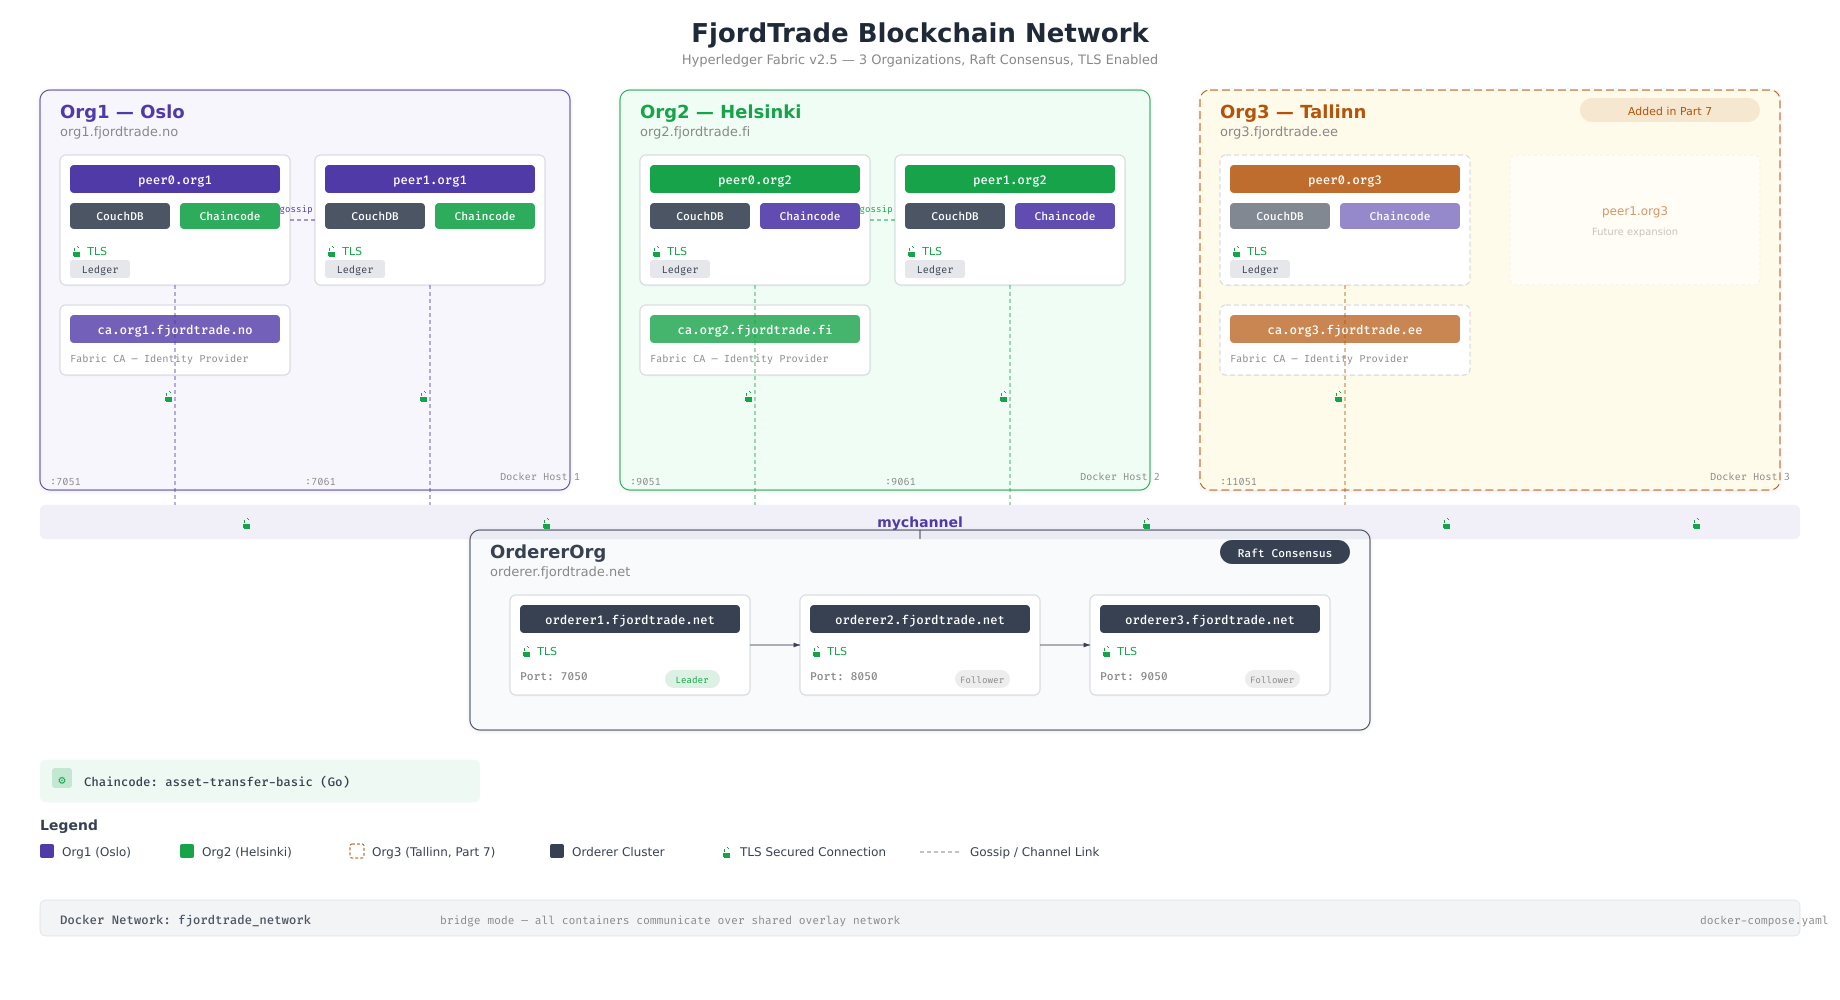
The topology above shows the final state of the FjordTrade network that this series will build. Oslo hosts the initial orderer cluster and the Org1 peer. Helsinki runs the Org2 peer with its own CouchDB state database. Tallinn is added as Org3 in Part 7, demonstrating how new organizations join an existing consortium. All inter-office communication travels over mutual TLS, and each organization maintains its own certificate authority.
Series Roadmap
Before starting, here is the complete roadmap for this series. Each part builds directly on the previous one, so completing them in order is essential.
Part 1 (this article): System preparation and Docker CE installation on Ubuntu 24.04 LTS. You will update the OS, install essential packages, configure firewall rules, install Docker CE, and verify the container runtime.
Part 2: Installing Go, Node.js, and Hyperledger Fabric binaries and tools. You will set up the programming language runtimes that Fabric depends on and download the official Fabric binaries.
Part 3: Generating cryptographic material and channel artifacts. You will create the MSP directory structure, generate TLS certificates, and produce the genesis block and channel transaction files.
Part 4: Launching the orderer and peer nodes using Docker Compose. You will write the compose files, start the containers, and verify that orderers form a Raft cluster and peers join the network.
Part 5: Creating and joining channels. You will create the application channel, join peers from both organizations, update anchor peers, and verify block synchronization.
Part 6: Writing, deploying, and invoking chaincode. You will write a Go chaincode for commodity trade settlement, package it, install it on peers, approve it for both organizations, commit the definition, and invoke transactions.
Part 7: Adding Org3 (Tallinn) dynamically to the running network. You will generate new crypto material, update the channel configuration, start Org3 containers, and verify that the expanded network processes transactions across all three organizations.
Free to use, share it in your presentations, blogs, or learning materials.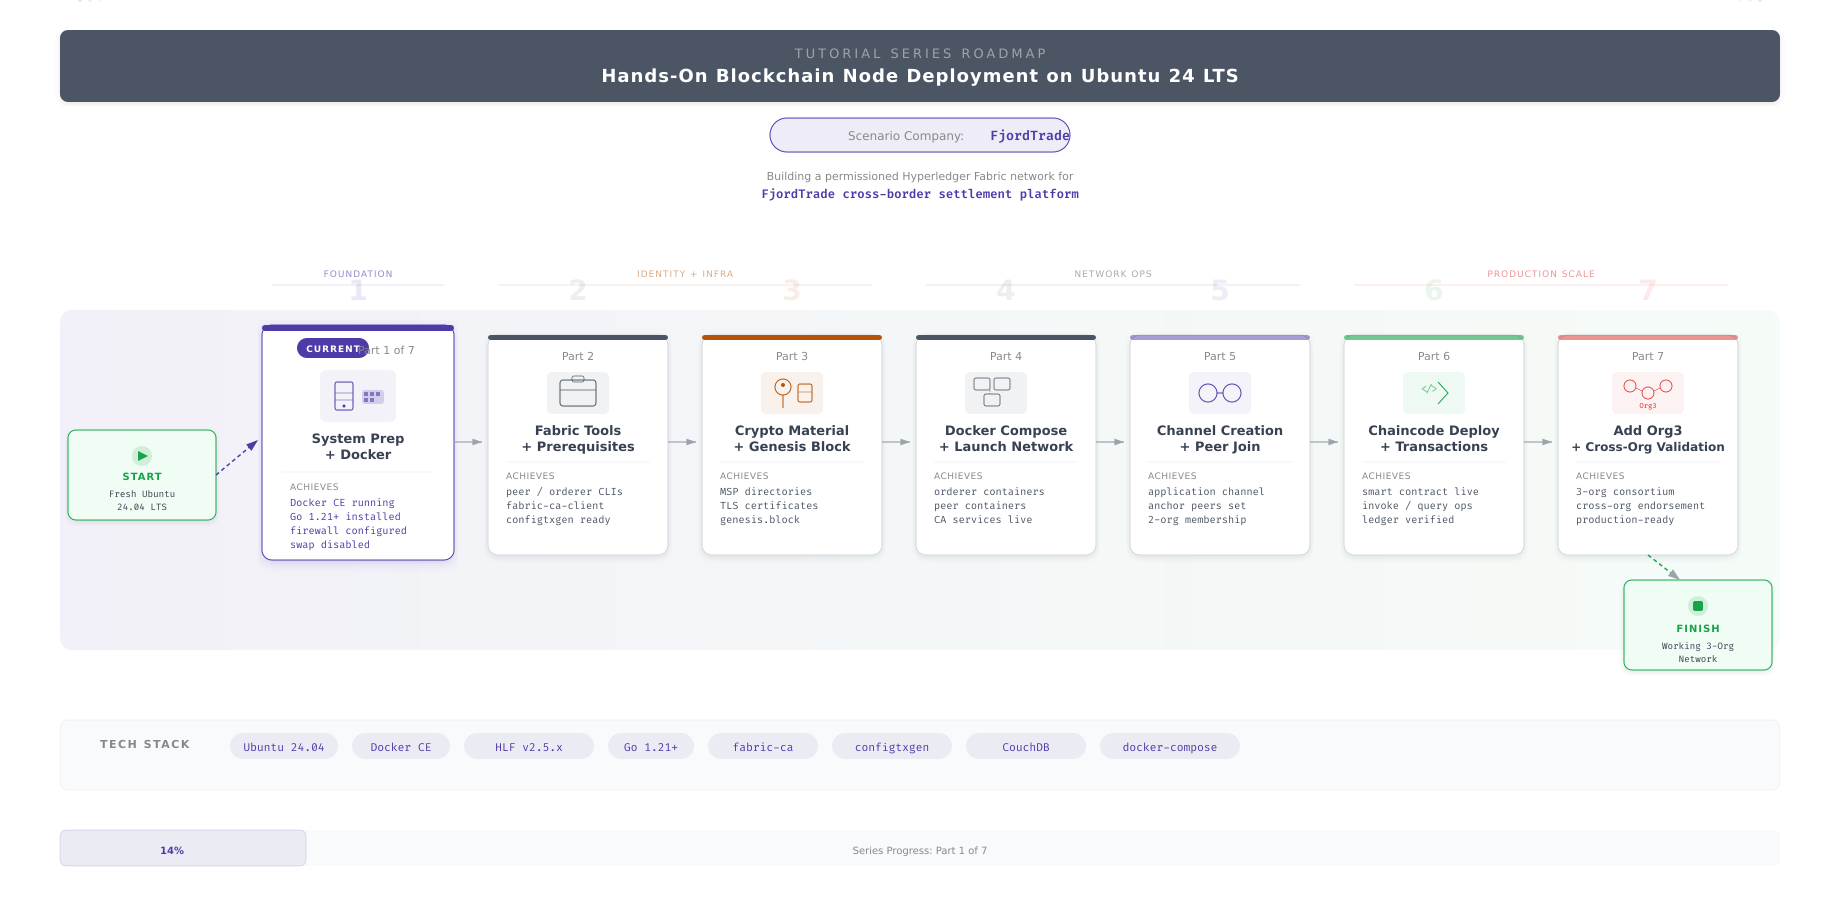
The roadmap above visualizes the progression from a bare operating system to a fully operational multi-organization blockchain network. Each part produces tangible, verifiable output that feeds directly into the next. Part 1 delivers a Docker-ready Ubuntu system. Part 2 adds the language runtimes and Fabric tools. Parts 3 through 7 build the actual network infrastructure layer by layer.
Prerequisites
Before proceeding, confirm that your environment meets the following requirements. Every step in this guide assumes these conditions are satisfied.
Operating system: A fresh installation of Ubuntu 24.04 LTS (Noble Numbat), either server or desktop edition. A minimal server installation is preferred because it avoids unnecessary packages that consume resources.
Access level: Root access or a user account with sudo privileges. Every administrative command in this guide uses sudo rather than running as root directly.
Network connectivity: The system must have unrestricted outbound internet access to download packages from Ubuntu repositories, Docker’s official repository, and GitHub. If you are behind a corporate proxy, configure the proxy settings before starting.
Hardware minimums: At least 4 GB of RAM, 2 CPU cores, and 20 GB of available disk space. For production deployments, FjordTrade allocates 8 GB RAM and 50 GB disk per node, but the minimum specifications are sufficient for completing this tutorial series.
System Update and Essential Packages
Every fresh Ubuntu installation ships with package lists that are outdated by the time you boot it. Running a full update before installing anything else ensures that all security patches are applied and that dependency resolution works against the latest available versions. Skipping this step is the most common cause of cryptic installation failures later in the process.
Free to use, share it in your presentations, blogs, or learning materials.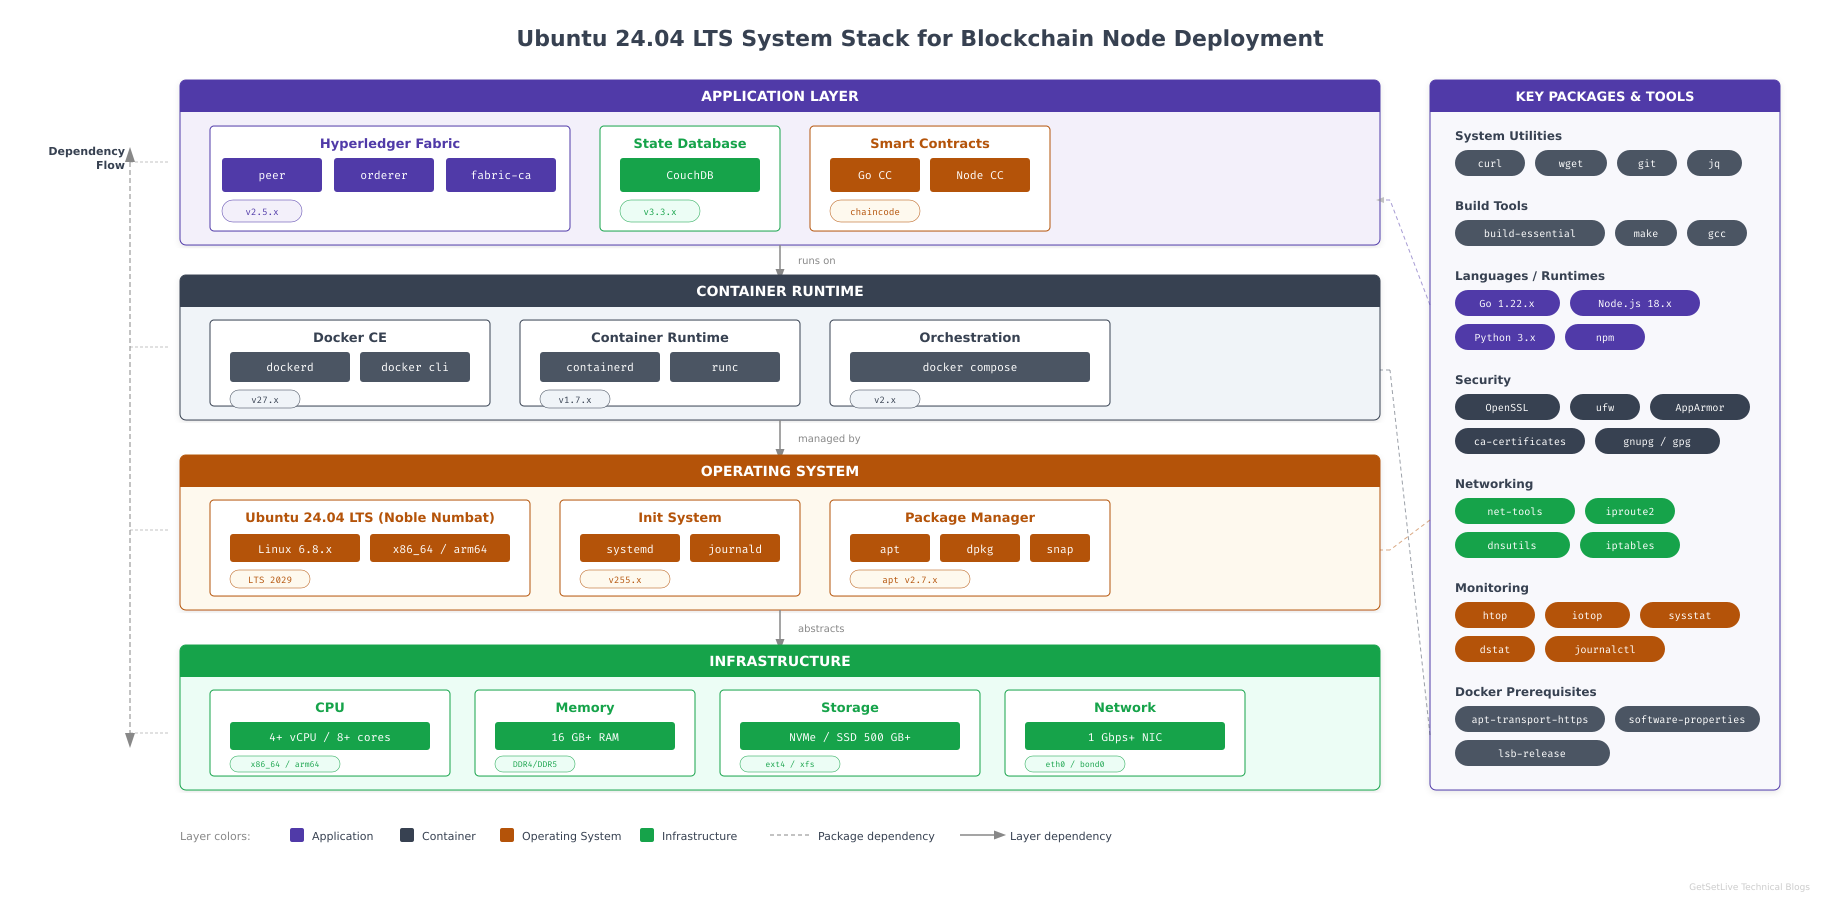
This diagram highlights the layered architecture of the Ubuntu system that FjordTrade provisions for each blockchain node. The kernel provides cgroups and namespaces that Docker leverages for container isolation. Systemd manages service lifecycles for Docker, containerd, and later the Fabric components. APT handles all package installation and dependency resolution. Understanding these layers helps when troubleshooting issues that surface during Docker installation or container runtime failures.
Updating the Package Index and Upgrading Installed Packages
Start by refreshing the package index from all configured repositories and then upgrading every installed package to its latest available version. The -y flag accepts all prompts automatically.
$ sudo apt update && sudo apt upgrade -yHit:1 http://archive.ubuntu.com/ubuntu noble InRelease
Hit:2 http://archive.ubuntu.com/ubuntu noble-updates InRelease
Hit:3 http://archive.ubuntu.com/ubuntu noble-backports InRelease
Hit:4 http://security.ubuntu.com/ubuntu noble-security InRelease
Reading package lists… Done
Building dependency tree… Done
Reading state information… Done
All packages are up to date.
Calculating upgrade… Done
0 upgraded, 0 newly installed, 0 to remove and 0 not upgraded.If your system has not been updated recently, you will see a longer list of packages being upgraded. The process may take several minutes depending on your internet speed. A system reboot is required if the kernel was upgraded; the output will indicate this with a message about /var/run/reboot-required.
Installing Essential Development and Utility Packages
Hyperledger Fabric’s build tools, Docker’s repository configuration, and later steps in this series require several packages that are not included in a minimal Ubuntu installation. Install all of them in a single command to minimize APT invocations.
$ sudo apt install -y apt-transport-https ca-certificates curl gnupg lsb-release software-properties-common build-essential git wget jq tree unzipReading package lists… Done
Building dependency tree… Done
Reading state information… Done
The following additional packages will be installed:
binutils binutils-common binutils-x86-64-linux-gnu cpp cpp-13 dpkg-dev
fakeroot g++ g++-13 gcc gcc-13 gcc-13-base libalgorithm-diff-perl
libalgorithm-diff-xs-perl libalgorithm-merge-perl libasan8 libatomic1
libbinutils libcc1-0 libctf-nobfd0 libctf0 libdpkg-perl libfakeroot
libgcc-13-dev libgomp1 libitm1 liblsan0 libquadmath0 libstdc++-13-dev
libtsan2 libubsan1 make patch
Setting up git (1:2.43.0-1ubuntu7) …
Setting up jq (1.7.1-3build1) …
Setting up tree (2.1.1-2ubuntu3) …
Setting up curl (8.5.0-2ubuntu10) …
Processing triggers for man-db (2.12.0-4build2) …Here is what each package group provides. apt-transport-https and ca-certificates enable secure HTTPS connections to external repositories, which Docker’s repository requires. curl and wget download files from the internet, used for fetching GPG keys and Fabric binaries in later parts. gnupg handles GPG key management for verifying package signatures. lsb-release and software-properties-common provide commands for adding third-party repositories. build-essential installs the GCC compiler toolchain, required by some Go chaincode dependencies and native Node.js modules. git manages source code checkouts for chaincode and configuration repositories. jq is a JSON processor used extensively when working with Fabric’s channel configuration. tree visualizes directory structures, which is invaluable for verifying crypto material directories. unzip extracts compressed archives.
Verifying Installed Tools
Confirm that the critical tools are accessible and report their versions correctly. If any of these commands fail, the corresponding package did not install properly.
$ git –version
$ curl –version | head -1
$ jq –versiongit version 2.43.0
curl 8.5.0 (x86_64-pc-linux-gnu) libcurl/8.5.0 OpenSSL/3.0.13 zlib/1.3 brotli/1.1.0 zstd/1.5.5 libidn2/2.3.7 libpsl/0.21.2 (+libidn2/2.3.7) libssh/0.10.6/openssl/zlib nghttp2/1.59.0 librtmp/2.3 OpenLDAP/2.6.7
jq-1.7.1The exact version numbers may vary slightly depending on when Ubuntu 24.04 was released and which updates have been applied. The important thing is that each command returns a valid version string rather than a “command not found” error.
Configuring System Parameters
Blockchain nodes that participate in a multi-host network must be identifiable by hostname, resolvable by other nodes, and synchronized to a common time source. Configuring these parameters now prevents subtle issues during Fabric network setup, where TLS certificate validation and Raft leader election both depend on consistent hostnames and accurate system clocks.
Setting the System Hostname
Set a descriptive hostname that identifies both the organization and the node’s role in the FjordTrade network. This hostname appears in logs, shell prompts, and TLS certificate subject fields.
$ sudo hostnamectl set-hostname fjordtrade-node1Verify that the hostname was applied correctly by querying the systemd host configuration.
$ hostnamectlStatic hostname: fjordtrade-node1
Icon name: computer-vm
Chassis: vm
Machine ID: a1b2c3d4e5f6a1b2c3d4e5f6a1b2c3d4
Boot ID: 1a2b3c4d5e6f1a2b3c4d5e6f1a2b3c4d
Virtualization: kvm
Operating System: Ubuntu 24.04.1 LTS
Kernel: Linux 6.8.0-31-generic
Architecture: x86-64
Hardware Vendor: QEMU
Hardware Model: Standard PC (Q35 + ICH9, 2009)The Static hostname line should show fjordtrade-node1. If you are setting up the Helsinki node, use fjordtrade-node2 instead. The Tallinn node uses fjordtrade-node3.
Configuring the Hosts File
The /etc/hosts file provides local name resolution that works even when DNS is unavailable. Adding all three FjordTrade nodes here ensures that the Fabric network configuration can reference hostnames rather than IP addresses, making the setup portable and readable.
$ sudo vim /etc/hostsReplace the contents of the file with the following configuration. Adjust the IP addresses to match your actual network environment.
127.0.0.1   localhost
127.0.1.1   fjordtrade-node1

# FjordTrade Blockchain Network Nodes
# These entries will be used for multi-host deployment
192.168.1.10  fjordtrade-node1  # Oslo – Org1
192.168.1.20  fjordtrade-node2  # Helsinki – Org2
192.168.1.30  fjordtrade-node3  # Tallinn – Org3
Press Esc, type :wq, press Enter to save and exit.
Verify the hosts file by pinging the hostname. The response should resolve to the configured IP address.
$ ping -c 2 fjordtrade-node1PING fjordtrade-node1 (192.168.1.10) 56(84) bytes of data.
64 bytes from fjordtrade-node1 (192.168.1.10): icmp_seq=1 ttl=64 time=0.031 ms
64 bytes from fjordtrade-node1 (192.168.1.10): icmp_seq=2 ttl=64 time=0.028 ms
— fjordtrade-node1 ping statistics —
2 packets transmitted, 2 received, 0% packet loss, time 1001ms
rtt min/avg/max/mdev = 0.028/0.029/0.031/0.001 msSetting the System Timezone
All FjordTrade nodes must use the same timezone to ensure consistent log timestamps and to prevent issues with TLS certificate validity windows. UTC is the standard choice for distributed systems because it eliminates daylight saving time ambiguity across the three Nordic countries involved.
$ sudo timedatectl set-timezone UTC$ timedatectlLocal time: Sun 2026-03-01 14:23:45 UTC
Universal time: Sun 2026-03-01 14:23:45 UTC
RTC time: Sun 2026-03-01 14:23:45
Time zone: UTC (UTC, +0000)
System clock synchronized: yes
NTP service: active
RTC in local TZ: noConfirm that the Time zone line shows UTC and that System clock synchronized is yes. If NTP synchronization is not active, Ubuntu 24.04 uses systemd-timesyncd by default; check its status with systemctl status systemd-timesyncd.
Configuring Firewall Rules
A blockchain node exposes multiple network services: the peer gossip protocol, the orderer consensus port, the CA enrollment endpoint, the CouchDB HTTP interface, and the Docker daemon’s management port. Each of these must be explicitly allowed through the firewall while everything else remains blocked. Ubuntu ships with UFW (Uncomplicated Firewall) as a frontend to iptables, and enabling it with the correct rules is a non-negotiable step before exposing the node to any network.
Enabling UFW and Allowing SSH
Always allow SSH before enabling the firewall. If you enable UFW without an SSH rule on a remote server, you will lock yourself out immediately and permanently until someone with physical or console access intervenes.
$ sudo ufw allow OpenSSH
$ sudo ufw enableRules updated
Rules updated (v6)
Command may disrupt existing ssh connections. Proceed with operation (y|n)? y
Firewall is active and enabled on system startupWhen prompted with “Command may disrupt existing ssh connections,” type y and press Enter. Your existing SSH session will continue because the OpenSSH rule was added before enabling the firewall.
Opening Ports for Docker and Hyperledger Fabric
Add firewall rules for every port that the FjordTrade blockchain network requires. Each rule includes a descriptive comment so that future administrators can understand why the port is open without consulting external documentation.
$ sudo ufw allow 2376/tcp comment ‘Docker daemon TLS’
$ sudo ufw allow 7050/tcp comment ‘Fabric Orderer’
$ sudo ufw allow 7051/tcp comment ‘Fabric Peer’
$ sudo ufw allow 7054/tcp comment ‘Fabric CA’
$ sudo ufw allow 5984/tcp comment ‘CouchDB’
$ sudo ufw allow 9443/tcp comment ‘Orderer Operations’Rule added
Rule added (v6)
Rule added
Rule added (v6)
Rule added
Rule added (v6)
Rule added
Rule added (v6)
Rule added
Rule added (v6)
Rule added
Rule added (v6)Here is the purpose of each port. Port 2376 is the Docker daemon’s TLS-secured management interface, used when Docker is configured for remote access. Port 7050 is the Hyperledger Fabric orderer’s gRPC endpoint where peers submit transactions for ordering. Port 7051 is the peer’s gRPC endpoint for endorsement requests and gossip communication. Port 7054 is the Fabric Certificate Authority’s enrollment and re-enrollment endpoint. Port 5984 is CouchDB’s HTTP interface, used as the state database backend for rich queries. Port 9443 is the orderer’s operations endpoint for health checks and metrics collection.
Verifying Firewall Status
Review the complete firewall ruleset to confirm that all required ports are open and no unintended rules exist.
$ sudo ufw status verboseStatus: active
Logging: on (low)
Default: deny (incoming), allow (outgoing), disabled (routed)
New profiles: skip
To Action From
— —— —-
22/tcp (OpenSSH) ALLOW IN Anywhere
2376/tcp ALLOW IN Anywhere # Docker daemon TLS
7050/tcp ALLOW IN Anywhere # Fabric Orderer
7051/tcp ALLOW IN Anywhere # Fabric Peer
7054/tcp ALLOW IN Anywhere # Fabric CA
5984/tcp ALLOW IN Anywhere # CouchDB
9443/tcp ALLOW IN Anywhere # Orderer Operations
22/tcp (OpenSSH (v6)) ALLOW IN Anywhere (v6)
2376/tcp (v6) ALLOW IN Anywhere (v6) # Docker daemon TLS
7050/tcp (v6) ALLOW IN Anywhere (v6) # Fabric Orderer
7051/tcp (v6) ALLOW IN Anywhere (v6) # Fabric Peer
7054/tcp (v6) ALLOW IN Anywhere (v6) # Fabric CA
5984/tcp (v6) ALLOW IN Anywhere (v6) # CouchDB
9443/tcp (v6) ALLOW IN Anywhere (v6) # Orderer OperationsThe default policy is deny (incoming), allow (outgoing). This means the node can reach the internet for package downloads and peer communication, but no unsolicited inbound connections are accepted on ports other than those explicitly listed. The IPv6 rules mirror the IPv4 rules, ensuring consistent behavior regardless of the network protocol used by connecting nodes.
Installing Docker CE
Hyperledger Fabric runs every major component inside Docker containers: peers, orderers, certificate authorities, CouchDB instances, and chaincode execution environments. Docker CE (Community Edition) is the required container runtime. Ubuntu’s default docker.io package from the universe repository is typically several versions behind Docker’s official release, and Fabric is sensitive to Docker version compatibility. Always install from Docker’s official APT repository to get the latest stable release.
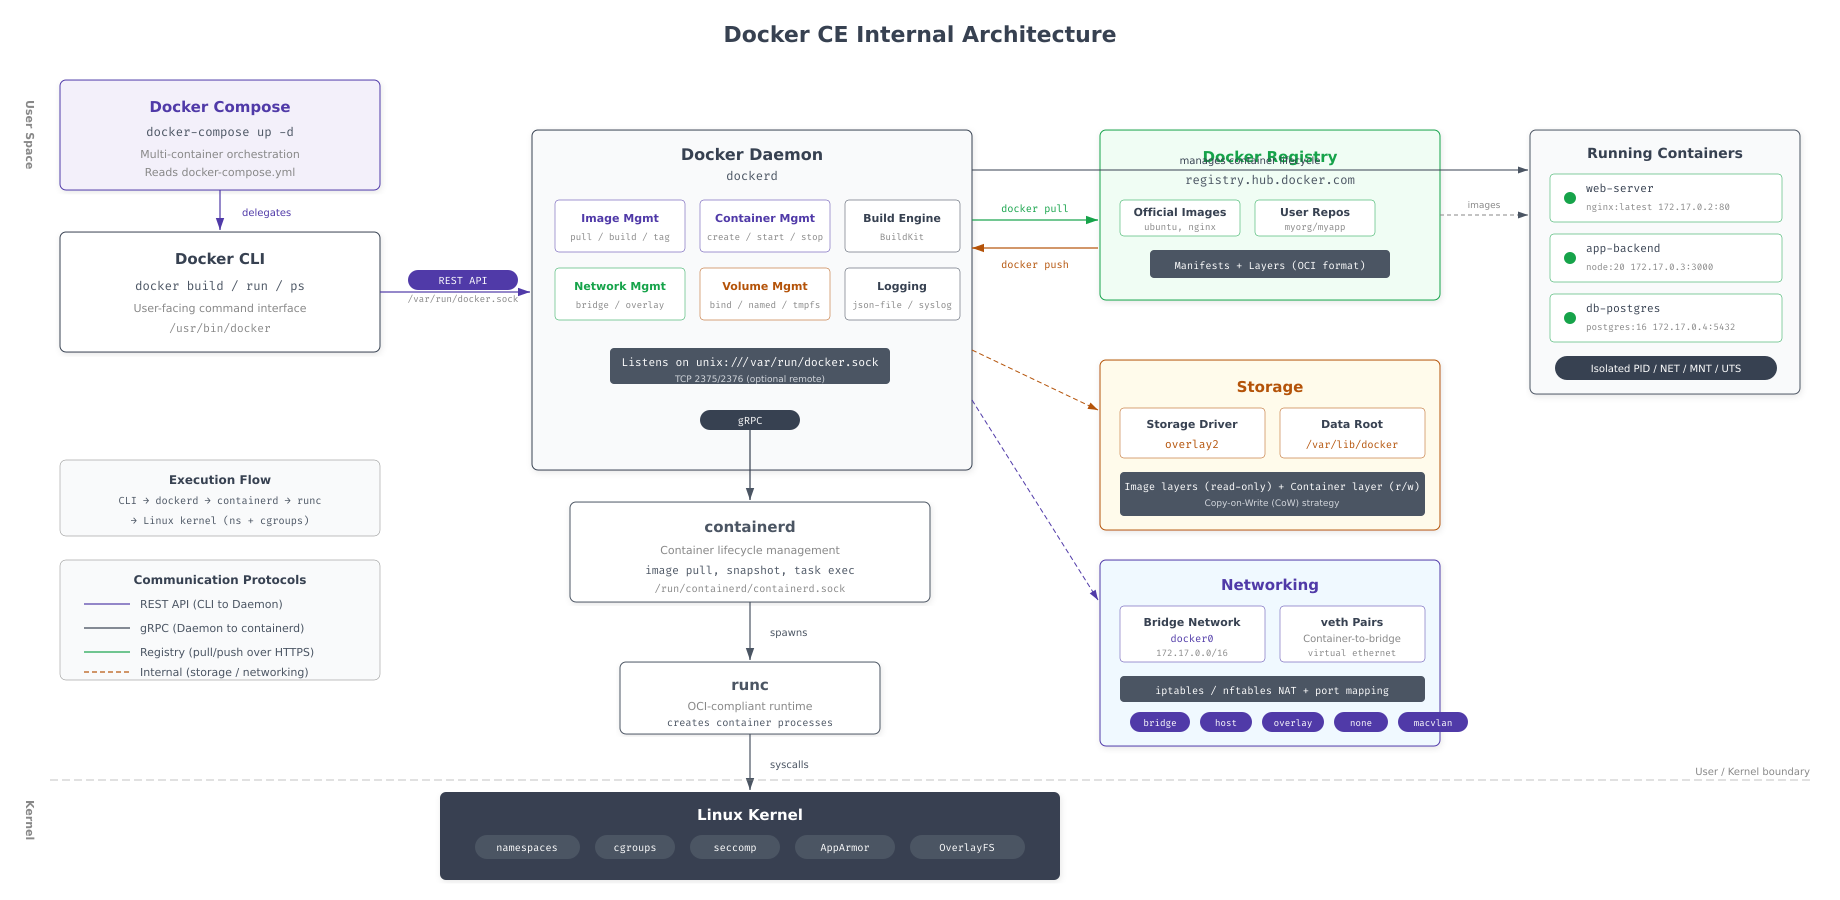
As shown above, the Docker architecture consists of three main layers. The Docker CLI sends commands to the Docker daemon over a Unix socket or TCP connection. The daemon translates these commands into container operations managed by containerd, which is the high-level container runtime. Containerd delegates actual container creation and execution to runc, which interfaces directly with the Linux kernel’s cgroup and namespace facilities. Understanding this stack helps when debugging container startup failures or resource isolation issues in the Fabric network.
Free to use, share it in your presentations, blogs, or learning materials.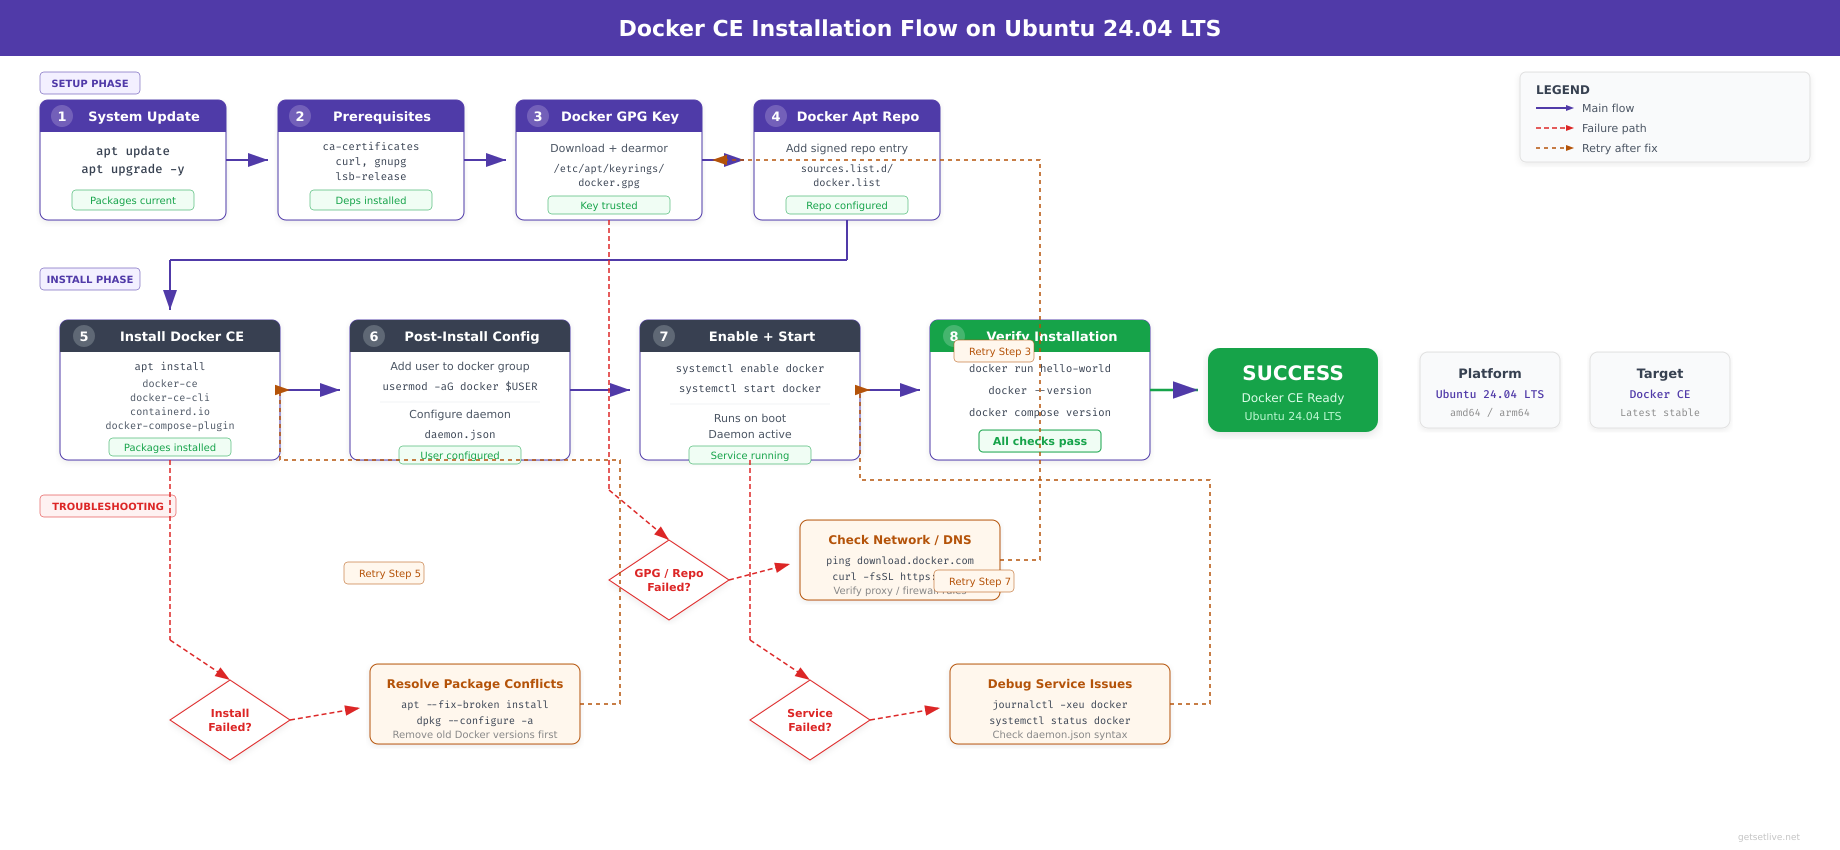
The installation flow above maps the exact sequence of operations covered in this section. Each step must complete successfully before proceeding to the next. Skipping the cleanup step can cause package conflicts. Skipping the GPG key step causes APT to reject the Docker repository as untrusted.
Removing Legacy Docker Packages
If any previous Docker installation exists on the system, whether from Ubuntu’s repository or a prior manual install, remove it completely. Leftover packages can conflict with the official Docker CE packages and cause unpredictable behavior.
$ sudo apt remove -y docker docker-engine docker.io containerd runc 2>/dev/nullReading package lists… Done
Building dependency tree… Done
Reading state information… Done
Package ‘docker’ is not installed, so not removed
Package ‘docker-engine’ is not installed, so not removed
Package ‘docker.io’ is not installed, so not removed
Package ‘containerd’ is not installed, so not removed
Package ‘runc’ is not installed, so not removed
0 upgraded, 0 newly installed, 0 to remove and 0 not upgraded.On a fresh Ubuntu installation, all packages will report “not installed.” The 2>/dev/null suppresses error messages about packages that do not exist in the repository index. This step is a safety measure; it is harmless on a clean system and essential on a system that has been used previously.
Adding Docker’s Official GPG Key
APT requires a GPG key to verify that packages downloaded from Docker’s repository have not been tampered with. The key is stored in /etc/apt/keyrings/, which is the standard location for third-party repository keys on modern Ubuntu systems.
$ sudo install -m 0755 -d /etc/apt/keyrings
$ sudo curl -fsSL https://download.docker.com/linux/ubuntu/gpg -o /etc/apt/keyrings/docker.asc
$ sudo chmod a+r /etc/apt/keyrings/docker.asc$The install -m 0755 -d command creates the directory with the correct permissions in a single operation. The curl -fsSL flags mean: fail silently on HTTP errors (-f), suppress progress meter (-s), show errors (-S), and follow redirects (-L). The chmod a+r ensures that APT can read the key file regardless of which user runs the package manager.
Verify that the key file was downloaded correctly by checking its size and type.
$ ls -la /etc/apt/keyrings/docker.asc
$ file /etc/apt/keyrings/docker.asc-rw-r–r– 1 root root 2942 Mar 1 14:30 /etc/apt/keyrings/docker.asc
/etc/apt/keyrings/docker.asc: PGP public key block Public-Key (old)Adding the Docker APT Repository
Configure APT to use Docker’s official repository for Ubuntu 24.04. The command dynamically detects your system’s architecture and release codename, so it works correctly on both amd64 and arm64 systems.
$ echo “deb [arch=$(dpkg –print-architecture) signed-by=/etc/apt/keyrings/docker.asc] https://download.docker.com/linux/ubuntu $(. /etc/os-release && echo “$VERSION_CODENAME”) stable” | sudo tee /etc/apt/sources.list.d/docker.list > /dev/nullVerify the repository file was created with the correct content.
$ cat /etc/apt/sources.list.d/docker.listdeb [arch=amd64 signed-by=/etc/apt/keyrings/docker.asc] https://download.docker.com/linux/ubuntu noble stableThe architecture will show amd64 on standard x86_64 systems or arm64 on ARM-based systems. The codename noble corresponds to Ubuntu 24.04 LTS. If you see a different codename, verify that you are running Ubuntu 24.04 with lsb_release -cs.
Installing Docker CE Packages
Update the package index to include Docker’s repository, then install the complete Docker CE stack. This includes the daemon, the CLI client, containerd, the BuildKit plugin for image building, and the Compose plugin for multi-container orchestration.
$ sudo apt update
$ sudo apt install -y docker-ce docker-ce-cli containerd.io docker-buildx-plugin docker-compose-pluginHit:1 http://archive.ubuntu.com/ubuntu noble InRelease
Hit:2 http://archive.ubuntu.com/ubuntu noble-updates InRelease
Hit:3 http://archive.ubuntu.com/ubuntu noble-backports InRelease
Hit:4 http://security.ubuntu.com/ubuntu noble-security InRelease
Get:5 https://download.docker.com/linux/ubuntu noble InRelease [48.8 kB]
Get:6 https://download.docker.com/linux/ubuntu noble/stable amd64 Packages [12.3 kB]
Fetched 61.1 kB in 1s (85.2 kB/s)
Reading package lists… Done
Reading package lists… Done
Building dependency tree… Done
Reading state information… Done
The following additional packages will be installed:
docker-ce-rootless-extras libslirp0 pigz slirp4netns
The following NEW packages will be installed:
containerd.io docker-buildx-plugin docker-ce docker-ce-cli
docker-ce-rootless-extras docker-compose-plugin libslirp0 pigz slirp4netns
0 upgraded, 9 newly installed, 0 to remove and 0 not upgraded.
Need to get 121 MB of archives.
After this operation, 441 MB of additional disk space will be used.
Get:1 https://download.docker.com/linux/ubuntu noble/stable amd64 containerd.io amd64 1.7.24-1 [30.5 MB]
…
Setting up docker-ce (5:27.5.1-1~ubuntu.24.04~noble) …
Setting up docker-compose-plugin (2.32.4-1~ubuntu.24.04~noble) …
Setting up docker-buildx-plugin (0.21.1-1~ubuntu.24.04~noble) …
Processing triggers for man-db (2.12.0-4build2) …The installation pulls five Docker packages plus their dependencies. docker-ce is the daemon itself. docker-ce-cli provides the docker command-line tool. containerd.io is the container runtime that Docker delegates to. docker-buildx-plugin enables advanced image building with BuildKit. docker-compose-plugin provides the docker compose command (note: this is the v2 plugin, not the legacy standalone docker-compose binary), which FjordTrade will use extensively to orchestrate the multi-container Fabric network in Part 4.
Post-Installation Configuration
Docker is now installed but requires several configuration steps before it is production-ready. The default settings are designed for development convenience, not for running a blockchain network that processes financial settlement transactions. This section configures user permissions, logging limits, network address pools, and container resource limits.
Free to use, share it in your presentations, blogs, or learning materials.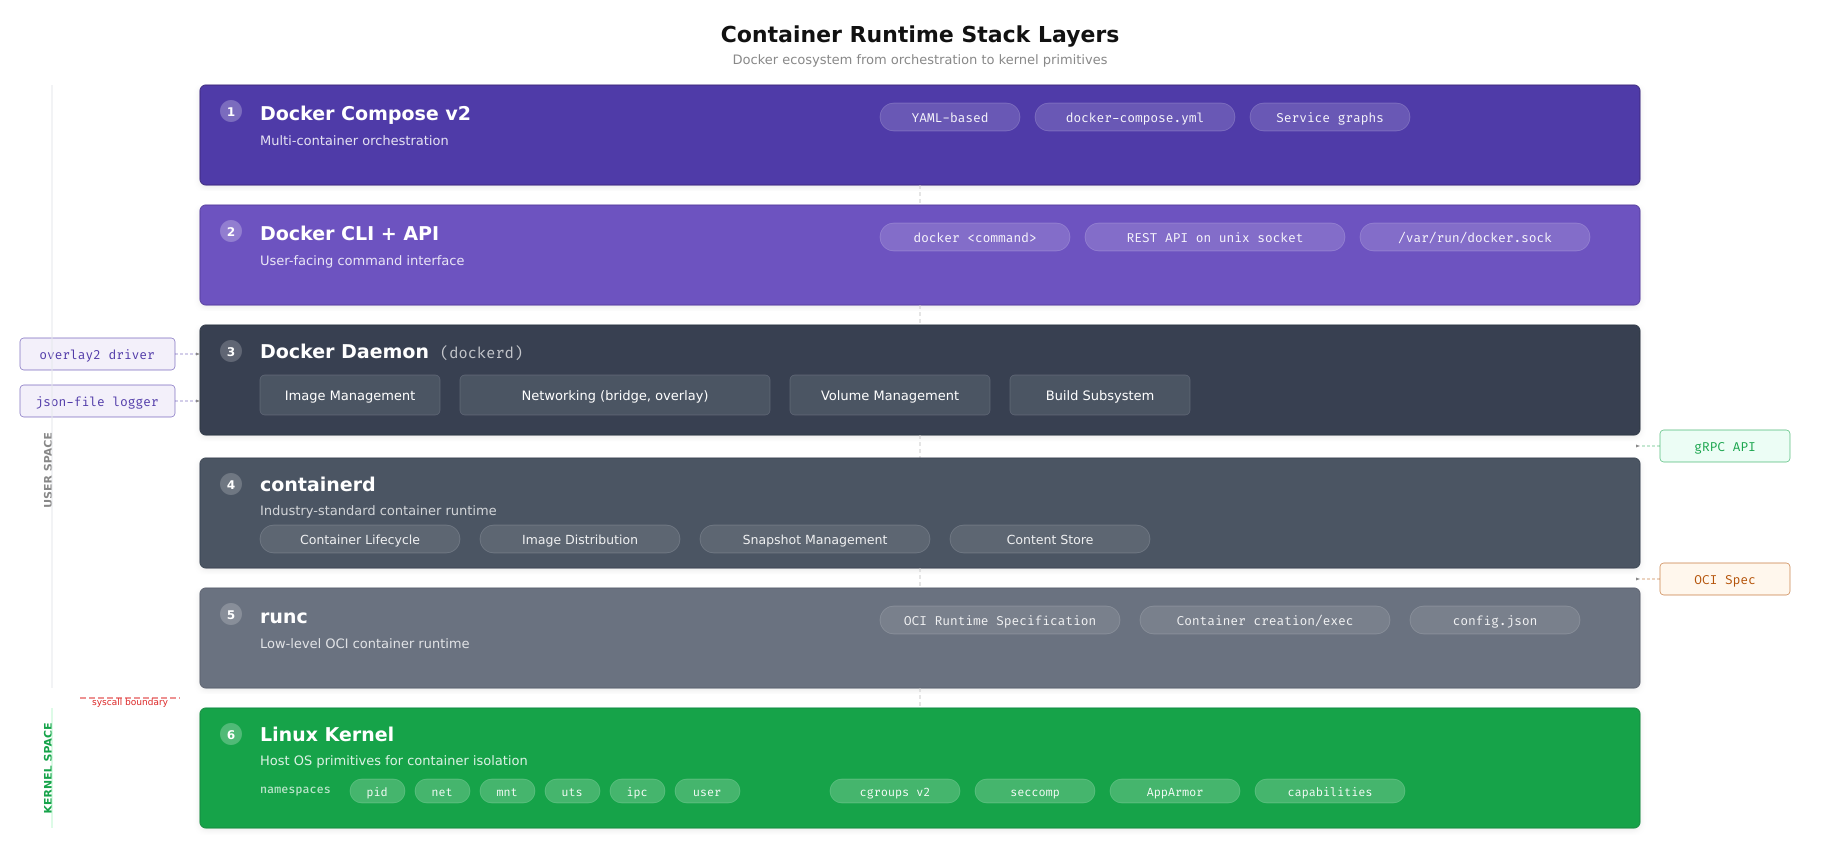
The layer diagram above illustrates the runtime stack that executes every Fabric container on FjordTrade’s nodes. When a peer container starts, the Docker daemon instructs containerd to pull the image layers and assemble the overlay2 filesystem. Containerd then calls runc to create the container process inside isolated Linux namespaces (PID, network, mount, UTS) with resource limits enforced by cgroups. Understanding these layers becomes critical when debugging container startup failures or investigating performance issues in the Fabric network.
Adding Your User to the Docker Group
By default, the Docker daemon socket is owned by root and the docker group. Running every Docker command with sudo is both inconvenient and a security anti-pattern because it grants full root privileges rather than scoped Docker access. Adding your user to the docker group allows non-root Docker operations.
$ sudo usermod -aG docker $USER
$ newgrp docker
The usermod -aG command appends (-a) the docker group (-G) to your user’s supplementary groups. The newgrp docker command activates the new group membership in the current shell session without requiring a full logout and login. If you skip newgrp, you will need to close your terminal session and open a new one for the group change to take effect.
Verify that your user is now a member of the docker group.
$ groups $USERfjordtrade : fjordtrade adm cdrom sudo dip plugdev users lxd dockerThe output should include docker in the list of groups. The exact list of groups varies depending on your Ubuntu installation type and user configuration.
Configuring the Docker Daemon
The Docker daemon’s behavior is controlled by /etc/docker/daemon.json. This file does not exist by default; you must create it. The configuration below sets production-appropriate values for storage, logging, networking, and process limits that FjordTrade requires for running Fabric containers reliably.
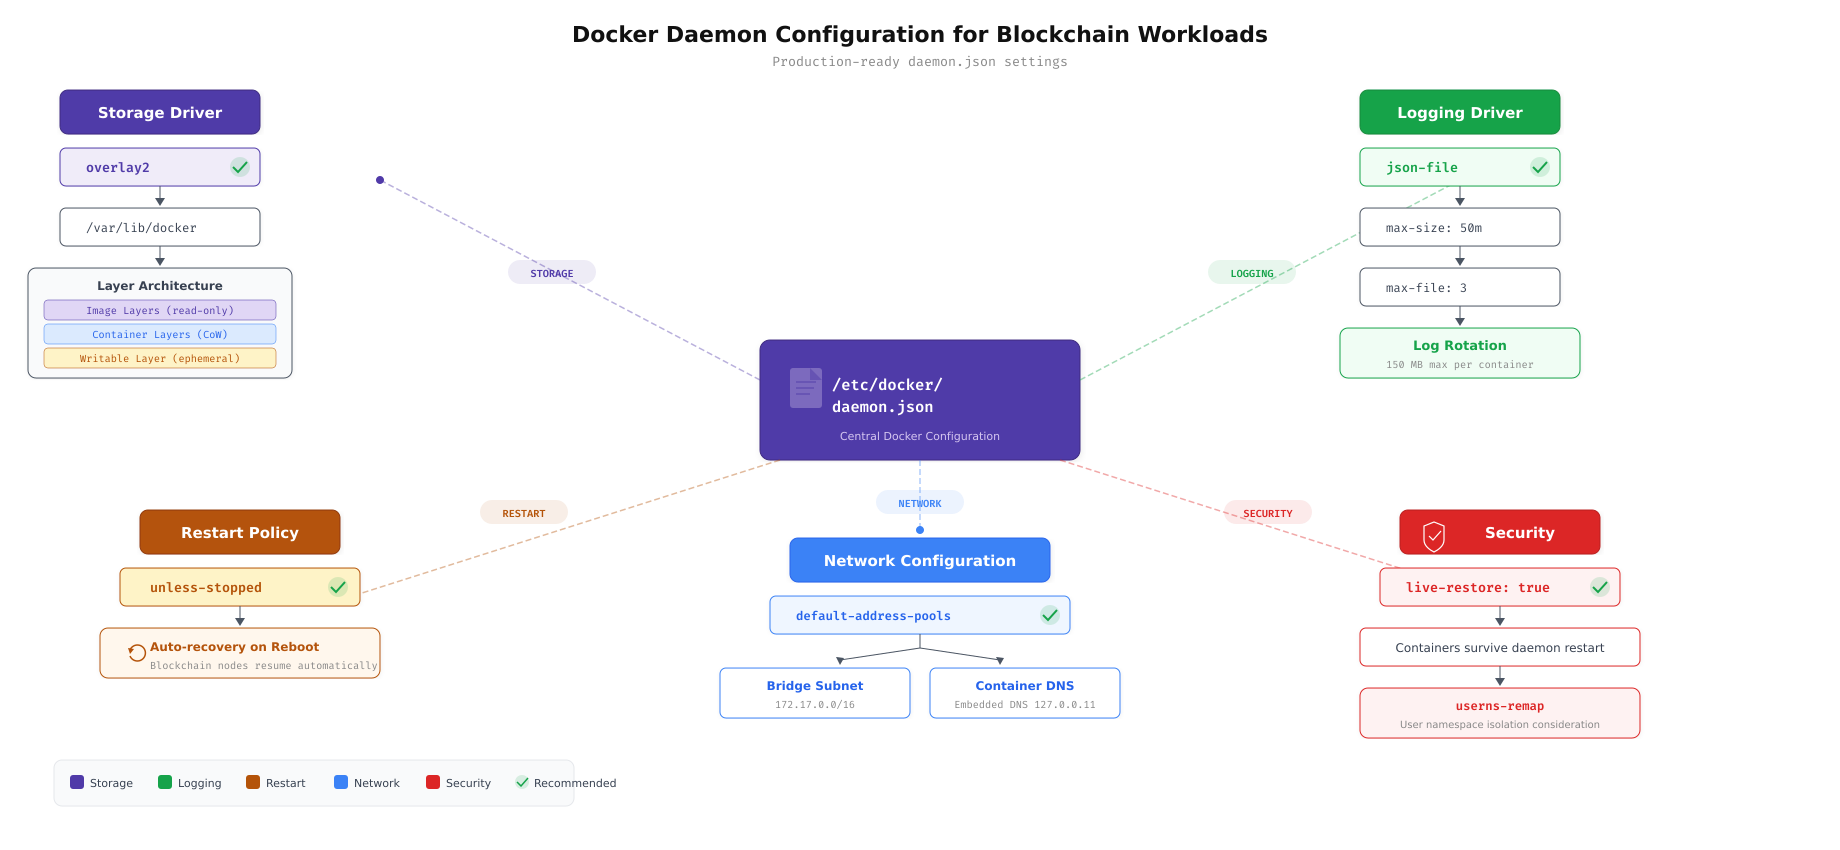
The configuration map above connects each daemon.json setting to the problem it solves. The storage driver determines how container layers are managed on disk. Log rotation prevents container logs from consuming all available disk space. Custom address pools avoid subnet conflicts with FjordTrade’s existing office networks. Live restore keeps containers running during daemon upgrades. Ulimits ensure that Fabric processes can open enough file descriptors for peer-to-peer communication.
$ sudo vim /etc/docker/daemon.jsonEnter the following complete configuration.
{
  “storage-driver”: “overlay2”,
  “log-driver”: “json-file”,
  “log-opts”: {
    “max-size”: “50m”,
    “max-file”: “3”
  },
  “default-address-pools”: [
    {
      “base”: “172.80.0.0/16”,
      “size”: 24
    }
  ],
  “live-restore”: true,
  “default-ulimits”: {
    “nofile”: {
      “Name”: “nofile”,
      “Hard”: 65536,
      “Soft”: 65536
    }
  }
}
Press Esc, type :wq, press Enter to save and exit.
Here is what each setting does. "storage-driver": "overlay2" selects the overlay2 filesystem driver, which is the fastest and most stable option for Ubuntu with ext4 or xfs filesystems. "log-driver": "json-file" with "max-size": "50m" and "max-file": "3" enables log rotation so that each container’s log is capped at 150 MB total (3 files of 50 MB each). Without this setting, a busy Fabric peer can generate gigabytes of logs and fill the disk. "default-address-pools" assigns the 172.80.0.0/16 range for Docker bridge networks, avoiding collisions with FjordTrade’s existing 172.16.0.0/16 and 172.17.0.0/16 office subnets. "live-restore": true allows running containers to survive a Docker daemon restart, which is essential during daemon upgrades on production nodes. "default-ulimits" sets the file descriptor limit to 65536 for all containers, which Fabric peers and orderers require for maintaining simultaneous gRPC connections to multiple nodes.
Restarting Docker and Enabling Auto-Start
Apply the new daemon configuration by reloading systemd’s unit files and restarting the Docker service. Then enable both Docker and containerd to start automatically on system boot, ensuring that a server reboot does not leave the blockchain network offline.
$ sudo systemctl daemon-reload
$ sudo systemctl restart docker$ sudo systemctl enable docker
$ sudo systemctl enable containerdSynchronizing state of docker.service with SysV service script with /usr/lib/systemd/systemd-sysv-install.
Executing: /usr/lib/systemd/systemd-sysv-install enable docker
Synchronizing state of containerd.service with SysV service script with /usr/lib/systemd/systemd-sysv-install.
Executing: /usr/lib/systemd/systemd-sysv-install enable containerdIf the restart command returns without any output, it completed successfully. An error at this stage usually means the daemon.json file contains invalid JSON. Validate the file with jq . /etc/docker/daemon.json if you encounter a startup failure.
Verifying Docker Installation
Verification is not optional. A Docker installation that appears to work during basic testing can fail under the specific conditions that Fabric containers create, such as multi-network attachments, named volumes, and inter-container DNS resolution. Run every verification step below to confirm that all Docker subsystems are functioning correctly.
Running the Hello World Container
The hello-world image is Docker’s official smoke test. It validates the entire chain: image pull from Docker Hub, container creation, execution, and output capture.
$ docker run hello-worldUnable to find image ‘hello-world:latest’ locally
latest: Pulling from library/hello-world
c1ec31eb5944: Pull complete
Digest: sha256:d211f485f2dd1dee407a80973c8f129f00d54604d2c90732e8e320e5038a0348
Status: Downloaded newer image for hello-world:latest
Hello from Docker!
This message shows that your installation appears to be working correctly.
To generate this message, Docker took the following steps:
1. The Docker client contacted the Docker daemon.
2. The Docker daemon pulled the “hello-world” image from the Docker Hub.
3. The Docker daemon created a new container from that image which runs the
executable that produces the output you are currently reading.
4. The Docker daemon streamed that output to the Docker client, which sent it
to your terminal.
To try something more ambitious, you can run an Ubuntu container with:
$ docker run -it ubuntu bash
Share images, automate workflows, and more with a free Docker ID:
https://hub.docker.com/
For more examples and ideas, visit:
https://docs.docker.com/get-started/If you see the “Hello from Docker!” message, the Docker daemon is running, network connectivity to Docker Hub is working, image pulling succeeds, and container execution completes successfully. If you get a “permission denied” error, the docker group membership has not taken effect; run newgrp docker or log out and back in.
Checking Docker Version Details
Verify the exact versions of both the Docker client and the Docker server (daemon). Hyperledger Fabric 2.5 requires Docker 20.10 or later; any version from the official repository will satisfy this requirement.
$ docker versionClient: Docker Engine – Community
Version: 27.5.1
API version: 1.47
Go version: go1.22.10
Git commit: 9f9e405
Built: Wed Jan 22 13:41:42 2026
OS/Arch: linux/amd64
Context: default
Server: Docker Engine – Community
Engine:
Version: 27.5.1
API version: 1.47 (minimum version 1.24)
Go version: go1.22.10
Git commit: 2e13e38
Built: Wed Jan 22 13:41:42 2026
OS/Arch: linux/amd64
Experimental: false
containerd:
Version: 1.7.24
GitCommit: 88bf19b2105c8b17560993bee28a01c3f5352e12
runc:
Version: 1.2.4
GitCommit: v1.2.4-0-g6c52178
docker-init:
Version: 0.19.0
GitCommit: de40ad0Both the Client and Server sections should display version information. If the Server section shows an error or is missing, the Docker daemon is not running. Check its status with sudo systemctl status docker.
Checking Docker Compose Version
Docker Compose is used in Part 4 to orchestrate the multi-container Fabric network. Verify that the plugin is installed and accessible.
$ docker compose versionDocker Compose version v2.32.4Note the command syntax: docker compose (two words, no hyphen). This is the v2 Compose plugin that integrates directly into the Docker CLI. The older standalone docker-compose (with hyphen) is deprecated and should not be used for new projects.
Inspecting Docker System Information
The docker info command reveals the daemon’s active configuration, including the storage driver, logging driver, cgroup version, and security options. Verify that the settings from daemon.json have been applied.
$ docker infoClient: Docker Engine – Community
Version: 27.5.1
Context: default
Debug Mode: false
Plugins:
buildx: Docker Buildx (Docker Inc.)
Version: v0.21.1
compose: Docker Compose (Docker Inc.)
Version: v2.32.4
Server:
Containers: 1
Running: 0
Paused: 0
Stopped: 1
Images: 1
Server Version: 27.5.1
Storage Driver: overlay2
Backing Filesystem: extfs
Supports d_type: true
Using metacopy: false
Native Overlay Diff: true
userxattr: false
Logging Driver: json-file
Cgroup Driver: systemd
Cgroup Version: 2
Plugins:
Volume: local
Network: bridge host ipvlan macvlan null overlay
Log: awslogs fluentd gcplogs gelf journald json-file local splunk syslog
Swarm: inactive
Runtimes: io.containerd.runc.v2 runc
Default Runtime: runc
Init Binary: docker-init
containerd version: 88bf19b2105c8b17560993bee28a01c3f5352e12
runc version: v1.2.4-0-g6c52178
Security Options:
apparmor
seccomp
Profile: builtin
cgroupns
Kernel Version: 6.8.0-31-generic
Operating System: Ubuntu 24.04.1 LTS
OSType: linux
Architecture: x86_64
CPUs: 2
Total Memory: 3.843GiB
Docker Root Dir: /var/lib/docker
Live Restore Enabled: trueVerify these critical lines in the output. Storage Driver: overlay2 confirms the daemon.json setting was applied. Logging Driver: json-file confirms log rotation is active. Cgroup Version: 2 indicates that Ubuntu 24.04 uses cgroups v2, which provides better resource isolation than v1. Live Restore Enabled: true confirms that containers will survive daemon restarts. The Containers: 1 and Stopped: 1 counts reflect the hello-world container that was run in the previous step.
Checking Docker Service Status
Confirm that the Docker daemon is running as a systemd service and is enabled for automatic startup on boot.
$ sudo systemctl status docker –no-pager● docker.service – Docker Application Container Engine
Loaded: loaded (/usr/lib/systemd/system/docker.service; enabled; preset: enabled)
Active: active (running) since Sun 2026-03-01 14:45:12 UTC; 5min ago
TriggeredBy: ● docker.socket
Docs: https://docs.docker.com
Main PID: 4521 (dockerd)
Tasks: 10
Memory: 92.4M (peak: 104.2M)
CPU: 1.234s
CGroup: /system.slice/docker.service
└─4521 /usr/bin/dockerd -H fd:// –containerd=/run/containerd/containerd.sock
Mar 01 14:45:11 fjordtrade-node1 dockerd[4521]: time=”2026-03-01T14:45:11.234Z” level=info msg=”Starting up”
Mar 01 14:45:11 fjordtrade-node1 dockerd[4521]: time=”2026-03-01T14:45:11.567Z” level=info msg=”Loading containers: start.”
Mar 01 14:45:12 fjordtrade-node1 dockerd[4521]: time=”2026-03-01T14:45:12.012Z” level=info msg=”Loading containers: done.”
Mar 01 14:45:12 fjordtrade-node1 dockerd[4521]: time=”2026-03-01T14:45:12.089Z” level=info msg=”Docker daemon” commit=2e13e38 …
Mar 01 14:45:12 fjordtrade-node1 dockerd[4521]: time=”2026-03-01T14:45:12.090Z” level=info msg=”Daemon has completed initialization”
Mar 01 14:45:12 fjordtrade-node1 systemd[1]: Started docker.service – Docker Application Container Engine.Look for Active: active (running) and enabled in the Loaded line. The enabled status means Docker will start automatically after a system reboot. If the status shows failed or inactive, check the journal for detailed error messages with journalctl -u docker --no-pager -n 50.
Creating the FjordTrade Project Directory
With Docker operational, create the directory structure that will hold all FjordTrade blockchain network configuration files, Docker Compose definitions, chaincode source, cryptographic material, and deployment scripts. Establishing this structure now prevents ad-hoc file placement later and ensures that every part of the series stores artifacts in a predictable location.
Creating the Directory Tree
Create the complete directory hierarchy in a single command. The -p flag creates parent directories as needed without errors if they already exist.
$ mkdir -p ~/fjordtrade-network/{config,docker,chaincode,scripts,crypto-config,channel-artifacts}Verify the structure with the tree command.
$ tree ~/fjordtrade-network/home/fjordtrade/fjordtrade-network
├── chaincode
├── channel-artifacts
├── config
├── crypto-config
├── docker
└── scripts
6 directories, 0 filesHere is the purpose of each directory. config/ holds Fabric configuration files such as configtx.yaml, core.yaml, and orderer.yaml (created in Parts 3 and 4). docker/ stores Docker Compose files for launching peers, orderers, CAs, and CouchDB containers (Part 4). chaincode/ contains the Go source code for smart contracts (Part 6). scripts/ holds shell scripts for channel creation, chaincode deployment, and network management (Parts 5 through 7). crypto-config/ is the output directory for cryptographic material generated by cryptogen or the Fabric CA (Part 3). channel-artifacts/ stores the genesis block, channel creation transaction, and anchor peer update files (Part 3).
Cleaning Up the Test Container
The hello-world container created during verification is no longer needed. Remove it along with its image to start with a clean Docker environment before Part 2.
$ docker rm $(docker ps -aq)
$ docker rmi hello-worlda1b2c3d4e5f6
Untagged: hello-world:latest
Untagged: hello-world@sha256:d211f485f2dd1dee407a80973c8f129f00d54604d2c90732e8e320e5038a0348
Deleted: sha256:d2c94e258dcb3c5ac2798d32e1249e42ef01cba4841c2234249495f87264ac5a
Deleted: sha256:c1ec31eb59444d78df06a974d155e597c894ab4ceee2c01af35186ff0b3c1a2dVerify that no containers or images remain.
$ docker ps -a
$ docker imagesCONTAINER ID IMAGE COMMAND CREATED STATUS PORTS NAMES
REPOSITORY TAG IMAGE ID CREATED SIZEBoth commands return only header rows with no entries, confirming that the Docker environment is clean and ready for the Fabric images that will be pulled in Part 2.
Troubleshooting Common Issues
Even on a fresh Ubuntu installation, several issues can surface during Docker setup. This section covers the most common problems and their solutions so you can resolve them without searching external resources.
Permission Denied When Running Docker Commands
Symptom: Running docker ps or docker run returns “Got permission denied while trying to connect to the Docker daemon socket.”
Cause: The current shell session does not reflect the docker group membership added by usermod -aG docker $USER. Group changes only take effect in new sessions.
Fix: Either run newgrp docker in the current terminal, or log out completely and log back in. On an SSH session, simply disconnect and reconnect.
$ newgrp docker
$ docker ps
Cannot Connect to the Docker Daemon
Symptom: Running any Docker command returns “Cannot connect to the Docker daemon at unix:///var/run/docker.sock. Is the docker daemon running?”
Cause: The Docker daemon is not running. This happens if the daemon failed to start due to a configuration error, or if the service was never started after installation.
Fix: Check the daemon status and start it manually. If it fails to start, examine the journal for the specific error.
$ sudo systemctl status docker –no-pager
$ sudo systemctl start docker
$ sudo journalctl -u docker –no-pager -n 20
If the journal shows a JSON parsing error, your /etc/docker/daemon.json file has a syntax error. Validate it with the following command.
$ jq . /etc/docker/daemon.jsonThe jq tool will print the parsed JSON if it is valid, or display a specific error message pointing to the line and character position of the syntax error.
Package docker-ce Has No Installation Candidate
Symptom: Running sudo apt install docker-ce returns “Package docker-ce has no installation candidate” or “Unable to locate package docker-ce.”
Cause: The Docker APT repository was not added correctly, or the GPG key was not downloaded to the right location. APT cannot see Docker’s packages without a properly configured repository source.
Fix: Verify the repository file exists and contains the correct content, then update the package index.
$ cat /etc/apt/sources.list.d/docker.list
$ ls -la /etc/apt/keyrings/docker.asc
$ sudo apt update
If the repository file is missing or empty, re-run the GPG key download and repository addition commands from the “Adding Docker’s Official GPG Key” and “Adding the Docker APT Repository” sections above.
Port Already in Use
Symptom: Docker fails to bind a container to a port with an “address already in use” error. This issue becomes more relevant in later parts when launching Fabric containers, but it can also affect the Docker daemon itself if another service occupies a required port.
Cause: Another process is already listening on the target port.
Fix: Identify the process using the port and either stop it or reconfigure the conflicting service.
$ sudo ss -tlnp | grep :7051LISTEN 0 4096 0.0.0.0:7051 0.0.0.0:* users:((“some-process”,pid=12345,fd=6))The output shows the process name, PID, and file descriptor using the port. Stop the conflicting process with sudo kill 12345 (replace with the actual PID) or sudo systemctl stop service-name if it is a managed service. Then retry starting the Docker container.
Summary
This part established the foundation that every subsequent step in the FjordTrade blockchain deployment depends on. Here is what was accomplished.
System preparation: Updated all Ubuntu 24.04 LTS packages to their latest versions and installed 12 essential development and utility packages required by Docker, Fabric, and the build toolchain.
Host configuration: Set the system hostname to fjordtrade-node1, configured the /etc/hosts file with entries for all three FjordTrade network nodes (Oslo, Helsinki, Tallinn), and set the timezone to UTC for consistent timestamps across the distributed network.
Firewall setup: Enabled UFW with a default-deny incoming policy. Opened SSH for management access and six application-specific ports required by Docker, Fabric orderers, peers, certificate authorities, CouchDB, and the operations monitoring endpoint.
Docker CE installation: Removed any legacy Docker packages, added Docker’s official GPG key and APT repository, and installed the complete Docker CE stack including the daemon, CLI, containerd, BuildKit, and Compose plugin.
Post-installation configuration: Added the current user to the docker group for non-root container management. Created /etc/docker/daemon.json with production settings for overlay2 storage, log rotation (50 MB per file, 3 files max), custom network address pools (172.80.0.0/16), live restore for daemon upgrades, and 65536 file descriptor ulimits for Fabric containers.
Verification: Confirmed Docker functionality through a hello-world container run, version checks for Docker and Compose, system info inspection verifying all daemon.json settings, and service status confirmation showing the daemon is active and enabled for boot.
Project structure: Created the ~/fjordtrade-network directory hierarchy with six subdirectories (config, docker, chaincode, scripts, crypto-config, channel-artifacts) that will hold all artifacts produced in Parts 2 through 7.
What Comes Next
In Part 2: Installing Go, Node.js, and Hyperledger Fabric Binaries, you will install the Go programming language (required for Fabric’s core tools and chaincode development), Node.js (used by Fabric SDK applications), and the complete Hyperledger Fabric binary suite including peer, orderer, configtxgen, configtxlator, cryptogen, and fabric-ca-client. By the end of Part 2, your system will have every tool needed to generate cryptographic material and launch the FjordTrade network.