
How Nodes Join: Identity vs Anonymity
The most fundamental difference between permissioned and permissionless blockchains is how a node proves its right to participate. In a permissioned network like Hyperledger Fabric, every node must enroll with a Certificate Authority, receive X.509 certificates, and be explicitly added to a channel configuration by consortium governance. In a permissionless network like Ethereum, any machine with the right software can generate a key pair and start syncing the chain. No registration, no approval, no identity verification. These two approaches create cascading differences in every layer of your deployment stack.
Free to use, share it in your presentations, blogs, or learning materials.
The diagram above illustrates the contrast clearly. Permissioned networks require a Certificate Authority infrastructure, MSP configuration, governance-approved channel joins, fine-grained ACL policies, and the ability to revoke access through certificate revocation lists. Permissionless networks skip all of this: generate a key pair locally, derive an address from the public key hash, connect to any bootnode, and start participating. The trade-off is that permissioned networks can enforce compliance and revoke bad actors instantly, while permissionless networks provide censorship resistance and open participation.
Setting Up a Permissioned Node (Fabric)
MedChain’s first deployment target was a Hyperledger Fabric 2.5 network connecting three organizations: MedChain Switzerland (manufacturer), LogiPharma Netherlands (distributor), and SGH Singapore (hospital network). Each organization operates its own Certificate Authority, peer nodes, and CouchDB state databases. The Raft ordering service spans all three organizations. Here is the complete setup process for enrolling a new organization’s node into the existing consortium.
# ============================================================
# PERMISSIONED NODE SETUP: Hyperledger Fabric 2.5
# Organization: MedChain Switzerland (Org1)
# ============================================================

# Step 1: Provision the server with hardened Linux
# MedChain uses Ubuntu 22.04 LTS with CIS Level 2 hardening
sudo apt update && sudo apt install -y docker.io docker-compose-v2 jq tree

# Create the blockchain operator user (never run nodes as root)
sudo useradd -m -s /bin/bash -G docker bcops
sudo passwd bcops

# Step 2: Set up the Fabric CA for this organization
sudo -u bcops mkdir -p /opt/medchain/{ca,peer,orderer,crypto,chaincode,scripts}
cd /opt/medchain

# Pull Fabric images
docker pull hyperledger/fabric-ca:1.5.7
docker pull hyperledger/fabric-peer:2.5
docker pull hyperledger/fabric-orderer:2.5
docker pull couchdb:3.3

# Start the organization's CA server
cat > ca/docker-compose.yml << 'COMPOSE'
version: "3.8"
services:
  ca.medchain.ch:
    image: hyperledger/fabric-ca:1.5.7
    environment:
      - FABRIC_CA_HOME=/etc/hyperledger/fabric-ca-server
      - FABRIC_CA_SERVER_CA_NAME=ca-medchain-ch
      - FABRIC_CA_SERVER_TLS_ENABLED=true
      - FABRIC_CA_SERVER_PORT=7054
      - FABRIC_CA_SERVER_CSR_CN=ca.medchain.ch
      - FABRIC_CA_SERVER_CSR_HOSTS=ca.medchain.ch,localhost
    ports:
      - "7054:7054"
    command: sh -c 'fabric-ca-server start -b admin:adminpw -d'
    volumes:
      - ./ca-data:/etc/hyperledger/fabric-ca-server
    networks:
      - medchain-net

networks:
  medchain-net:
    driver: bridge
COMPOSE

cd ca && docker compose up -d && cd ..

# Wait for CA to initialize
sleep 5

# Step 3: Enroll the CA admin
export FABRIC_CA_CLIENT_HOME=/opt/medchain/crypto/ca-admin
fabric-ca-client enroll -u https://admin:adminpw@ca.medchain.ch:7054 --tls.certfiles /opt/medchain/ca/ca-data/tls-cert.pem

# Step 4: Register the peer node identity with the CA
fabric-ca-client register \
  --id.name peer0.medchain.ch \
  --id.secret peer0pw \
  --id.type peer \
  --id.attrs '"hf.Registrar.Roles=peer"' \
  --tls.certfiles /opt/medchain/ca/ca-data/tls-cert.pem

# Step 5: Register the admin user for this organization
fabric-ca-client register \
  --id.name admin.medchain.ch \
  --id.secret adminpw \
  --id.type admin \
  --id.attrs '"hf.Registrar.Roles=client,orderer,peer,user","hf.Registrar.DelegateRoles=client,orderer,peer,user","hf.Revoker=true","hf.GenCRL=true"' \
  --tls.certfiles /opt/medchain/ca/ca-data/tls-cert.pem

# Step 6: Enroll the peer node (generates signing cert + TLS cert)
export FABRIC_CA_CLIENT_HOME=/opt/medchain/crypto/peer0
fabric-ca-client enroll \
  -u https://peer0.medchain.ch:peer0pw@ca.medchain.ch:7054 \
  --csr.hosts peer0.medchain.ch,localhost \
  --tls.certfiles /opt/medchain/ca/ca-data/tls-cert.pem

# Enroll TLS certificate separately
fabric-ca-client enroll \
  -u https://peer0.medchain.ch:peer0pw@ca.medchain.ch:7054 \
  --enrollment.profile tls \
  --csr.hosts peer0.medchain.ch,localhost \
  -M /opt/medchain/crypto/peer0/tls \
  --tls.certfiles /opt/medchain/ca/ca-data/tls-cert.pem

# Step 7: Build the MSP directory structure
mkdir -p /opt/medchain/crypto/peer0/msp/{admincerts,cacerts,tlscacerts}
cp /opt/medchain/crypto/ca-admin/msp/cacerts/*.pem /opt/medchain/crypto/peer0/msp/cacerts/
cp /opt/medchain/crypto/peer0/tls/tlscacerts/*.pem /opt/medchain/crypto/peer0/msp/tlscacerts/

# Verify the MSP structure
tree /opt/medchain/crypto/peer0/msp/
# msp/
# ├── admincerts/
# │   └── admin-cert.pem
# ├── cacerts/
# │   └── ca-medchain-ch-7054.pem
# ├── keystore/
# │   └── priv_sk
# ├── signcerts/
# │   └── cert.pem
# └── tlscacerts/
#     └── tls-ca-medchain-ch-7054.pem
Setting Up a Permissionless Node (Ethereum PoS)
For comparison, MedChain also evaluated running an Ethereum mainnet validator to understand the permissionless deployment model. The contrast is stark: there is no Certificate Authority, no enrollment process, no governance approval. You generate a key pair, deposit 32 ETH to the beacon chain deposit contract, and your node starts participating in consensus after the activation queue processes your deposit. The technical setup focuses on syncing the execution layer (Geth) and consensus layer (Prysm or Lighthouse) clients.
# ============================================================
# PERMISSIONLESS NODE SETUP: Ethereum PoS Validator
# No registration, no CA, no governance approval needed
# ============================================================

# Step 1: Provision the server (lower requirements than permissioned)
sudo apt update && sudo apt install -y curl jq

# Create non-root user for the validator
sudo useradd -m -s /bin/bash -G docker ethvalidator
sudo passwd ethvalidator

# Step 2: Install Geth (Execution Layer)
sudo add-apt-repository -y ppa:ethereum/ethereum
sudo apt install -y geth

# Step 3: Install Prysm (Consensus Layer)
sudo -u ethvalidator mkdir -p /opt/ethereum/{execution,consensus,validator,keys}
cd /opt/ethereum/consensus
curl -sSL https://raw.githubusercontent.com/prysmaticlabs/prysm/master/prysm.sh -o prysm.sh
chmod +x prysm.sh

# Step 4: Generate a JWT secret for EL <-> CL communication
openssl rand -hex 32 > /opt/ethereum/jwt.hex
chmod 600 /opt/ethereum/jwt.hex

# Step 5: Start Geth (execution layer) - NO genesis configuration needed for mainnet
# Geth uses built-in mainnet chain spec and discovers peers automatically
geth \
  --mainnet \
  --datadir /opt/ethereum/execution \
  --http --http.addr 127.0.0.1 --http.port 8545 \
  --http.api eth,net,web3,txpool \
  --authrpc.addr 127.0.0.1 --authrpc.port 8551 \
  --authrpc.jwtsecret /opt/ethereum/jwt.hex \
  --syncmode snap \
  --maxpeers 50 \
  --port 30303 \
  --discovery.port 30303 \
  --metrics --metrics.addr 127.0.0.1 --metrics.port 6060 &

# Step 6: Start Prysm beacon node (consensus layer)
./prysm.sh beacon-chain \
  --mainnet \
  --datadir=/opt/ethereum/consensus/beacondata \
  --execution-endpoint=http://127.0.0.1:8551 \
  --jwt-secret=/opt/ethereum/jwt.hex \
  --p2p-tcp-port=13000 \
  --p2p-udp-port=12000 \
  --monitoring-host=127.0.0.1 \
  --monitoring-port=8080 \
  --suggested-fee-recipient=0xYOUR_FEE_RECIPIENT_ADDRESS &

# Step 7: Generate validator keys using the Ethereum staking CLI
# This is the ONLY identity step - completely self-service
cd /opt/ethereum/keys
curl -sSL https://github.com/ethereum/staking-deposit-cli/releases/download/v2.7.0/staking_deposit-cli-linux-amd64.tar.gz | tar xz
./staking_deposit-cli/deposit new-mnemonic \
  --num_validators 1 \
  --chain mainnet \
  --eth1_withdrawal_address 0xYOUR_WITHDRAWAL_ADDRESS

# Output: validator_keys/ directory with deposit_data.json and keystore files
# No CA, no enrollment, no admin approval - just cryptographic keys

# Step 8: Import keys into Prysm validator client
./prysm.sh validator accounts import \
  --keys-dir=/opt/ethereum/keys/validator_keys \
  --wallet-dir=/opt/ethereum/validator/wallet

# Step 9: Start the validator client
./prysm.sh validator \
  --mainnet \
  --datadir=/opt/ethereum/validator \
  --wallet-dir=/opt/ethereum/validator/wallet \
  --beacon-rpc-provider=127.0.0.1:4000 &

# Step 10: Verify sync status
curl -s http://127.0.0.1:8545 \
  -H "Content-Type: application/json" \
  -d '{"jsonrpc":"2.0","method":"eth_syncing","params":[],"id":1}' | jq '.'
# Returns: false (when fully synced)

# Check peer count (connects to ANY node worldwide, no allowlist)
curl -s http://127.0.0.1:8545 \
  -H "Content-Type: application/json" \
  -d '{"jsonrpc":"2.0","method":"net_peerCount","params":[],"id":1}' | jq '.result'
# Returns: "0x32" (50 peers, from any IP on the planet)
Consensus Mechanism Differences
The consensus mechanism is the core engine that determines how transactions are validated and blocks are produced. Permissioned networks can use simpler, faster consensus protocols because all participants are known and authenticated. Raft provides crash fault tolerance where f < n/2 nodes can fail. IBFT 2.0 provides stronger Byzantine fault tolerance where f < n/3 nodes can be malicious. Permissionless networks need economic security models like Proof of Stake where validators lock up capital that gets slashed for bad behavior, because participants are anonymous and could be adversaries.
Free to use, share it in your presentations, blogs, or learning materials.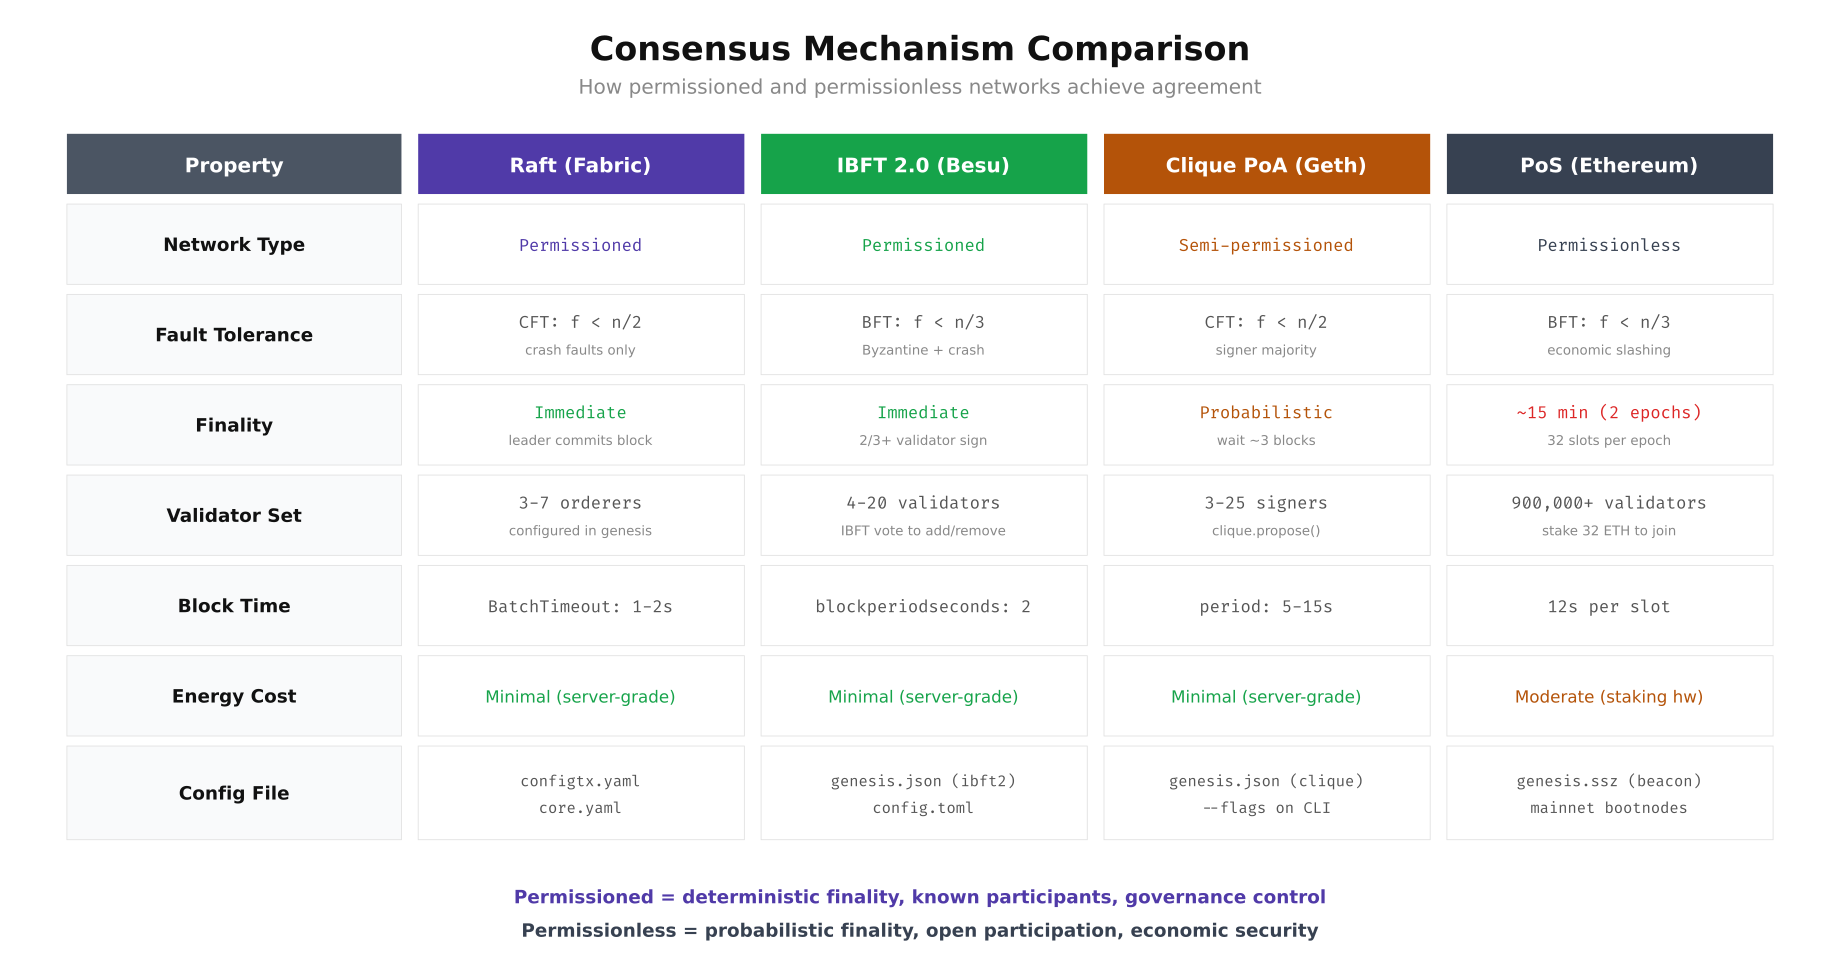
The comparison above highlights why MedChain's pharmaceutical use case strongly favors permissioned consensus. They need immediate finality (a shipped drug batch cannot wait 15 minutes for confirmation), a small known validator set (3 organizations, not 900,000 anonymous validators), and the ability to configure block time to match their business process cadence (2-second blocks for real-time tracking updates).
Firewall and Network Security Configurations
The network security posture differs dramatically between the two models. A permissioned network restricts all traffic to known consortium member IPs through firewall rules and VPN tunnels. A permissionless network must accept connections from any IP address on the internet for P2P discovery. This single difference cascades into every firewall rule, DDoS mitigation strategy, and monitoring configuration.
# ============================================================
# FIREWALL: Permissioned Network (nftables for Fabric node)
# ============================================================
cat > /etc/nftables.conf << 'NFT'
#!/usr/sbin/nft -f
flush ruleset

table inet filter {
    # Define consortium member IPs
    set consortium_members {
        type ipv4_addr
        elements = {
            10.10.1.0/24,     # MedChain Switzerland (WireGuard)
            10.10.2.0/24,     # LogiPharma Netherlands (WireGuard)
            10.10.3.0/24      # SGH Singapore (WireGuard)
        }
    }

    set monitoring_ips {
        type ipv4_addr
        elements = {
            10.10.0.100       # Prometheus server
        }
    }

    chain input {
        type filter hook input priority 0; policy drop;

        # Allow established connections
        ct state established,related accept

        # Allow loopback
        iif lo accept

        # SSH from bastion only
        tcp dport 22 ip saddr 10.10.0.1 accept

        # WireGuard VPN tunnel
        udp dport 51820 accept

        # Fabric peer gRPC (ONLY from consortium VPN)
        tcp dport 7051 ip saddr @consortium_members accept

        # Fabric orderer (ONLY from consortium VPN)
        tcp dport 7050 ip saddr @consortium_members accept

        # Fabric CA enrollment (ONLY from consortium VPN)
        tcp dport 7054 ip saddr @consortium_members accept

        # CouchDB (localhost only, never expose)
        tcp dport 5984 ip saddr 127.0.0.1 accept

        # Operations/metrics endpoint
        tcp dport 9443 ip saddr @monitoring_ips accept

        # Drop everything else (log first)
        log prefix "nftables-drop: " counter drop
    }

    chain forward {
        type filter hook forward priority 0; policy drop;
    }

    chain output {
        type filter hook output priority 0; policy accept;
    }
}
NFT

sudo nft -f /etc/nftables.conf
sudo systemctl enable nftables

# Verify: only consortium IPs can reach Fabric ports
sudo nft list ruleset | grep -A2 "consortium_members"


# ============================================================
# FIREWALL: Permissionless Network (ufw for Ethereum validator)
# ============================================================
# P2P port MUST be open to the entire internet for peer discovery
sudo ufw default deny incoming
sudo ufw default allow outgoing

# SSH from specific management IPs only
sudo ufw allow from 192.168.1.0/24 to any port 22 proto tcp

# Ethereum P2P (MUST be open to ALL IPs - this is the key difference)
sudo ufw allow 30303/tcp    # devp2p TCP
sudo ufw allow 30303/udp    # devp2p UDP discovery
sudo ufw allow 13000/tcp    # Prysm beacon P2P
sudo ufw allow 12000/udp    # Prysm beacon discovery

# JSON-RPC (NEVER expose to public internet on a validator)
# Only allow localhost - apps connect through SSH tunnel or local socket
sudo ufw deny 8545/tcp
sudo ufw deny 8546/tcp

# Metrics (localhost only)
# Prometheus connects through SSH tunnel
sudo ufw deny 6060/tcp
sudo ufw deny 8080/tcp

sudo ufw enable
sudo ufw status verbose

# Key difference: permissionless CANNOT use IP allowlists for P2P
# because peers are unknown. DDoS protection must use rate-limiting instead:
sudo iptables -A INPUT -p tcp --dport 30303 -m connlimit --connlimit-above 50 -j DROP
sudo iptables -A INPUT -p tcp --dport 30303 -m hashlimit \
  --hashlimit-above 20/min --hashlimit-burst 30 \
  --hashlimit-mode srcip --hashlimit-name p2p_limit -j DROP
Infrastructure Architecture Comparison
The physical and virtual infrastructure required for each model differs significantly in complexity, cost, and security posture. A permissioned network deployment involves dedicated servers per organization connected through encrypted VPN tunnels, with each organization maintaining its own Certificate Authority, peer nodes, and state databases. A permissionless deployment is simpler: one or two servers running execution and consensus layer clients, connecting directly to the public internet. But "simpler" does not mean "easier to secure." The open attack surface of a permissionless node requires different defensive strategies.
Free to use, share it in your presentations, blogs, or learning materials.
As shown above, the permissioned deployment requires a WireGuard VPN mesh connecting all organizations, with strict nftables rules limiting traffic to consortium member IPs only. The permissionless deployment accepts connections from any IP on Earth. The cost structures also diverge: MedChain's permissioned Fabric network costs approximately $4,000/month for infrastructure across three organizations (4 servers per org), while a single Ethereum validator can run on a $300/month home server or a $1,500/month cloud instance.
VPN Configuration for Permissioned Networks
WireGuard is the standard VPN solution for connecting permissioned blockchain organizations. Unlike IPSec, WireGuard uses modern cryptography (ChaCha20, Curve25519), has a minimal attack surface (approximately 4,000 lines of code in the kernel module), and achieves near-line-rate throughput on modern hardware. MedChain deployed a mesh topology where each organization maintains WireGuard tunnels to every other organization, providing direct encrypted paths for gRPC and orderer traffic.
# ============================================================
# WIREGUARD VPN MESH for Permissioned Blockchain
# MedChain: 3 organizations, full mesh topology
# ============================================================

# Install WireGuard on all three organization servers
sudo apt install -y wireguard

# Organization 1: MedChain Switzerland (Zurich DC)
# Generate key pair
wg genkey | tee /etc/wireguard/private.key | wg pubkey > /etc/wireguard/public.key
chmod 600 /etc/wireguard/private.key

# MedChain Switzerland WireGuard config
cat > /etc/wireguard/wg0.conf << 'WG'
[Interface]
Address = 10.10.1.1/24
ListenPort = 51820
PrivateKey =
PostUp = nft add rule inet filter input udp dport 51820 accept
PostDown = nft delete rule inet filter input udp dport 51820 accept

# LogiPharma Netherlands
[Peer]
PublicKey =
AllowedIPs = 10.10.2.0/24
Endpoint = nl-node.logipharma.net:51820
PersistentKeepalive = 25

# SGH Singapore
[Peer]
PublicKey =
AllowedIPs = 10.10.3.0/24
Endpoint = sg-node.sgh.sg:51820
PersistentKeepalive = 25
WG

# Enable and start WireGuard
sudo systemctl enable wg-quick@wg0
sudo systemctl start wg-quick@wg0

# Verify tunnel connectivity to all peers
wg show wg0
# Output shows handshake timestamps and transfer stats for each peer

# Test connectivity through the VPN to peer organizations
ping -c 3 10.10.2.1  # LogiPharma NL peer
ping -c 3 10.10.3.1  # SGH Singapore peer

# Verify that Fabric peer gRPC works through the tunnel
grpcurl -cacert /opt/medchain/crypto/peer0/tls/ca.crt \
  -cert /opt/medchain/crypto/peer0/tls/server.crt \
  -key /opt/medchain/crypto/peer0/tls/server.key \
  10.10.2.1:7051 protos.Endorser/ProcessProposal

# Monitor VPN tunnel health (add to crontab for alerting)
cat > /opt/medchain/scripts/check-vpn.sh << 'SCRIPT'
#!/bin/bash
PEERS=("10.10.2.1" "10.10.3.1")
NAMES=("LogiPharma-NL" "SGH-SG")

for i in "${!PEERS[@]}"; do
    if ! ping -c 1 -W 3 "${PEERS[$i]}" > /dev/null 2>&1; then
        echo "$(date -u +%Y-%m-%dT%H:%M:%SZ) ALERT: VPN tunnel to ${NAMES[$i]} (${PEERS[$i]}) is DOWN" | \
            tee -a /opt/medchain/logs/vpn-monitor.log
        # Send alert to PagerDuty or Slack webhook
        curl -s -X POST "$SLACK_WEBHOOK_URL" \
            -H 'Content-type: application/json' \
            -d "{\"text\":\"VPN tunnel to ${NAMES[$i]} is DOWN on $(hostname)\"}"
    fi
done
SCRIPT
chmod +x /opt/medchain/scripts/check-vpn.sh
echo "*/5 * * * * /opt/medchain/scripts/check-vpn.sh" | crontab -
Governance and Upgrade Workflows
How you upgrade the network, add new participants, or respond to security incidents is fundamentally different between the two models. Permissioned networks use formal governance processes where proposals require multi-organization signatures before taking effect. Permissionless networks rely on social consensus among client developers, with changes activated at specific block numbers through hard forks. MedChain needed to understand both models to plan their operational workflows and incident response procedures.
Free to use, share it in your presentations, blogs, or learning materials.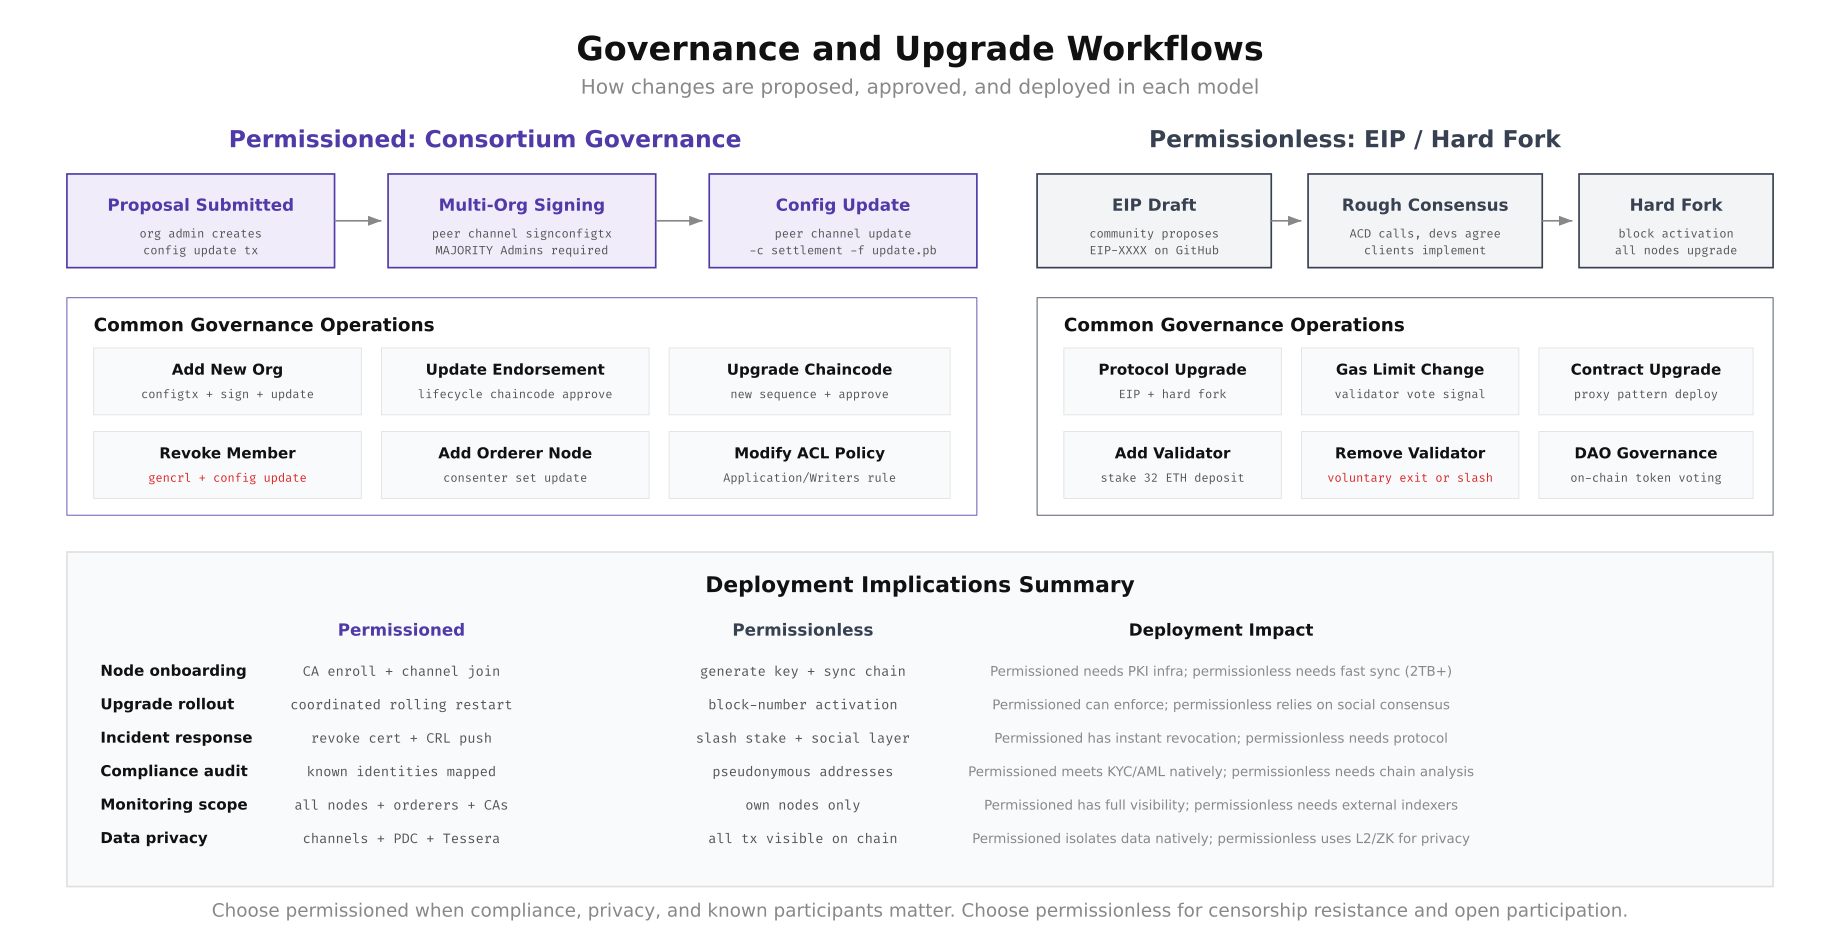
The governance flow diagram shows how permissioned changes follow a structured proposal, signing, and update pipeline where MAJORITY of organization admins must sign before a configuration change takes effect. In Ethereum's permissionless model, EIP proposals go through community discussion, rough consensus on All Core Developers calls, client implementation, and block-number-activated hard forks. MedChain's regulated pharmaceutical environment requires the deterministic governance of the permissioned model, where every configuration change has a documented approval chain for auditors.
Adding a New Organization (Permissioned)
When MedChain needed to onboard a fourth organization (PharmaLog Germany, a cold-chain logistics provider), the process required configuration updates signed by the existing consortium members. This is a governance operation that takes the existing channel configuration, adds the new organization's MSP definition, and requires signatures from a majority of the current organizations before the update takes effect.
# ============================================================
# ADD NEW ORGANIZATION: PharmaLog Germany to MedChain consortium
# Requires: majority of existing org admins to sign
# ============================================================

# Step 1: Fetch the current channel configuration
peer channel fetch config config_block.pb -o orderer0.medchain.ch:7050 \
  -c pharma-supply --tls \
  --cafile /opt/medchain/crypto/orderer/tls/ca.crt

# Decode to JSON for editing
configtxlator proto_decode --input config_block.pb --type common.Block \
  | jq '.data.data[0].payload.data.config' > current_config.json

# Step 2: Create the new org's MSP definition
# PharmaLog Germany has already set up their CA and generated certs
cat > pharmalog_de.json << 'JSON'
{
    "PharmaLogDEMSP": {
        "mod_policy": "Admins",
        "policies": {
            "Admins": {
                "mod_policy": "Admins",
                "policy": {
                    "type": 1,
                    "value": {
                        "identities": [{"principal": {"msp_identifier": "PharmaLogDEMSP", "role": "ADMIN"}}],
                        "rule": {"n_out_of": {"n": 1, "rules": [{"signed_by": 0}]}}
                    }
                }
            },
            "Readers": {
                "mod_policy": "Admins",
                "policy": {
                    "type": 1,
                    "value": {
                        "identities": [
                            {"principal": {"msp_identifier": "PharmaLogDEMSP", "role": "ADMIN"}},
                            {"principal": {"msp_identifier": "PharmaLogDEMSP", "role": "PEER"}},
                            {"principal": {"msp_identifier": "PharmaLogDEMSP", "role": "CLIENT"}}
                        ],
                        "rule": {"n_out_of": {"n": 1, "rules": [{"signed_by": 0}, {"signed_by": 1}, {"signed_by": 2}]}}
                    }
                }
            }
        },
        "values": {
            "MSP": {
                "mod_policy": "Admins",
                "value": {
                    "config": {
                        "name": "PharmaLogDEMSP",
                        "root_certs": [""],
                        "tls_root_certs": [""],
                        "fabric_node_ous": {
                            "enable": true,
                            "client_ou_identifier": {"certificate": "", "organizational_unit_identifier": "client"},
                            "peer_ou_identifier": {"certificate": "", "organizational_unit_identifier": "peer"},
                            "admin_ou_identifier": {"certificate": "", "organizational_unit_identifier": "admin"},
                            "orderer_ou_identifier": {"certificate": "", "organizational_unit_identifier": "orderer"}
                        }
                    }
                }
            }
        }
    }
}
JSON

# Step 3: Merge new org into the channel config
jq -s '.[0] * {"channel_group":{"groups":{"Application":{"groups":.[1]}}}}' \
  current_config.json pharmalog_de.json > updated_config.json

# Step 4: Compute the config update delta
configtxlator proto_encode --input current_config.json --type common.Config --output current_config.pb
configtxlator proto_encode --input updated_config.json --type common.Config --output updated_config.pb
configtxlator compute_update --channel_id pharma-supply \
  --original current_config.pb --updated updated_config.pb --output config_update.pb

# Wrap in an envelope
echo '{"payload":{"header":{"channel_header":{"channel_id":"pharma-supply","type":2}},"data":{"config_update":'$(configtxlator proto_decode --input config_update.pb --type common.ConfigUpdate | jq -c .)'}}}'  \
  | configtxlator proto_encode --type common.Envelope --output config_update_envelope.pb

# Step 5: Collect signatures from existing orgs (governance requirement)
# MedChain Switzerland signs
peer channel signconfigtx -f config_update_envelope.pb

# LogiPharma Netherlands signs (run on their node)
# scp config_update_envelope.pb bcops@nl-node.logipharma.net:/tmp/
# ssh bcops@nl-node.logipharma.net "peer channel signconfigtx -f /tmp/config_update_envelope.pb"

# Step 6: Submit the update (needs MAJORITY = 2 of 3 existing orgs)
peer channel update -f config_update_envelope.pb -c pharma-supply \
  -o orderer0.medchain.ch:7050 --tls \
  --cafile /opt/medchain/crypto/orderer/tls/ca.crt

# Step 7: PharmaLog Germany joins the channel
# (run on PharmaLog's node after receiving the genesis block)
peer channel fetch 0 pharma-supply.block -o orderer0.medchain.ch:7050 \
  -c pharma-supply --tls \
  --cafile /opt/medchain/crypto/orderer/tls/ca.crt
peer channel join -b pharma-supply.block

# Verify: PharmaLog's peer should appear in the channel
peer channel list
# Channels peers has joined: pharma-supply
Certificate Revocation (Permissioned Incident Response)
One of the strongest operational advantages of permissioned networks is the ability to instantly revoke a compromised node's access. If MedChain discovers that a peer node's private key has been compromised, they can revoke the certificate through their CA, generate a Certificate Revocation List (CRL), and push it to the channel configuration. The compromised node is immediately unable to participate in any transactions. In a permissionless network, there is no equivalent mechanism: a compromised validator can only be "removed" by slashing its stake, which requires on-chain evidence of misbehavior.
# ============================================================
# CERTIFICATE REVOCATION: Compromised peer node response
# Scenario: peer0.logipharma.net private key leaked
# ============================================================

# Step 1: Revoke the compromised identity at the org's CA
# (executed by LogiPharma's CA admin)
fabric-ca-client revoke \
  -e peer0.logipharma.net \
  --reason keycompromise \
  --gencrl \
  --tls.certfiles /opt/logipharma/ca/tls-cert.pem

# The --gencrl flag generates a Certificate Revocation List
# Output: CRL written to /opt/logipharma/crypto/ca-admin/msp/crls/crl.pem

# Step 2: Verify the CRL contains the revoked certificate
openssl crl -in /opt/logipharma/crypto/ca-admin/msp/crls/crl.pem -text -noout
# Shows: Revoked Certificate Serial Number, Revocation Date, Reason

# Step 3: Update the channel configuration to include the new CRL
# This is a config update that requires governance signatures
# Encode the CRL in base64 and add it to LogiPharma's MSP in the channel config
CRL_B64=$(base64 -w0 /opt/logipharma/crypto/ca-admin/msp/crls/crl.pem)

# Fetch current config, add CRL, compute delta, sign, update
# (same governance flow as adding a new org, but modifying existing MSP)

# Step 4: All peers in the channel now reject the revoked certificate
# The compromised peer can no longer:
#   - Submit endorsement proposals
#   - Participate in gossip protocol
#   - Query the ledger
#   - Join new channels

# Step 5: Issue new certificates for the replacement node
fabric-ca-client register \
  --id.name peer0-new.logipharma.net \
  --id.secret newpeer0pw \
  --id.type peer \
  --tls.certfiles /opt/logipharma/ca/tls-cert.pem

fabric-ca-client enroll \
  -u https://peer0-new.logipharma.net:newpeer0pw@ca.logipharma.net:7054 \
  --csr.hosts peer0-new.logipharma.net \
  --tls.certfiles /opt/logipharma/ca/tls-cert.pem

# Step 6: Bring up the replacement peer and rejoin the channel
# The entire incident response completes in minutes, not hours

# ============================================================
# CONTRAST: Permissionless incident response
# If an Ethereum validator key is compromised:
# ============================================================
# Option 1: Voluntary exit (takes ~27 hours in exit queue)
# The compromised key can still sign bad blocks during this time
#
# Option 2: Wait for slashing (requires on-chain proof of double-signing)
# The protocol slashes 1/32 of stake immediately, plus correlated penalty
# Full withdrawal takes 256+ epochs (~27 hours minimum)
#
# There is NO way to instantly revoke a compromised validator key
# The protocol must process the exit through its queue
MedChain's Deployment Decision
After three weeks of parallel evaluation, MedChain's engineering team chose the permissioned model with Hyperledger Fabric 2.5 for their pharmaceutical supply chain. The decision was driven by five factors that directly mapped to their deployment requirements: GDPR compliance required known participant identities and the ability to delete personal data from private data collections, pharmaceutical regulatory audits demanded a documented governance chain for every network change, drug traceability needed immediate transaction finality (not 15-minute probabilistic confirmation), bilateral pricing agreements between manufacturers and distributors required channel-level data isolation, and the ability to instantly revoke a compromised node was essential for their security incident response playbook. For organizations evaluating both models, the choice ultimately depends on whether your use case prioritizes compliance and control (permissioned) or censorship resistance and open participation (permissionless). Most enterprise deployments in regulated industries land on the permissioned side, while public-facing applications and DeFi protocols operate on permissionless networks.