
Rohan ran BrightEdge Digital, a 4-person web development shop in Pune managing 9 client websites on a single GoDaddy shared hosting plan. Five of those sites ran WordPress, two were Laravel applications, one was a Magento storefront, and one was a static HTML portfolio. Combined monthly traffic across all nine sites was around 285,000 page views. The hosting plan cost INR 8,400 per year. For three years, it worked. Then it stopped working. The stationery store incident was the final trigger, but the warning signs had been piling up for months: TTFB creeping past 3.2 seconds during afternoons, email deliverability dropping because the shared IP had landed on two blacklists, no SSH access for debugging, and a backup system that created tar files so large they exceeded the hosting panel’s download limit. Every month brought a new fire. Every fire cost a client relationship. The VPS migration was not a luxury upgrade. It was survival.
Why Shared Hosting Stops Working
Shared hosting works until it does not. There is no gradual decline with a clear warning bell. The degradation is slow enough that you rationalize it for months before admitting the infrastructure is the bottleneck. Rohan’s team tracked 14 separate incidents over eight months before the June meltdown. Here are the patterns that kept repeating across those nine sites, and they match what most teams experience when they have outgrown shared hosting.
The noisy neighbour problem. Shared hosting means 50 to 200 websites sharing the same CPU, RAM, and disk I/O. When one of those sites gets a traffic spike or runs a bad script, your sites pay the price. Rohan’s Magento store saw response times jump from 1.4 seconds to 9.8 seconds every weekday between 2 PM and 5 PM. He spent two weeks optimizing queries before realizing the slowdown had nothing to do with his code. A neighbour was running a heavy image processing script during business hours.
IP reputation damage. On shared hosting, all sites share one or a handful of IP addresses. If any site on that server sends spam or gets flagged for malware, your IP lands on blacklists. Rohan’s client emails started bouncing in April. Two of his WordPress sites used the server’s built-in mail function for contact forms and order confirmations. When he checked the IP on MXToolbox, it was listed on Spamhaus and Barracuda. He did not send spam. His neighbour did. Cleaning that reputation took three weeks of delisting requests.
The lack of SSH access is what turns minor issues into full-day firefights. Without shell access, you cannot tail a log in real time, you cannot run a database query directly, you cannot restart a stuck PHP process, and you cannot install diagnostic tools. Every debugging session becomes a game of uploading PHP scripts through a file manager and refreshing a browser.
Resource caps you cannot see. Shared hosting providers enforce CPU and memory limits per account, but they rarely expose these limits in the control panel. Rohan’s Magento store was getting killed by the OOM (out of memory) manager without any log entry he could access. The PHP process would simply die mid-execution. Orders would fail silently. He only discovered this after three support tickets and a manager escalation that finally revealed a 512 MB memory cap on his account.
Backup limitations. The hosting panel offered a “full backup” button, but the generated archive was 6.2 GB for all nine sites combined. The download link expired after 24 hours. The restore process required opening another support ticket. Rohan tested a restore once. It took 11 hours and restored files with wrong permissions. That is not a backup system. That is a liability.
The Real Cost of Not Migrating
Before diving into migration planning, it is worth calculating what staying on shared hosting actually costs. Most teams compare the VPS monthly fee against the shared hosting annual fee and conclude the VPS is “too expensive.” That comparison ignores every hidden cost that shared hosting imposes.
Rohan’s team tracked their shared hosting costs for six months. The hosting plan was INR 8,400 per year. But the total cost of operating on shared hosting was far higher. They logged 47 hours of debugging time caused by shared resource issues (at INR 1,500 per hour, that was INR 70,500). They lost one client entirely after a 6-hour outage during a product launch (INR 25,000 per month in recurring revenue). The stationery store incident cost INR 1,80,000 in direct lost sales. Email deliverability issues caused 23% of contact form submissions to bounce, which they estimated cost two missed project inquiries worth INR 80,000 combined. The total six-month cost of “cheap” shared hosting was over INR 4,00,000 in lost revenue, lost clients, and wasted engineering time. The VPS they eventually moved to costs INR 2,400 per month.
When you calculate the true cost of shared hosting, include debugging hours, lost sales during outages, client churn from reliability issues, and the opportunity cost of projects you could not take because your infrastructure could not handle them. The monthly VPS fee is almost always cheaper than what shared hosting silently costs you.
Planning the Migration: The 28-Point Checklist
Rohan’s first mistake was thinking the migration was a weekend project. “Move files, move database, change DNS. How hard can it be?” It took his team six weeks from the first planning meeting to the last DNS cutover. Not because the technical work was complex, but because the preparation required touching every system his sites depended on. Here is the checklist his team built after learning most of these items the hard way.
Free to use, share it in your presentations, blogs, or learning materials.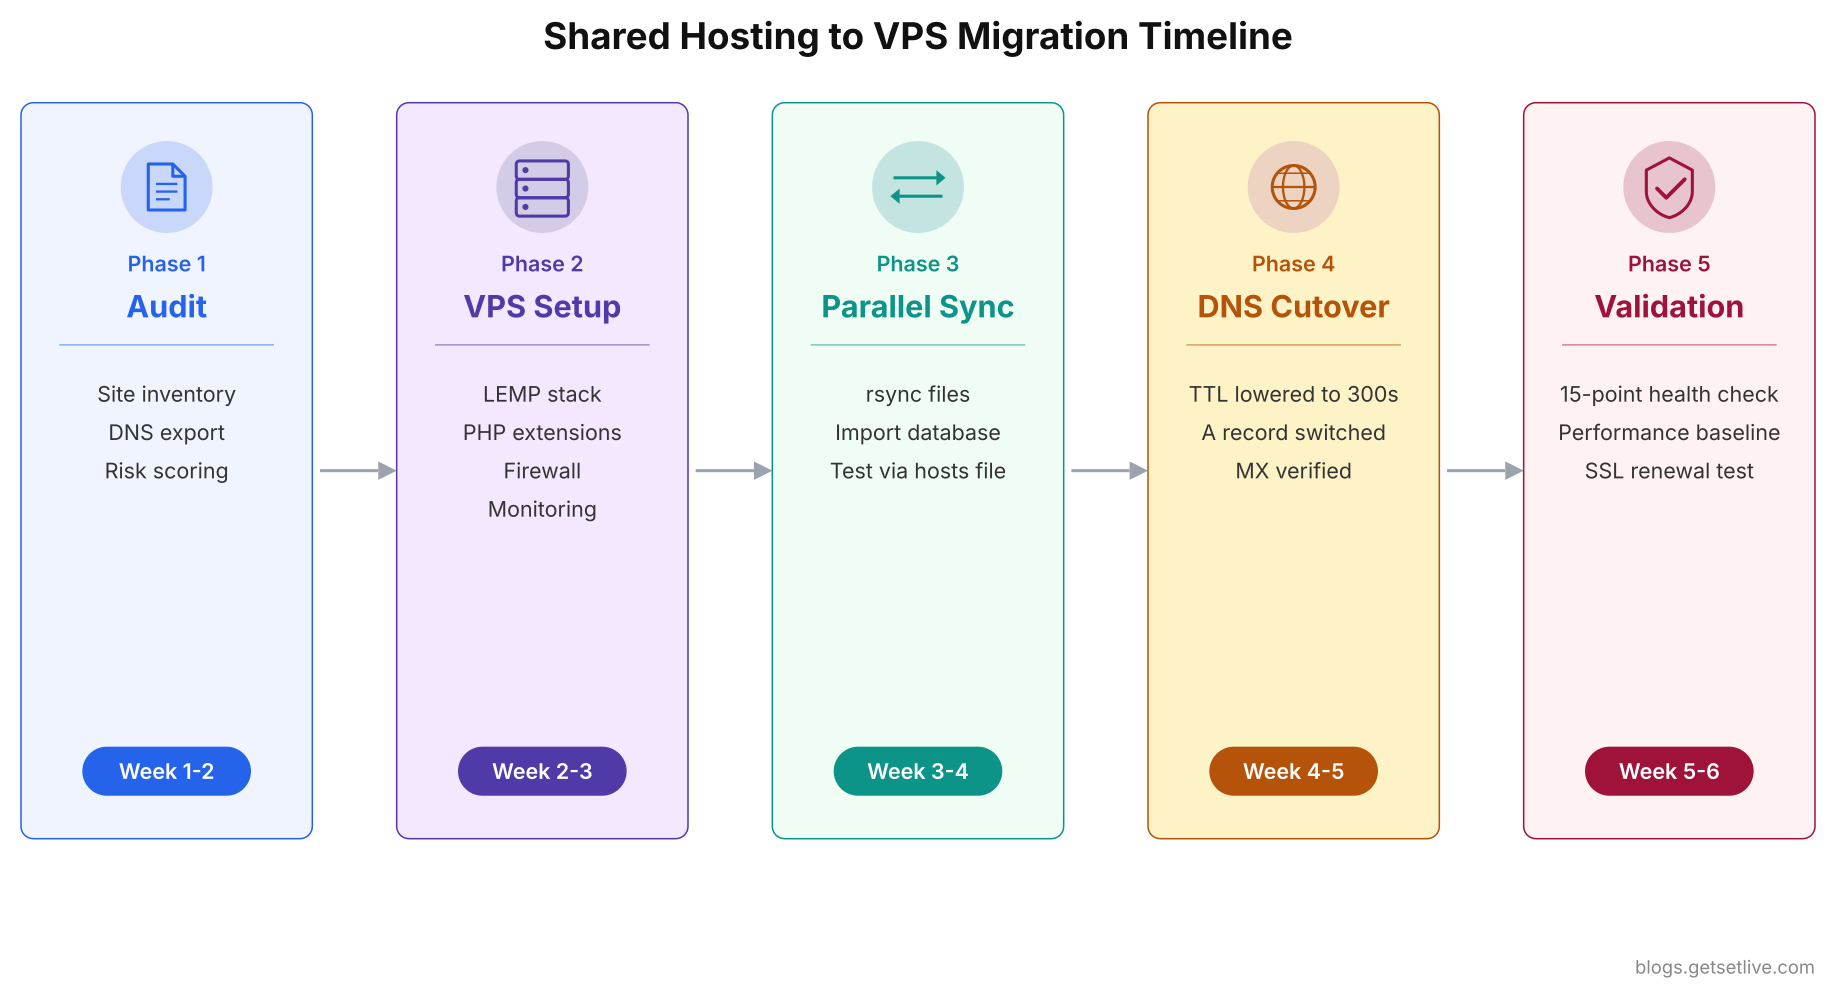
Each phase builds on the previous one. Skipping the audit phase and jumping straight to VPS setup is the most common mistake teams make, because it feels productive. But every unaudited dependency becomes a surprise failure during cutover.
Site Inventory and Dependencies
- List every site with its tech stack. CMS version, PHP version, database engine, custom modules. Rohan discovered that two of his WordPress sites were running on PHP 7.4, which the VPS’s default Ubuntu 24.04 shipped with PHP 8.3. Three plugins broke on the newer version.
- Map every cron job. Shared hosting panels hide cron jobs in different places. Rohan found 7 cron jobs he had forgotten about, including one that ran a nightly database cleanup on the Magento store. Missing it caused the session table to grow to 2.3 GB within two weeks after migration.
- Document every .htaccess rule. Shared hosting relies heavily on .htaccess for URL rewrites, redirects, PHP settings, and access control. Rohan had 340 redirect rules across all sites accumulated over three years. Fifteen of those redirects were critical for SEO (301 redirects from old blog URLs that still received organic traffic).
- Identify hardcoded paths. Search every config file for the shared hosting home directory path (usually /home/username/public_html). Rohan found 12 hardcoded paths in wp-config.php files, Laravel .env files, and custom PHP scripts. Each one would cause a fatal error on the VPS where the paths were completely different.
Run this grep across your entire site directory to catch every hardcoded reference to the shared hosting path before you start moving files.
$ grep -rl ‘/home/username/public_html’ /var/www/html/ –include=’*.php’ –include=’*.env’ –include=’*.json’ –include=’*.conf’1grep -n ‘ABSPATH\|WP_HOME\|WP_SITEURL\|WP_CONTENT_DIR\|UPLOADS’ wp-config.php
- List external service integrations. Payment gateways, SMTP services, CDN configurations, analytics scripts, third-party APIs. Each one may have IP whitelists, webhook URLs, or callback endpoints that reference the old server.
DNS and Email Audit
- Export every DNS zone file. Screenshot every record or export to a text file. Shared hosting providers sometimes delete DNS records when you cancel the plan. Rohan almost lost 47 DNS records across 9 domains because he assumed they would persist after cancellation. They did not.
- Identify where email is hosted. If your email runs through the shared hosting provider (MX records pointing to their mail server), moving DNS will break email. Rohan’s 3 clients used hosting-based email. Two of them lost incoming emails for 18 hours because the MX records were overwritten during DNS migration.
- Document SPF, DKIM, and DMARC records. These authentication records prevent your emails from landing in spam. When you change hosting, these records often reference the old server IP. Rohan’s contact form emails on two sites went straight to spam for a week because the SPF record still included the old shared hosting IP.
- Check current TTL values. If your DNS records have a TTL of 86400 (24 hours), you need to lower them to 300 seconds at least 48 hours before migration day. Otherwise, some users will keep hitting the old server for up to 24 hours after you switch DNS.
Before touching any DNS settings, dump a full snapshot of your current zone. This becomes your rollback reference if anything breaks during the cutover.
$ dig example.com ANY +noall +answer$ dig example.com MX +short$ dig example.com TXT +short$ dig example.com A +ttlexample.com.       86400   IN  A     192.168.1.100
example.com.       86400   IN  MX    10 mail.example.com.
example.com.       86400   IN  TXT   “v=spf1 +a +mx include:_spf.google.com ~all”
If the TTL column shows 86400 (24 hours), that is the value you need to reduce to 300 before migration day. Save this output to a text file. If your hosting provider deletes DNS records on cancellation, this file is your only recovery source.
- Verify domain registrar access. Make sure you can log into wherever the domain is registered (GoDaddy, Namecheap, Cloudflare). Rohan had one client domain registered under a former employee’s personal account. Getting transfer access took 9 days and almost delayed the entire migration.
SSL and Security
- Plan SSL certificate provisioning on the VPS. Shared hosting typically provides free SSL via AutoSSL or Let’s Encrypt managed by the panel. On a raw VPS, you install and renew certificates yourself using certbot. Rohan forgot to set up the certbot renewal cron job. Two months after migration, three sites showed “Not Secure” warnings when the certificates expired.
- Audit .htaccess HTTPS redirect rules. Shared hosting often handles HTTP-to-HTTPS redirects through the hosting panel. On the VPS, you need explicit Nginx or Apache redirect rules. Rohan’s sites served mixed content for the first 48 hours because the HTTPS redirect was missing from the Nginx config.
- Review firewall requirements. Shared hosting manages the firewall for you. On a VPS, an open port 22 with password authentication and no fail2ban is an invitation for brute-force attacks. Rohan’s VPS received 14,000 SSH login attempts in the first 72 hours before he configured UFW and fail2ban.
These are the bare minimum firewall rules Rohan applied on day one of the VPS setup. Do this before migrating any site.
$ sudo ufw default deny incoming$ sudo ufw default allow outgoing$ sudo ufw allow 22/tcp$ sudo ufw allow 80/tcp$ sudo ufw allow 443/tcp$ sudo ufw enable$ sudo ufw status verbose$ sudo apt install fail2ban -y$ sudo systemctl enable fail2ban$ sudo systemctl start fail2ban$ sudo fail2ban-client status sshdStatus for the jail: sshd
|- Filter
| |- Currently failed: 3
| |- Total failed: 47
| `- File list: /var/log/auth.log
`- Actions
|- Currently banned: 1
|- Total banned: 12
`- Banned IP list: 203.0.113.45Database and File Transfer
- Test database export and import sizes. Rohan’s Magento database was 1.8 GB. The shared hosting phpMyAdmin timed out at 512 MB exports. He had to use mysqldump via a PHP wrapper script (since he had no SSH access) and download the dump in chunks.
- Plan for serialized data in WordPress. WordPress stores theme settings, widget configurations, and plugin options as serialized PHP arrays in the database. A simple search-and-replace of the old domain with the new one corrupts these serialized strings because the character count changes. Use WP-CLI’s search-replace command, never raw SQL REPLACE statements.
- Map file ownership and permissions. On shared hosting, the web server user and your account user are typically the same. On a VPS, the web server runs as www-data (or nginx), and files need specific ownership. Directories need 755, files need 644, and wp-config.php needs 640. Rohan copied all files with his SSH user and then spent 4 hours fixing permission errors because WordPress could not write to the uploads directory.
After transferring files to the VPS, run these commands to set correct ownership and permissions for a WordPress site. Getting this wrong causes “Could not create directory” errors, failed plugin updates, and broken media uploads.
1sudo chown -R www-data:www-data /var/www/html/example.com/
2sudo find /var/www/html/example.com/ -type d -exec chmod 755 {} \;
3sudo find /var/www/html/example.com/ -type f -exec chmod 644 {} \;
4sudo chmod 640 /var/www/html/example.com/wp-config.php
1ls -la /var/www/html/example.com/wp-config.php
2ls -la /var/www/html/example.com/wp-content/uploads/
3stat -c ‘%a %U:%G %n’ /var/www/html/example.com/wp-content/
4-rw-r—– 1 www-data www-data 3456 Jun 15 02:30 /var/www/html/example.com/wp-config.php
5drwxr-xr-x 12 www-data www-data 4096 Jun 15 02:30 /var/www/html/example.com/wp-content/uploads/
6755 www-data:www-data /var/www/html/example.com/wp-content/
- Account for file transfer time. Rohan’s total file size across 9 sites was 18 GB. Over his office internet connection (50 Mbps upload), the initial rsync took 6 hours. Plan the first full sync days before migration day so that the final sync on cutover day only transfers the delta.
VPS Environment Setup
- Match PHP versions. Install the exact PHP version your sites currently use, even if a newer version is available. Upgrade PHP after the migration is stable, not during it. Rohan learned this when his contact form plugin threw a fatal error on PHP 8.3 because it used the deprecated
create_function()method. - Install all required PHP extensions. Shared hosting typically has every PHP extension pre-installed. A fresh VPS has the bare minimum. Rohan’s Laravel apps needed php-curl, php-mbstring, php-xml, php-zip, and php-gd. His Magento store needed php-intl, php-soap, and php-bcmath. Each missing extension caused a different cryptic error.
Before migrating, check which PHP version and extensions your shared hosting currently uses. Then install the exact same set on the VPS.
php -v
php -m | sort
$ sudo apt install php8.1-cli php8.1-fpm php8.1-mysql php8.1-curl php8.1-gd \  php8.1-mbstring php8.1-xml php8.1-zip php8.1-intl php8.1-soap \
  php8.1-bcmath php8.1-imagick php8.1-redis -y
$ sudo systemctl restart php8.1-fpmphp -m | grep -i mbstring
php -i | grep ‘Loaded Configuration File’
Replace php8.1 with whatever version matches your shared hosting. If your shared host runs PHP 7.4, install php7.4-* packages. Upgrade PHP after the migration is stable, not during it.
- Configure web server virtual hosts. One Nginx or Apache virtual host per site, each with its own document root, SSL certificate path, PHP-FPM pool, and log file location. Rohan set up all 9 virtual hosts before transferring any files.
- Set up monitoring before migration. Install a lightweight monitoring tool (Netdata, Monit, or even a simple uptime checker like UptimeRobot) on the VPS before moving any sites. You want baseline metrics for the empty server so you can compare after migration.
- Configure automated backups. Before a single site goes live on the VPS, set up daily automated backups to an off-server location. Rohan used a nightly script that compressed each site’s files and database separately, then uploaded to a Backblaze B2 bucket. Total backup storage cost: INR 150 per month for 45 GB.
Impact Analysis: Scoring Risk Per Site
Not all sites carry the same migration risk. Rohan’s static HTML portfolio had zero database dependencies and no dynamic content. Moving it was a 15-minute job. His Magento store had 4,200 products, 18,000 customer records, payment gateway integrations with Razorpay, and a custom shipping calculator. Moving it wrong could cost real money. Treating both sites with the same migration approach wastes time on the simple one and underestimates risk on the complex one.
Rohan’s team built a risk matrix for each site with four factors scored from 1 (low) to 5 (high).
- Revenue sensitivity. Does this site process payments or generate leads? The stationery store scored 5. The portfolio site scored 1.
- Data complexity. How many database tables, how large is the dataset, are there serialized options or custom post types? Magento scored 5 with its 340+ database tables. A basic WordPress blog scored 2.
- Integration count. Payment gateways, third-party APIs, webhook endpoints, email services, CDN configurations. Each integration is a potential failure point. The Magento store had 7 integrations. The static site had zero.
- Traffic volume. High-traffic sites need faster DNS propagation and shorter maintenance windows. The Laravel app serving 3,200 daily users scored 4. The WordPress blog with 180 daily visitors scored 1.
Sites scoring 15 or above got dedicated migration windows with rollback plans. Sites scoring under 8 were migrated in batches of two or three during off-peak hours. This scoring saved Rohan’s team from the classic mistake of migrating the most complex site first “to get it out of the way.” Instead, they started with the two lowest-risk WordPress blogs, learned from the process, and migrated the Magento store last with a refined playbook.
Always migrate the simplest site first. Every migration teaches you something about the VPS configuration, the DNS propagation behaviour of your domain registrar, and the quirks of your file transfer process. Take those lessons into the high-risk migrations.
The Zero-Downtime Migration Process
Zero downtime does not mean zero risk. It means your users never see an error page during the transition. Behind the scenes, both the old shared hosting and the new VPS run simultaneously for a period, serving identical content. The switch happens at the DNS level, and because you lowered the TTL beforehand, the transition window shrinks from 24 hours to under 10 minutes for most visitors.
Rohan’s team executed this process for each site. The entire sequence, from first sync to final validation, ran over 5 days per site.
Phase 1: Pre-Sync (Day 1 to Day 3)
Three days before migration day, lower the DNS TTL for the site’s A record from its current value (usually 3600 or 86400 seconds) to 300 seconds (5 minutes). This change itself takes one full TTL cycle to propagate. If your current TTL is 86400 (24 hours), you need to make this change at least 24 hours before migration day. Rohan made this change 72 hours early to be safe.
On the same day, run the first full file sync from the shared host to the VPS. If your shared hosting has SSH access (some plans do), use rsync. If not, download everything via FTP to a local machine and then upload to the VPS. Rohan’s initial sync for each WordPress site took between 40 minutes and 3 hours depending on the size of the uploads directory.
$ rsync -avz –progress -e ssh user@shared-host:/home/user/public_html/ /var/www/html/example.com/Also export the database and import it on the VPS. For WordPress, use mysqldump from the shared host (or export via phpMyAdmin) and import on the VPS. Do the search-replace for the domain name now, on the VPS copy, not the live one.
mysqldump -u dbuser -p database_name > /tmp/site_backup.sql
$ mysql -u vps_dbuser -p vps_database < /tmp/site_backup.sql[/gsl_terminal]

[gsl_terminal type="command" title="Run WordPress search-replace for domain change (serialization-safe)"]
$ cd /var/www/html/example.com$ wp search-replace 'old-shared-domain.com' 'example.com' --skip-columns=guid --allow-root[/gsl_terminal]

[gsl_terminal type="output" title="Expected search-replace output"]
+------------------+-----------------------+--------------+------+
| Table            | Column                | Replacements | Type |
+------------------+-----------------------+--------------+------+
| wp_options       | option_value          | 28           | PHP  |
| wp_posts         | post_content          | 145          | SQL  |
| wp_posts         | post_excerpt          | 3            | SQL  |
| wp_postmeta      | meta_value            | 67           | PHP  |
+------------------+-----------------------+--------------+------+
Success: Made 243 replacements.
[/gsl_terminal]


<p class="wp-block-paragraph">Test the site on the VPS using a hosts file override. Edit /etc/hosts on your laptop to point the domain to the VPS IP. This lets you browse the site on the VPS without changing public DNS.


[gsl_terminal type="command" title="Add hosts file override to test VPS copy before DNS switch"]
$ sudo nano /etc/hosts165.22.xx.xx example.com www.example.comWith this hosts entry, your browser will load example.com from the VPS while the rest of the world still sees the shared host. Verify every page loads, every form submits, and every image renders. Remove the hosts entry after migration is complete.
Phase 2: Delta Sync (Day 4, Migration Day)
On migration day, schedule the cutover for the lowest-traffic window. For Rohan’s Indian client base, that was between 1 AM and 5 AM IST. Run the final delta sync of files, then export the live database one more time and import it on the VPS, replacing the earlier copy.
$ rsync -avz –delete –progress -e ssh user@shared-host:/home/user/public_html/ /var/www/html/example.com/mysqldump -u dbuser -p database_name –single-transaction > /tmp/final_backup.sql
$ mysql -u vps_dbuser -p -e “DROP DATABASE vps_database; CREATE DATABASE vps_database;”$ mysql -u vps_dbuser -p vps_database < /tmp/final_backup.sql$ wp search-replace 'old-shared-domain.com' 'example.com' --skip-columns=guid --path=/var/www/html/example.com --allow-root[/gsl_terminal]
<p class="wp-block-paragraph"><mark style="background-color:#fde8e0;padding:2px 4px;">The critical window is the gap between the final database export from the old server and the DNS switch. Any data written to the old database during this gap (new orders, contact form submissions, user registrations) will be lost unless you freeze writes or merge the delta afterward. For e-commerce sites, Rohan put up a maintenance banner for 15 minutes during this window.</mark>
<p class="wp-block-paragraph">Run the domain search-replace on the fresh database import. Verify the site on the VPS one more time using hosts file override. Check SSL certificates are active. Check that HTTPS redirects work. Check that the admin panel loads. Check that forms submit and emails arrive.
<h3 class="wp-block-heading">Phase 3: DNS Cutover (Day 4, Migration Day)</h3>
<p class="wp-block-paragraph">Once the VPS copy is verified, update the DNS A record to point to the VPS IP. Because you lowered the TTL to 300 seconds three days ago, most DNS resolvers worldwide will pick up the new IP within 5 to 10 minutes. Some ISPs and corporate networks cache DNS aggressively and may take up to 2 hours regardless of TTL settings.
<p class="wp-block-paragraph">Use an online DNS propagation checker to monitor the rollout across global resolvers. Rohan checked propagation every 15 minutes using whatsmydns.net. Within 30 minutes, 90% of global resolvers were pointing to the VPS. The remaining 10% caught up within 4 hours.
[gsl_terminal type="command" title="Monitor DNS propagation from multiple resolvers after cutover"]
$ dig example.com A +short @8.8.8.8$ dig example.com A +short @1.1.1.1$ dig example.com A +short @208.67.222.222$ dig example.com A +short @9.9.9.9165.22.xx.xx
165.22.xx.xx
165.22.xx.xx
165.22.xx.xx
$ echo | openssl s_client -servername example.com -connect example.com:443 2>/dev/null | openssl x509 -noout -dates -subject$ curl -sI https://example.com | head -5subject=CN = example.com
notBefore=Jun 15 00:00:00 2026 GMT
notAfter=Sep 13 23:59:59 2026 GMT
HTTP/2 200
server: nginx/1.24.0If any resolver still returns the old shared hosting IP, that region’s users are still hitting the old server. This is normal during the first 2 to 4 hours. If it persists beyond 6 hours, check whether the DNS change actually saved at your registrar or DNS provider.
Do not cancel or shut down the old shared hosting yet. Keep it running for at least 72 hours after the DNS switch. During this window, some users will still reach the old server through cached DNS. Any requests they make (form submissions, purchases) will go to the old server. Rohan set up a simple redirect on the old server that forwarded all requests to the new VPS IP, catching these stragglers.
Phase 4: Validation (Day 4 to Day 5)
After DNS has fully propagated, run through a validation checklist for every migrated site.
- Homepage loads under 3 seconds (measure with GTmetrix or Lighthouse)
- All internal links resolve (no 404 errors from old paths)
- Contact forms submit and emails arrive at the intended inbox
- SSL certificate is valid and HTTPS redirect works (check padlock icon)
- Admin panel is accessible and login works
- Media files (images, PDFs, videos) load correctly
- Search functionality works (WordPress search, Magento search, custom search)
- Payment gateway test transaction succeeds (use sandbox/test mode)
- Cron jobs are running (check WordPress scheduled actions, Laravel scheduler, custom crons)
- Email deliverability passes (SPF, DKIM, DMARC records are correct)
- 301 redirects from old URLs still work
- robots.txt is accessible and does not block crawlers
- XML sitemap generates and is accessible
- Google Search Console shows no new crawl errors
- Server monitoring shows CPU, RAM, and disk usage within expected ranges
You can script most of these checks into a single validation pass. Rohan’s team built a quick-check script that ran after every site cutover.
# Check HTTP response code and TTFB
$ curl -o /dev/null -s -w “HTTP: %{http_code} | TTFB: %{time_starttransfer}s | Total: %{time_total}s\n” https://example.com
# Verify SSL certificate expiry
$ echo | openssl s_client -servername example.com -connect example.com:443 2>/dev/null | openssl x509 -noout -dates
# Check for mixed content (HTTP resources on HTTPS page)
$ curl -s https://example.com | grep -i ‘http://’ | grep -v ‘https://’ | head -5
# Verify robots.txt is accessible
$ curl -s -o /dev/null -w “%{http_code}” https://example.com/robots.txt
# Check XML sitemap responds
$ curl -s -o /dev/null -w “%{http_code}” https://example.com/sitemap_index.xml
# Verify WordPress cron is scheduled
$ cd /var/www/html/example.com && wp cron event list –allow-root | head -10
# Check disk usage after migration
$ df -h /var/www/html/$ du -sh /var/www/html/example.com/HTTP: 200 | TTFB: 0.347s | Total: 0.892s
notBefore=Jun 15 00:00:00 2026 GMT
notAfter=Sep 13 23:59:59 2026 GMT
200
200
+—————————+———————+———————–+
| hook | next_run_gmt | next_run_relative |
+—————————+———————+———————–+
| wp_scheduled_delete | 2026-06-16 00:00:00 | 18 hours 12 minutes |
| wp_update_plugins | 2026-06-15 14:22:00 | 8 hours 34 minutes |
+—————————+———————+———————–+
/dev/vda1 155G 42G 106G 29% /var/www/html/
3.2G /var/www/html/example.com/Rohan’s team missed the cron job check on the Magento store. The nightly session cleanup job was not migrated. Within two weeks, the sessions table bloated to 2.3 GB, the database queries slowed down, and page load times crept past 8 seconds. It took another evening of debugging to find the root cause. That one unchecked item on the validation list cost 4 hours of work and two days of degraded performance.
DNS Cutover Strategy in Detail
DNS is where most migration downtime actually happens. Not because DNS itself is complicated, but because teams underestimate propagation delays and overlook the records that are not the A record. The A record points your domain to an IP address. But your DNS zone file contains many more records that affect email, security, and third-party services.
Here is the timeline Rohan followed for each domain.
Free to use, share it in your presentations, blogs, or learning materials.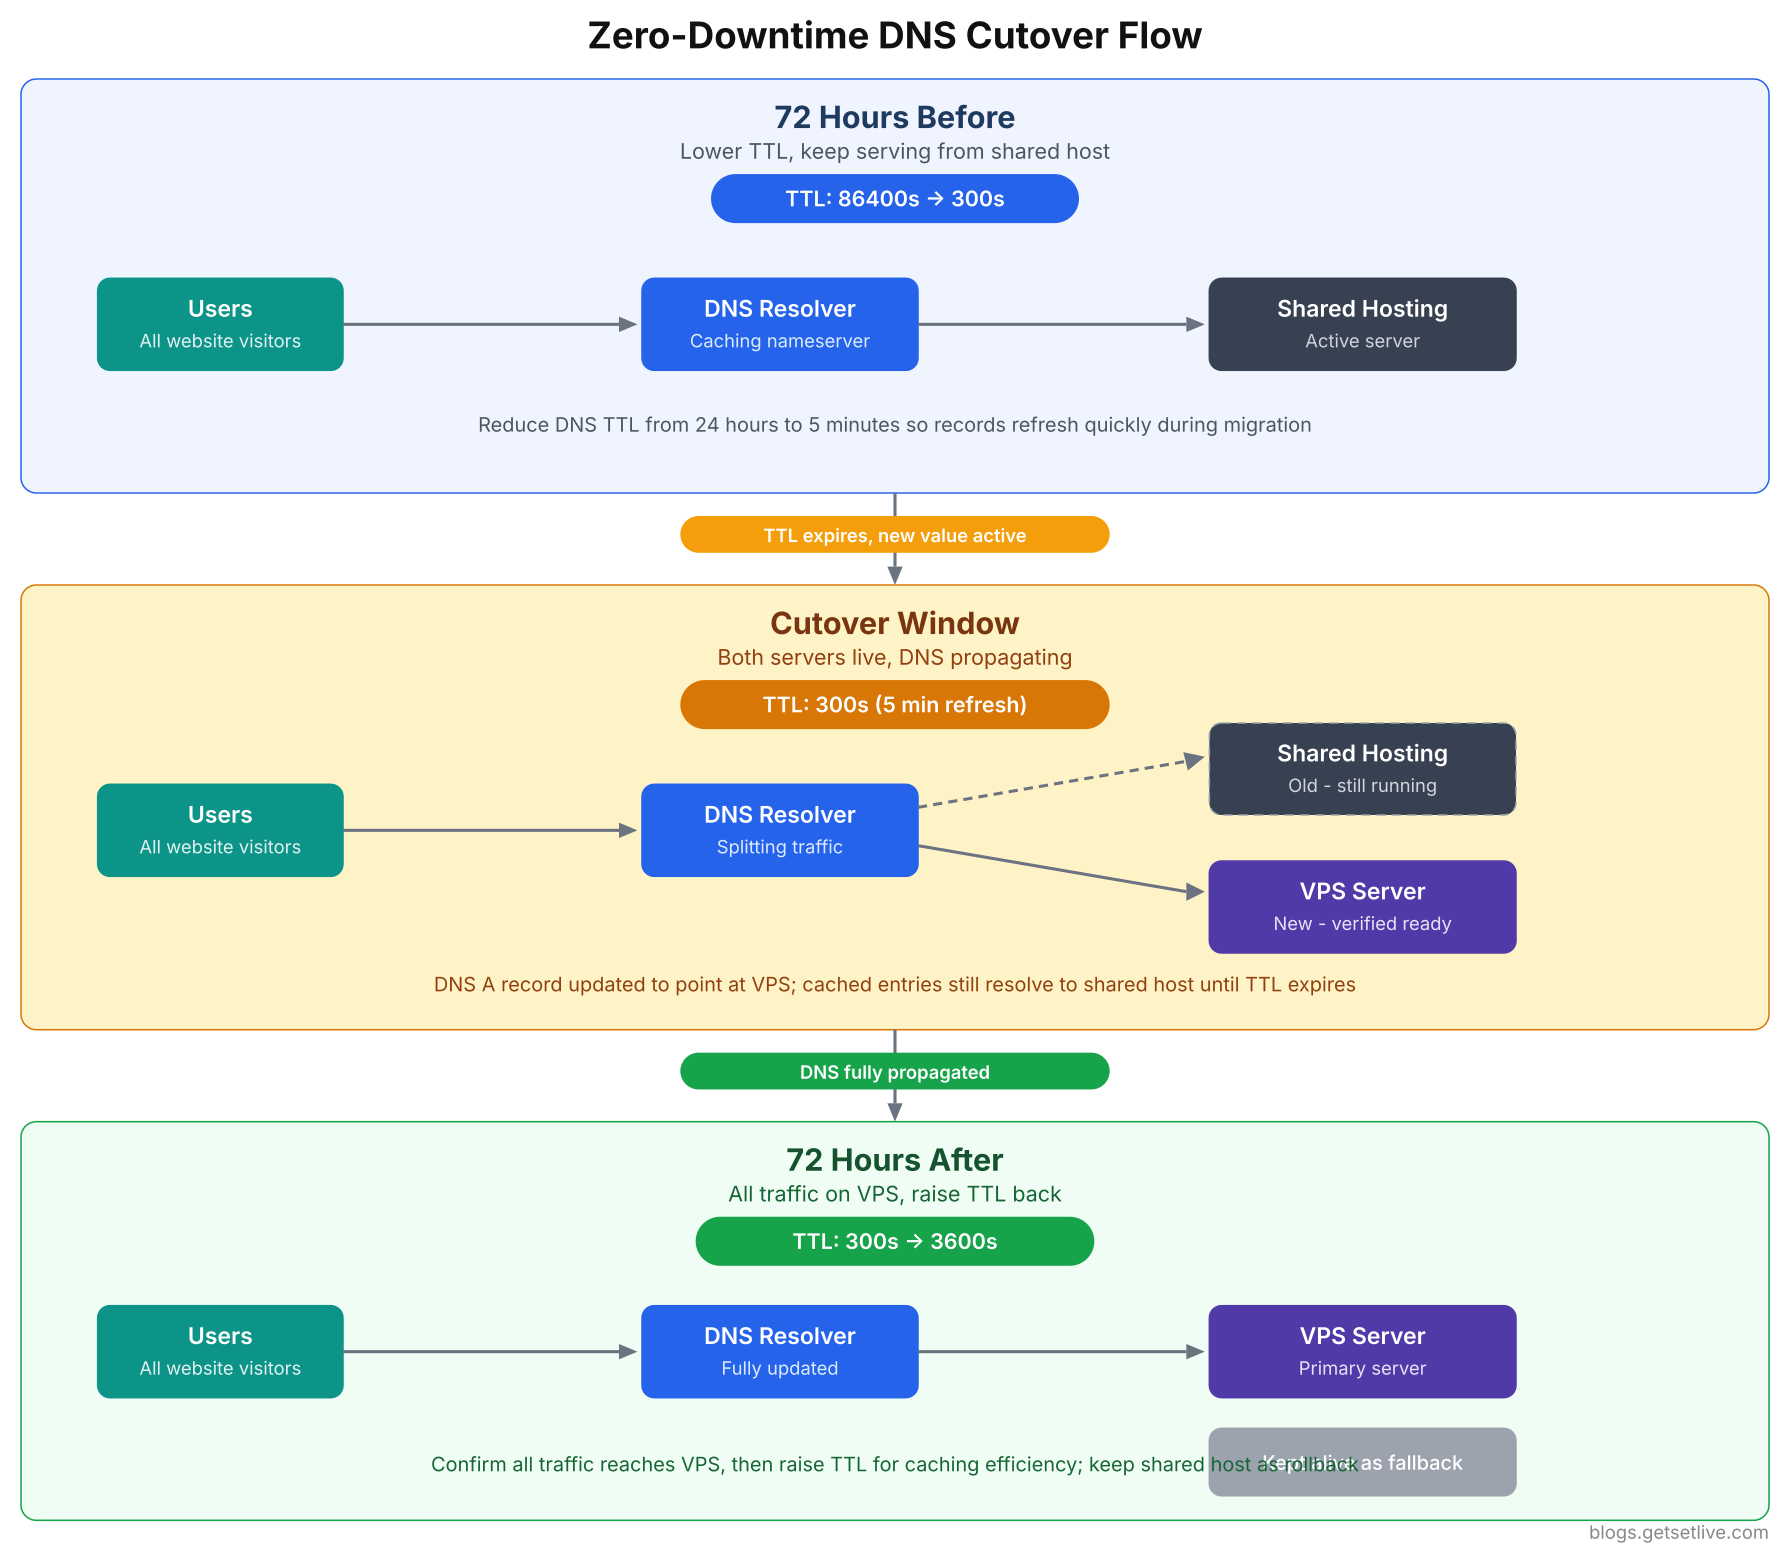
The key insight in this flow is that both servers run simultaneously during the cutover window. Users hitting cached DNS entries still reach the old server, while users with refreshed DNS reach the VPS. Neither group sees an error page.
72 hours before cutover: Lower TTL on A record and AAAA record to 300 seconds. Do not touch MX, TXT, CNAME, or any other records yet. Verify the TTL change has propagated by querying multiple DNS resolvers.
$ dig example.com A +short @8.8.8.8$ dig example.com A +ttl @1.1.1.148 hours before cutover: Verify that the low TTL is now in effect globally. The old TTL value needs one full cycle to expire before the new TTL takes over. If your old TTL was 86400 seconds, you need at least 24 hours. Rohan waited 48 hours because some corporate DNS resolvers enforce minimum TTL floors of 3600 seconds regardless of what the authoritative server says.
Cutover moment: Update the A record IP to the VPS. If the site uses IPv6, update the AAAA record too. Do not change MX records unless you are also migrating email to the VPS. Do not change CNAME records for subdomains unless those subdomains are also moving.
Immediately after cutover: Update TXT records. If the SPF record referenced the old hosting IP, add the VPS IP. If you use Cloudflare as a proxy, the A record change alone handles everything since Cloudflare proxies mask your origin IP.
The most dangerous DNS mistake is changing all records at once. Change the A record first. Wait 2 hours. Verify the site works on the new server. Then update TXT records (SPF, DKIM). Wait another hour. Then update any remaining CNAME or SRV records. Sequential changes let you isolate failures.
72 hours after cutover: Raise the TTL back to 3600 seconds (1 hour). Keeping TTL at 300 seconds permanently adds unnecessary DNS lookup overhead for your visitors. Once the migration is confirmed stable, restore the standard TTL value.
Rollback Readiness: Your Safety Net
A migration without a rollback plan is a one-way trip with no brakes. Rohan’s rollback strategy was simple: if anything critical fails on the VPS within the first 72 hours, point DNS back to the old shared hosting server. The old server stays live and untouched during this entire window. No files deleted, no databases dropped, no hosting plan cancelled.
But rollback is not as clean as “just change DNS back.” Data divergence is the real problem. Once DNS points to the VPS, new orders, form submissions, user registrations, and content updates happen on the VPS database. If you roll back DNS to the old server, you lose all that data unless you merge it manually.
Rohan built a rollback decision framework with clear criteria.
Free to use, share it in your presentations, blogs, or learning materials.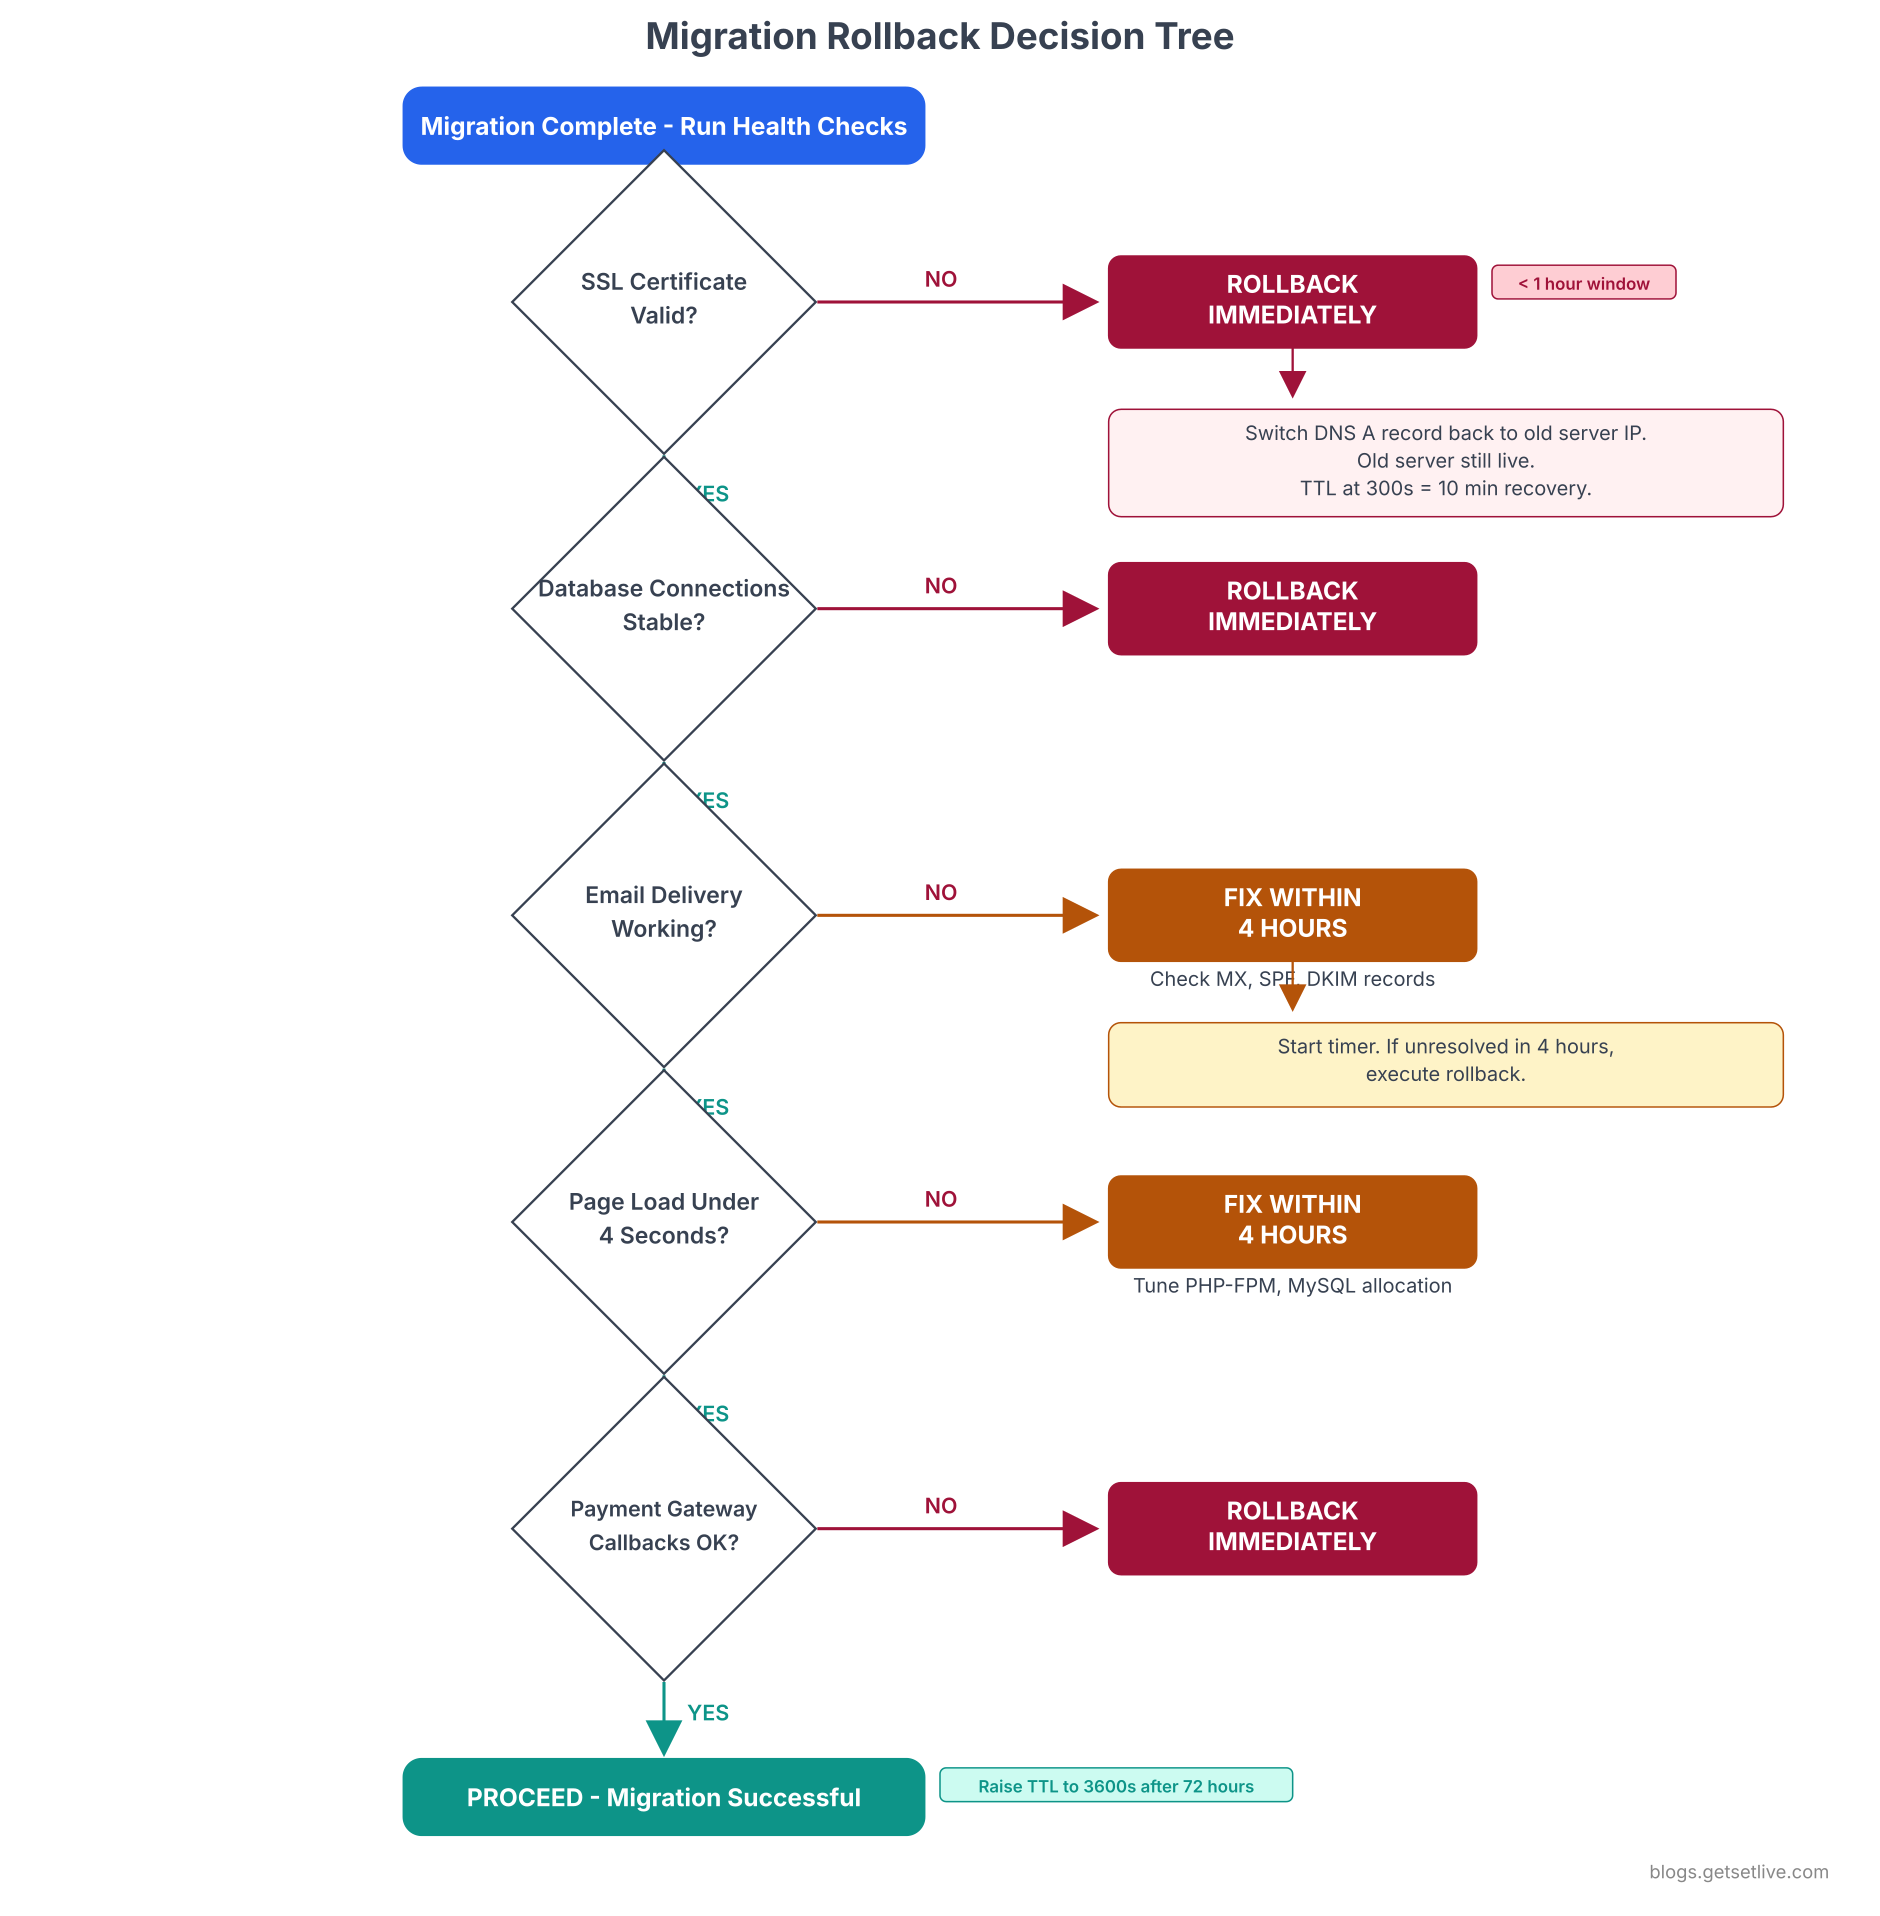
The tree separates critical failures (SSL, database, payment gateway) that demand immediate rollback from fixable issues (email, performance) that get a 4-hour repair window. This distinction prevents unnecessary rollbacks for problems that have straightforward fixes.
Immediate rollback triggers (within 1 hour of cutover):
- SSL certificate fails to validate (site shows “Not Secure”)
- Database connection errors on the VPS
- Payment gateway cannot reach callback URLs
- Homepage returns 500 or 503 errors
For these triggers, Rohan’s team rolled back DNS immediately without attempting a fix. With TTL at 300 seconds, the rollback propagated within 10 minutes. The window of exposure was small enough that data divergence was minimal.
Investigate-first triggers (fix within 4 hours or rollback):
- Email deliverability failures (forms submit but emails do not arrive)
- Performance degradation (TTFB above 4 seconds consistently)
- Specific pages returning 404 errors (broken rewrites)
- Image uploads failing (permission issues on the uploads directory)
For these issues, the team had 4 hours to diagnose and fix. If the fix was not verified within 4 hours, they rolled back DNS and attempted the migration again on the next scheduled window.
Non-rollback issues (fix on the VPS, do not roll back):
- Minor CSS rendering differences between old and new server
- Missing PHP extensions causing non-critical plugin failures
- Cron jobs not firing (can be fixed without rollback)
- Log rotation not configured (fix forward, not backward)
Define your rollback triggers before migration day, not during the panic of a failed cutover. When the site is down at 2 AM and three team members are on a call, nobody makes good decisions about whether to rollback or keep debugging. Pre-defined criteria take the emotion out of the decision.
The Email Problem Nobody Warns You About
Email is the silent casualty of most hosting migrations. Websites get all the attention because a broken website is visible. A broken email system is invisible until a client says “I sent you three invoices last week and you never responded.”
Rohan’s team hit two separate email disasters during their migration.
Disaster 1: MX record overwrite. Three of Rohan’s clients used email hosted on the shared hosting server (GoDaddy’s built-in email). When Rohan moved the DNS to Cloudflare for the migration, the default DNS template in Cloudflare did not include MX records pointing to GoDaddy’s mail server. For 18 hours, incoming emails for those three domains bounced. Senders received “550 No Such User” errors. The fix was adding the correct MX records to Cloudflare’s DNS panel, but the damage was already done. One client missed a purchase order from a retail chain.
Disaster 2: SPF record mismatch. After migration, Rohan’s WordPress contact forms used PHP’s mail() function, which now sent from the VPS IP. But the SPF record in DNS still authorized only GoDaddy’s mail server IPs. Every email sent from the contact forms on the VPS was flagged as spoofing by Gmail, Yahoo, and Outlook. The emails landed in spam or were rejected outright. Rohan only discovered this a week later when a client asked why they had received zero contact form submissions since the migration.
The lesson was clear. Before any migration, separate your email from your hosting. Move email to Google Workspace, Zoho Mail, or any dedicated email service. Set the MX records to point to the email provider, not the hosting server. Once email and hosting are on different systems, you can migrate hosting freely without touching email at all.
If email breaks after migration, run these checks immediately. Most email failures after a hosting change come down to three DNS records: MX, SPF, and DKIM.
$ dig example.com MX +short1 aspmx.l.google.com.
5 alt1.aspmx.l.google.com.
5 alt2.aspmx.l.google.com.
10 alt3.aspmx.l.google.com.
10 alt4.aspmx.l.google.com.$ dig example.com TXT +short | grep spf“v=spf1 ip4:165.22.xx.xx include:_spf.google.com ~all”
$ dig google._domainkey.example.com TXT +short$ dig _dmarc.example.com TXT +short“v=DMARC1; p=quarantine; rua=mailto:dmarc@example.com”
If the SPF record still references the old shared hosting IP, emails sent from your VPS (contact forms, order confirmations, password resets) will fail SPF validation. Gmail and Outlook will either reject them or drop them into spam. Update the SPF record to include the VPS IP address within hours of cutover, not days.
Post-Migration: The First 30 Days
The migration is not done when the DNS propagates. The first 30 days on the VPS are when the hidden issues surface. Here is what Rohan’s team dealt with in the month after completing all 9 site migrations.
Week 1: Permission creep. WordPress auto-updates tried to run and failed because the wp-content directory was owned by the SSH user, not www-data. Plugin updates, theme updates, and media uploads all threw “Could not create directory” errors. The fix was running chown -R www-data:www-data on the wp-content directories and adding the SSH user to the www-data group for manual file management.
When WordPress throws a white screen or a generic 500 error after migration, the first thing to check is whether PHP debug logging is enabled. Without it, you are debugging blind.
1grep -n ‘WP_DEBUG\|WP_DEBUG_LOG\|WP_DEBUG_DISPLAY’ wp-config.php
1define(‘WP_DEBUG’, true);
2define(‘WP_DEBUG_LOG’, true);
3define(‘WP_DEBUG_DISPLAY’, false);
With debug logging enabled, all PHP errors write to wp-content/debug.log instead of showing on screen. Check this file after every migration to catch silent failures.
1tail -50 /var/www/html/example.com/wp-content/debug.log
2tail -50 /var/log/php8.1-fpm.log
3tail -50 /var/log/nginx/example.com-error.log
4[15-Jun-2026 02:45:13 UTC] PHP Fatal error: Uncaught Error: Call to undefined function create_function() in /var/www/html/example.com/wp-content/plugins/contact-form/cf7.php:142
5[15-Jun-2026 02:47:22 UTC] PHP Warning: require_once(/home/olduser/public_html/wp-includes/version.php): Failed to open stream: No such file or directory
6[15-Jun-2026 03:10:05 UTC] PHP Fatal error: Allowed memory size of 134217728 bytes exhausted
The first error tells you a plugin uses a PHP function removed in PHP 8.0. The second reveals a hardcoded path from the old shared hosting that was not updated. The third shows the PHP memory limit is too low. Each one is a different fix, but without the debug log, all three show the same generic white screen.
1php -i | grep -E ‘memory_limit|display_errors|error_reporting|error_log|upload_max’
1memory_limit => 128M => 128M
2display_errors => Off => Off
3error_reporting => 22527 => 22527
4error_log => /var/log/php8.1-fpm.log
5upload_max_filesize => 2M => 2M
A 128M memory limit is often too low for Magento or WooCommerce stores. Raise it to 256M or 512M in the PHP-FPM pool configuration, not in .htaccess (which only works with Apache mod_php, not PHP-FPM).
Week 2: Memory limits. The Magento store started throwing 500 errors during peak hours. The VPS had 4 GB of RAM, but Rohan had allocated 2 GB to MySQL and left only 512 MB for PHP-FPM across 9 sites. During peak traffic, PHP-FPM workers exhausted the available memory and the OOM killer terminated them. Rohan restructured the allocation: 1.5 GB for MySQL, 2 GB for PHP-FPM (with max_children tuned per site based on traffic), and 512 MB for the operating system and other services.
$ free -h$ ps aux –sort=-%mem | head -15$ dmesg | grep -i ‘oom\|killed process’ | tail -10$ journalctl -k | grep -i ‘out of memory’ | tail -5 1[example]
2user = www-data
3group = www-data
4listen = /run/php/php8.1-fpm-example.sock
5pm = dynamic
6pm.max_children = 10
7pm.start_servers = 3
8pm.min_spare_servers = 2
9pm.max_spare_servers = 5
10pm.max_requests = 500
11php_admin_value[memory_limit] = 256M
12php_admin_value[upload_max_filesize] = 64M
13php_admin_value[post_max_size] = 64M
14php_admin_value[max_execution_time] = 300
The formula Rohan used for max_children: divide the total RAM available to PHP-FPM by the average memory per PHP process (usually 30 to 50 MB for WordPress, 60 to 100 MB for Magento). For a VPS with 2 GB allocated to PHP-FPM and an average of 40 MB per worker, that gives roughly 50 workers across all sites. Distribute them based on traffic: the Magento store got 15, each WordPress site got 5, and the Laravel apps got 5 each.
Week 3: SEO ranking fluctuation. Two WordPress sites saw a 15% drop in organic traffic. Google had re-crawled the sites and found that the canonical URLs now returned different response headers. The old shared hosting server sent an X-Powered-By header that Rohan had not replicated on the VPS. On top of that, the sites now loaded 2.3 seconds faster, which changed the Core Web Vitals scores. Google’s re-ranking took about 3 weeks to stabilize. By week 4, both sites had recovered and one actually gained 8% more traffic due to the improved load times.
Expect SEO fluctuations for 2 to 4 weeks after migration. As long as your URLs, 301 redirects, robots.txt, and XML sitemaps are intact, rankings will stabilize. Do not panic and make SEO changes during this stabilization period. Let Google re-crawl and re-index naturally.
Week 4: Certbot renewal failure. The SSL certificates Rohan had provisioned during migration were 30-day Let’s Encrypt certificates. He had installed certbot but had not tested the renewal process. When the first renewal ran, it failed because the Nginx configuration did not include the .well-known/acme-challenge directory for the HTTP-01 challenge. Three sites displayed “Your connection is not private” warnings for 6 hours before Rohan woke up and saw the monitoring alert.
$ sudo certbot –nginx -d example.com -d www.example.com$ sudo certbot –nginx -d store.example.com$ sudo certbot renew –dry-runSaving debug log to /var/log/letsencrypt/letsencrypt.log
Processing /etc/letsencrypt/renewal/example.com.conf
Simulating renewal of an existing certificate for example.com and www.example.com
Congratulations, all simulated renewals succeeded:
/etc/letsencrypt/live/example.com/fullchain.pem (success)$ sudo systemctl status certbot.timer$ sudo certbot certificatesRun the dry-run test on the day you complete migration, not a month later when certificates are about to expire. If the dry-run fails, fix the Nginx location block for .well-known/acme-challenge or switch to DNS-01 challenge validation before the real renewal deadline hits.
What BrightEdge Digital Learned
Six weeks after the last site was migrated, Rohan’s team held a retrospective. They had migrated 9 sites to a DigitalOcean VPS with 4 vCPUs, 8 GB RAM, and 160 GB SSD storage. The monthly cost was INR 2,400 (approximately $29). Their combined TTFB dropped from 3.2 seconds to 380 milliseconds. The Magento store’s checkout completion rate went from 34% to 61% within the first month. Not a single client site experienced the noisy neighbour problem again. Email deliverability, after fixing the SPF and DKIM records, jumped from 72% inbox placement to 97%.
But the migration was not smooth. Here are the honest numbers from the retrospective.
- Total migration time: 6 weeks (planned for 2 weeks)
- Total engineering hours: 127 hours across 4 team members
- Unplanned incidents during migration: 11
- Client-facing downtime: 18 hours total across all sites (mostly email)
- Rollbacks executed: 2 (one for SSL failure, one for a broken .htaccess rewrite)
- Items discovered post-migration that should have been caught in planning: 9
Rohan’s single biggest takeaway: “The migration itself takes 20% of the effort. The other 80% is everything you did not know you needed to check before and after. Next time, I would spend two full weeks on the checklist before touching a single file.”
If you are sitting on shared hosting right now, reading this because your sites are slow and your clients are frustrated, start with the checklist. Do not start with the migration. Map every dependency, every DNS record, every cron job, every hardcoded path, every email configuration. Then migrate the smallest, simplest site first. Learn from it. Refine the process. Then move the site that matters most.
The goal is not to migrate fast. The goal is to migrate once, correctly, with a rollback plan you never have to use.
References
- Hostinger, How to Migrate a Website from Shared Hosting to VPS, 2025
- ServMask, 15 Common WordPress Migration Errors and How to Fix Them, 2025
- Cloudways, Why Shared Hosting is a Nightmare for Digital Agencies, 2025
- Unihost, Zero-Downtime Migration to VPS or Dedicated: DNS, Data Sync, and Cutover Checklist, 2025
- DCHost, DNS TTL Best Practices for A, MX, CNAME and TXT Records, 2025
- Kinsta, The Hidden Costs of Website Downtime, 2025
- Anurodh Keshari, When Changing Hosting Breaks Your Google Workspace Email, Medium, 2025
Frequently Asked Questions
Lower your DNS TTL to 300 seconds at least 48 hours before migration. Sync all files and databases to the VPS beforehand. Test the VPS copy using a local hosts file override. On migration day, do a final database sync during a low-traffic window, then update the DNS A record to point to the VPS IP. Keep the old shared hosting live for 72 hours as a fallback. With a 300-second TTL, most visitors transition to the new server within 10 minutes.
Only if your email depends on the shared hosting server’s MX records. If your MX records point to your hosting provider’s mail server, changing DNS without recreating those MX records will break email delivery. The safest approach is to move email to a dedicated provider like Google Workspace or Zoho Mail before migrating hosting. Once email and hosting use separate DNS records, you can migrate hosting without affecting email at all.
The actual file and database transfer takes 1 to 6 hours depending on site size. The DNS propagation window adds 2 to 24 hours. But the total process, including planning, VPS setup, testing, and post-migration validation, typically takes 5 to 10 days per site. Teams migrating multiple sites should budget 2 to 6 weeks for the complete project, starting with the simplest site and ending with the most complex.
Keep the old shared hosting server running and untouched for at least 72 hours after DNS cutover. If the VPS fails critical checks (SSL errors, database connection failures, payment gateway issues), switch the DNS A record back to the old server IP. With a 300-second TTL, traffic returns to the old server within 10 minutes. Define your rollback triggers before migration day so the decision is pre-made, not improvised during an outage.
Expect minor ranking fluctuations for 2 to 4 weeks while Google re-crawls and re-indexes your site from the new server. As long as your URLs remain the same, 301 redirects are preserved, robots.txt does not block crawlers, and your XML sitemap is accessible, rankings will recover. Most sites see rankings stabilize within 3 weeks. Sites that gain faster load times from the VPS often see improved rankings after the stabilization period.